Troubleshooting
Instrument configuration times out
Sometimes the script hangs with an error message that INSTCONFIG has timed out and a prompt to retry/abort/ignore. The “instconfig” command configures the instrument, moving a number of mechanisms in parallel, and it will time out if any one of these mechanism moves times out.
The corrective action following an INSTCONFIG timeout is:
- do not respond to the abort/retry/ignore prompt immediately;
- but, first, on the MODS GUI, press the UPDATE button -or- type the command “refresh instconfig” in the Command Window at the bottom of the Dashboard. This re-reads the mechanism positions, and you should see status information appear in green type as each mechanism is queried, until finallly the last query, to the SlitMask, has been made.
- Once the update has finished (the SlitMask status is shown), enter “r” (to retry) in the script-running window.
- If the retry is not successful, i.e. you get a message “ERROR: INSTCONFIG instrument configuration already in progress – command disallowed”, or the script times out, then the script will need to be aborted and repeated.
- Please report or call the support astronomer if these steps do not resolve the problem.
INSTCONFIG completes with a fault
There have been instances where the instconfig reports that it has completed with a fault, but the script will continue. One or more mechanisms did not get set properly and the observer should note the error and examine the GUI Dashboard and Communication Log for signs of what mechanism did not get set — do the settings in the GUI match what is expected? and does the Communication Log indicate a mechanism is BUSY? Are any of the boxes in the GUI amber/orange (a mechanism is moving or not in position), or red (a mechanism is in an error state)? Warnings and errors appear in red in the Communications log.
If you notice that the instconfig has completed with a fault, then control-C the script that is running and repeat it. Usually on the second try the instconfig will finish successfully. If there are still problems, and especially if any of the boxes on the GUI are red, please call your support astronomer for assistance.
Script times out when moving Calib unit IN or OUT
If the script times out when moving the calibration unit, prompting the user for retry/abort/ignore, enter “r” to retry. If that doesn’t work, then abort the script. In the Command Window at the bottom of the MODS GUI, enter “calib” to query the status of the calibration unit, and “calib reset” reset the calibration unit; a reset will leave the calibration unit OUT. Repeat the script to move the calibration unit to the desired position and continue on with the desired instrument configuration and exposures.
Putting instrument into OBSMODE fails with “PRINT ERROR”
This message is rare, but can arise in a few contexts. It occurs most frequently when trying to put the instrument into Observing mode and the hatch position is not correctly read. This results in the error message:
OBSMODE could not open hatch, PRINT ERROR
The corrective is first, to try to reread the Hatch position, by Clicking Update at the lower left corner of the GUI or issuing the command “hatch” in the Command Window at the bottom of the GUI. If that doesn’t work, then issue the command “hatch reset” in the Command Window.
Sometimes, there is an error relating to the CALIB unit.
CALIB CALIB=PRINT ERROR0
First try the same 2 steps recommended for the Hatch, but as this error (which happened only 2 times in the combined histories of MODS1 and MODS2) seems to involve a timeout, it may be necessary to restart the IE service or to reboot the comtrol unit. Please call the support astronomer for assistance.
IMCS fails to Lock
If IMCSlock fails, the IMCSlock button on the MODS Dashboard will turn red and the script will pause with some messages about the IMCS lock fail and a query to either “a” (abort), “r” (retry) or “i” (ignore). Before typing any response:
Check the laser power by typing
irlaser
in the command window of the MODS Dashboard, or
isisCmd –mods1 m1.ie irlaser
in a terminal window on one of the mountain workstations (obs2, obs3 or obs4). For MODS1, replace the two instances of “1” in the above command by a “2”.
The irlaser should be “enabled” and power output “1.0mW” for MODS1 and MODS2. The output of the above command will contain information on the following parameters:
-
-
- IRLASER=ON/OFF is the AC power state to the laser control box, it does not turn on the laser proper!
- IRBEAM = ENABLED/DISABLED indicates if the laser output is enabled
- IRPSET = IR power set-point (what is requested) in mW
- IRPOUT = measured IR laser power in mW
-
If the laser is not “enabled”, check whether the mods1Wake.pro or mods2Wake.pro script was run. If the laser is “enabled” and power output is reading the correct output value (1.0mW) hit “r” to retry. Sometimes the IMCS is slow to lock after a change of configuration and at certain elevation/rotator angles and exceeds the 150-sec timeout threshold. Hitting “r” to retry should cause it to lock in a few seconds.
If a retry does not work, then you should involve the ISA or OSA in further troubleshooting:
- If the laser is on, enabled and the power out (irpout) is 1.0, yet the laser still does not lock after a retry (“r”), there may be another problem:
- One problem we’ve had lately are moths or some debris blocking the laser. Slewing the telescope may help.
- If the laser is on and “enabled”, but the power output is not reading the correct output value, the laser or laserbox may need power cycling.
- First, the ISA/OSA may try to adjust the power output (for MODS2, “1”->”2″). Power 1.0 will set the power to 1.0 mW. Issue the “irlaser status” command to see whether this has helped; it may be necessary to disable/enable the laser.
isisCmd –mods1 m1.ie irlaser power 1.0
- As a last resort, a full power cycle of the IR laser and the lamp and laser box may be needed.
isisCmd –mods1 m1.ie irlaser status
isisCmd –mods1 m1.ie irlaser disable
isisCmd –mods1 m1.ie irlaser off
— wait 10 seconds —
isisCmd –mods1 m1.ie irlaser on
— wait several seconds —
isisCmd –mods1 m1.ie irlaser enable
— wait 10 seconds (a built-in safety between enabling the beam and the beam coming on) —
isisCmd –mods1 m1.ie irlaser <status>(query the status again)
Calibration Lamp does not Light
Occasionally, a calibration lamp does not light. We have seen this occur with the VFLAT lamp in MODS2 and with the Ne lamps in both MODS. The Ne lamp is typically used with Hg in the dual grating comparison lamp calibrations, and on its own in the red-only grating and prism comparison lamp calibrations. The dual grating red channel spectra below illustrate the difference between when the Ne and Hg[Ar] lamps are both on (top) and when the Ne lamp is not working (bottom).
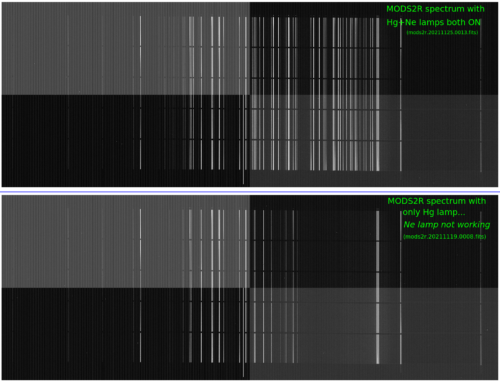
If you notice that a lamp has not come on, try to turn it on again. The quickest way to check this is to use the buttons on the MODS User Interface to turn on the lamp (click “Ne”) and take an exposure (Click “GO”), after verifying the exposure time is appropriate. If this doesn’t work after 2 or 3 tries even, then it may be necessary to wait until the day crew has a chance to investigate. Either way, please let the operator or support astronomer know, so that the frequency of these failures can be noted.
New Images Not Displaying in modsDisp
- Are the images in /lbt/data/new? In a terminal type ls -ltr /lbt/data/new. This will list the files in /lbt/data/new with the latest files at the end. On the MODS dashboard, check the filenames of the “Last File” and the “Next File” for the relevant channel. Check if the index number of the “Next File” greater than that of the “Last File” by more than 1.
- If the images are not in /lbt/data/new and the index number of the “Next File” is more than 1 above the “Last File”, the file transfer between the CCD control PC and the mods1data computer has stalled. You need to run fitsflush for the appropriate channel. Do not try to transfer images while the detector will be reading out, so type this either during a long exposure (count on a few seconds to transfer each image) or when the exposure is paused or the script is done, but do not let the number of files not yet transferred build up to more than just a few. To run, in the command line of the MODS dashboard, type
red fitsflush
or
blue fitsflush - After giving the fitsflush command, you should see the “Last File” index number incrementing as the new images are displayed by modsDisp. You may note that once all the files are transferred, the “Last Image” index number returns to the value it had before running fitsflush and that image is again displayed. Don’t worry – this is normal. You can confirm that all the images have been successfully transferred with ls -ltr /lbt/data/new.
- If fitsflush has not transferred the files, then there may be another problem which would require intervention by the OSA, observer or support astronomer.
- Ask them to check the instrument control computer for the affected channel (i.e. M2.RC if the mods2 red channel images are not appearing). Is the IC program running? If not, restart it.
- Ask them to check the data server (e.g. mods2data for mods2 images). When they connect to the console of the dataserver (mods2data, e.g.), they may find that there are error messages in the caliban window. Are both shared disks visible (no errors mentioning a disk). If so, try to stop/restart the caliban by entering, in the terminal window on the dataserver’s console: mods2 stop cb_red followed by mods2 start cb_red.
Exposure State Flags on UI out of sync
Sometimes the exposure status on the MODS GUI does not match what the exposure control is really doing, e.g. the shutter is shown to be closed, but the exposure countdown is in progress.
The state machine, the code in the MODS GUI that mediates the exposure control states and the IMCS, can get out-of-whack.
If this happens, the first level of intervention is to exit and restart the MODS GUI.
If the problems continue, then you may need to reboot the system, i.e. both CCD control computers and the data server. Please call the support astronomer for assistance.
As a preventative measure, it is recommended to reboot the systems for both MODS before the start of a partner block, or before a night during which a high cadence time series observation might be executed.
Exposure hangs upon completion
If the exposure hangs on “Exposure Done, Cleaning up…”, most likely there was a communication glitch. The “Exposure Done” signal was not successfully passed from the CCD control PC to the mods computer. Check whether the image on which it hung is in /lbt/data/new (type ls -ltr /lbt/data/new in a terminal). If it is, then in the command window of the MODS Dashboard, type (depending on which channel hung) either:
red expdone
or
blue expdone
This should cause the exposure control to become active again, and, subsequent exposures, if indicated in the script, will be taken. The “expdone” command was written for this specific error condition, where the GUI reads “Exposure Done, Cleaning up…” and should work best for it, but please report any ensuing problems with the image counter.
Exposure hangs at “Starting exposure”
If the exposure control is hung at “Starting exposure…”, it is most likely that there has been a communications glitch. Check that the last exposure has been written to disk (type ls -ltr /lbt/data/new in a terminal and verify that the image appears in mods(2)Disp). If so, then in the command window of the MODS Dashboard, type:
red expdone
or
blue expdone
This was not the intended use of expdone, and there may be problems with image counters and race conditions. Specifically, this command may trigger a new exposure while the current one is ongoing and cause at least one image of the intended sequence to be skipped.
Exposure ends but it is not reading out
Sometimes, especially for MODS2 Red (before Sep 2024, it was MODS1 Red) and MODS2 Blue, the exposure control seems to hang after the exposure is finished and before reading out. Typical delays between the close-of-shutter and beginning-of-readout are a few seconds, and occasionally 10-20 seconds; but for MODS2 Red and MODS2 Blue, these can sometimes be as large as 100 seconds. The frequency of these ~100-sec readout delays is ~12% for MODS2R and ~14% for MODS2B.
There is no action to be taken, but just wait and count to 100…
The delay for each image can be measured by comparing the header values for EXPTIME and DARKTIME. Relevant issue tracks are IT 6500 and IT 9149.
Exposure countdown fails
If, during the exposure, the countdown timer is not working, this is a symptom of a communication glitch, where the CCD controller probably failed to tell the GUI that it had started the exposure. The recovery is to:
- Abort the exposure, or wait until it finishes;
- Refresh the GUI (Click the “Update” button at the bottom left of the Dashboard.) This clears all exposure and configuration state flags, then asks the instrument to report its current state; and
- Type
red reset
and/or
blue reset
in the MODS Dashboard GUI Command window, depending on which channel has the problem.
Preset or offset times out
If a preset fails with the message “ClearStars” (more detail or a screenshot needed), the MODS tcs service may have gone down. Check the status of all services with mods1 status or mods2 status and under the Instrument Server status, look for the status of lbttcs service. Is it “Stopped” or “Running”? If it is Stopped, then you need to restart it. To restart it, login to any of the mountain workstations as user “mods” and type mods1 start tcs to start it on MODS1 or mods2 start tcs to start it on MODS2.
Script times out on offset
This error most frequently occurs during execution of a binocular imaging script which uses synchronous offsets.
The MODS script engine imposes a 60-sec timeout on offsets. Synchronous offsets must occur simultaneously on both sides, but binocular script execution on MODS1 and MODS2 may fall out of sync by more than 60-sec due to the different overheads, detector and other, and excessive readout delays. When this occurs, the script on the side that is ahead will hang on the offset with a prompt for the user to retry/abort/ignore the command, as illustrated below:
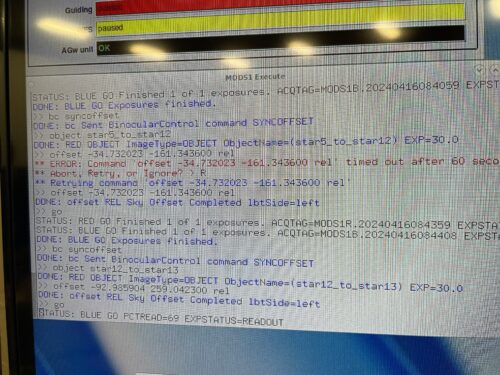
Use of synchronous offsets in imaging scripts is discouraged, as mentioned on the Observing with MODS -> Imaging webpage.
Strange File Names
Occasionally the image readout will not have the expected filename mods#x.YYYYMMDD.NNNN.fits, but instead something like 020101M8.08q.fits (which we call a “unique name”). This happens when the expected name will clash with the name of a file already in the raw data directory on the mods data computer but also for other reasons. Files on the mods data computer are copied automatically to /lbt/data/new, and will be in /lbt/data/new or in the subdirectory of /Repository which corresponds to the UTdate on which they were taken.
Common mistakes which result in “unique names” are
- to forget to update the date information on the Monocular Observing and Binocular Observing pages
or - to reset the counter to 1 without realizing that some technical images had been taken earlier in the afternoon.
If you notice a “unique name” file:
- Determine what the file should be called using the command gethead to list the value of the FITS header keyword, FILENAME:
gethead uniquenamefile.fits filename
- Check whether any files with the expected filename are already in /lbt/data/new or /lbt/data/repository/UTdate.
- If the date is not correct, stop the script and edit the setup information to avoid the filename conflict.
- If the date is correct, and especially if there is a series of unique named images, there may be a deeper problem and contacting the ISA is in order.
- After a potential name-conflict, please notify the ISA by email, so they can insure both sets of images will be written to the archive with reasonable names.
modsAlign problems
The new modsAlign has gotten into a “race condition” where the ds9 window is launched and a popup error box appears with the message: An internal error has been detected. Invalid command name ” ” and, in the launching terminal window you may see something like:
ValueError: XPA$ERROR invalid command name “” (DS9:mods1Align c0a83a21:54342)
This has been seen only on the first instance of running modsAlign each night; when the ds9 window is up, new images are displayed to it without issue.
A delay was added to the script (March 2017) to try to prevent this race condition, but if you do still see this error, the corrective is to OK the popup error box, leave the ds9 window up, and repeat the modsAlign command.
There may also be a popup about ds9 preferences, but that often disappears before you can even click “OK” to acknowledge and accept these.
Guide Star Fails to Acquire
- Check what the current conditions are.
- Confirm the GS is a point source.
- Does the guide star have R<~16-16.5
If the conditions are good and the magnitude criteria met, then the guide star should be easily detected. Check:
- What filter is the AGw guiding with. The default should be clear. Through B-Bessel, sensitivity is reduced by about 1 magnitude.
- Was the guide probe homed at the start of the night.
If neither of these suggestions helps, consult the OSA and ISA. It may be necessary to shut down GCS, cycle power to the guider or WFS controller, and then restart GCS.
Mask Selection Error
At certain telescope orientations (particularly low elevations <40-45 degrees), custom masks located in slots 13-16 of the MODS1 slitmask cassette have occasionally returned a mask selection error. If a mask selection error occurs, you will see that, on the MODS Dashboard, the selected mask will be blank and both mask IN and OUT buttons will be orange, not grey. The script-running window will display errors like:
*** ERROR: MSELECT MSELECT=FAULT Mechanism out-of-position, in-position sensor not asserted. Reset MSELECT to recover.
Errors in the log may look like:
2012-11-14T10:02:57.162316 M1.IE>MC1 STATUS: MSELECT Selecting mask 16
2012-11-14T10:02:57.165169 MC1>ACQ STATUS: MSELECT Selecting mask 16
2012-11-14T10:03:19.457404 M1.IE>MC1 ERROR: MSELECT MSELECT=0 Move Fault, position at end of move 0 but requested position 16.000000
2012-11-14T10:03:19.462097 MC1>ACQ ERROR: MSELECT MSELECT=0 Move Fault, position at end of move 0 but requested position 16.000000
If you encounter this error:
- Please consult the OSA and possibly also the ISA.
- The OSA should slew to zenith, and, at zenith, you should select the desired mask using the mask drop-down menu on the MODS Dashboard.
- The background of the mask button will turn from grey to orange while the cassette is moving, and, once the mask is selected, the button will turn black-on-grey again.
- Once the mask is selected (it doesn’t matter whether you choose to put it IN the focal plane or OUT), you can run the acquisition script again to slew, configure the instrument and take the sequence of acquisition images. This should now work since the mask selection, which is where the problem lies, has been completed.
Readout Delays
There are sometimes very long (~100 seconds!) delays between the close-of-shutter and the beginning of the readout for the MODS1 Red and MODS2 Blue channels.
These affect from 10-20% of the images and seem to occur randomly. The observer will notice that, in the Exposure Control section of the MODS Dashboard, the exposure has ended (the exposure countdown and progress bar have gone away) but the progress bar reporting the readout has not started, and it appears that there is nothing happening for that channel, that it has hung. After about 100 seconds, the readout begins. The header keywords EXPTIME and DARKTIME can be used to check the frequency with which these readout delays occur; usually DARKTIME-EXPTIME differ by only a few seconds, but in these cases, the difference is 100 + a few seconds. There is no action to be taken. Rebooting the system has not been seen to have a large effect.
Trailed images:
Trails in MODS images have been attributed to two issues, one internal to MODS and most commonly seen with MODS2R and the other which is usually seen for multiple channels (both blue & red channels of one or both MODS) and is attributed to the TCS.
Trailed Images: Stepped image motion
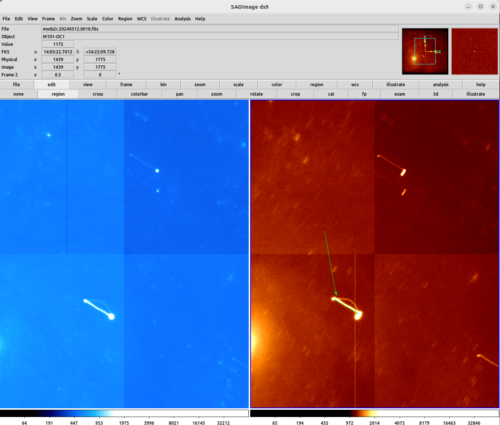
If the stars on a field image each appear as a series of dots or the image of the slit is jagged, as in the examples below, then this is indicative of excessive collimator motion during the exposure. The collimator position normally updates by <~ 1 micron every ~6 seconds to compensate for flexure, but in this case, the steps are each several microns. This issue has occurred predominantly for MODS2R, though it could occur anytime the instrument is reconfigured and an exposure that is longer than 10 sec (the threshold for running the IMCS) is manually taken without first issuing an “imcslock”. While the root cause of this behavior is still under investigation (IT 8645), it seems that the command to open the IMCS loop after an exposure is not sent.
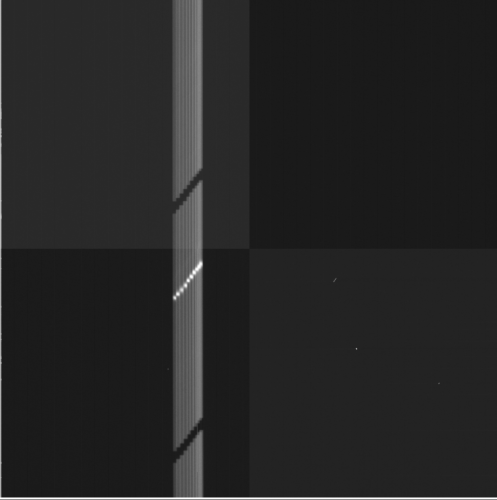
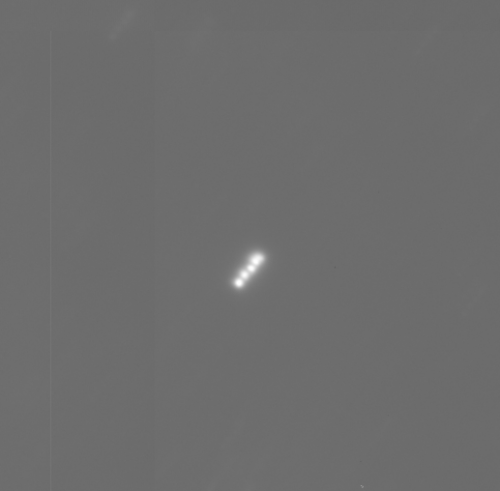
A 60-sec confirmatory through-slit MODS2R image taken while the collimator was erroneously executing large offsets is shown above on the left. There were 9 motion commands during the exposure. Note that the slit image is displaced to the lower left. Note that short exposures images with the slit and target displaced from their nominal positions, even if they show no trailing, are also symptomatic of this problem. On the right is a field image taken when the collimator was in this error state.
Users can check the IMCS status and send the close command by typing in a terminal on the obs computer: isisCmd --mods2 m2.ie rimcs and, if it reports closed, then isisCmd --mods2 m2.ie rimcs open to open the loop, but the problem may reoccur. To resolve the issue, please ask the service observer or support astronomer to reboot the MODS2 system (mods2data, M2.RC and M2.BC).
Trailed Images: Smooth image motion
A second class of image motion most likely derives from the TCS. In this case, both blue and red channels would exhibit trailing so long as both are exposing at the instant the problem occurs. The trailing has been seen even for both MODS1 and MODS2. In the pair of quasi-simultaneous MODS2 blue and red 30-sec exposures there are ~20″ trails and an arc. The red exposure also shows collimator motion, as discussed in the previous note.
We don’t know why this is sometimes happening, but it is being tracked in IT 8518. If this occurs, please ask the telescope operator to trigger a RefMemDump from the LSS GUI.
It may help to make the offsets synchronous rather than asynchronous, even though the offsets are small and within the copointing limit. But note that currently, a 60-sec timeout is imposed on synchronous offsets, and when the two MODS exposures fall out of sync by more than 60-sec, this leads to multiple script timeouts (see separate note).
Manual offsets via the GUI – a warning
Be aware that any offsets commanded by the GUI will adopt the offset type (“Move Type”), relative or absolute) that was last used, regardless of what is shown as the “MoveType” in the upper right part of the GUI. The “MoveType” pull-down menu allows the user to select Relative or Absolute, but Relative always appears unless Absolute is selected. So the observer can end up in a situation where the offset type is Absolute (the last offset sent was absolute), but the GUI shows Relative. In this case, if the observer wants to send a relative offset, they must use the pull-down menu to select Relative.
This doesn’t arise often, because manual offsets are usually only made as part of the alignment process when the observer wants to send a small relative offset to improve the centering of the object in the slit. Because the last offset sent (the offset commanded by modsAlign) is relative, the offset type is already what is desired.
But observing scripts mostly use absolute offsets (except for blind offsets). If there is a spectroscopic observation with dithering up/down the slit and an offset is needed to adjust the target position, the offset type will be Absolute (last offset was absolute) despite the fact that the GUI shows it as Relative. If the observer wishes to make a relative offset, they must use the GUI’s pulldown menu to select Relative.
Readout Artifacts and Problems
Please see Looking at your Data -> Image Artifacts and Features for examples and discussion on several detector issues relating to bad reads and saturation effects.
Image Artifacts and Problems
Please see Looking at your Data -> Image Artifacts and Features for examples and discussion on a few issues that may affect the images.
Quick recovery in case the preset is lost
If the preset is lost, you can save time in re-acquiring the object by incorporating the offset made by modsAlign into the acquisition script. Each time modsAlign is run, it writes (and overwrites) a file called MODS#_lastoffset (where # is 1 or 2 for MODS1 or MODS2).
- Make a copy of the acquisition script with a different name, e.g. mods1acq_recover.txt for MODS1 and mods2acq_recover.txt for MODS2.
- Locate the files MODS1_lastoffset (and MODS2_lastoffset for MODS2) in the directory from which modsAlign was run. This file contains the last offset command: e.g.
offsetxy dx dy detxy relfor longslit mode oroffsetpointing dtheta dx dy detxy relfor MOS mode. - Edit mods1acq_recover.txt to replace all of the contents of the Acquire: block with, on the first line, the contents of MODS1_lastOffset and on the second, slitGO. Do the same for the mods2acq_recover.txt script, using MODS2_lastOffset. The mods(1,2)acq_recover.txt scripts should each have an Acquire block with only 2 lines, like:
Acquire:
offsetxy -0.228 10.824 detxy rel
SlitGO
acqBinoMODS mods1acq_recover.txt mods2acq_recover.txtwill execute the binocular preset and take the pair of thru-slit MODS1 and MODS2 images.- Tweak the centering manually, i.e. using the GUI, as needed.
- Copy the observation script to a recovery obs script, e.g. cp mods1obs.txt mods1obs_recover.txt and adjust the exposure time and/or the nimgs as needed to complete the observation sequence.
modsDisp Crash/failure from samp error
Occassional issues have been experienced with modsDisp and modsAlign that result with a connection issue or crash. These tools have recently been updated to use a SAMP connection in an effort to avoid future deprecation. Reopening these tasks with the xpa version may be necessary:
- modsDisp_xpa
- modsAlign_xpa

