Starting the Software
- on the mountain: login to obs5 or obs6 (robs is a virtual machine) using your partner account credentials.
- in the Tucson remote room:
- login to a 6-headed rm507 workstation as observer (ask LBTO support staff for the password)
- from the Applications menu in the bottom left corner, select x2go.
- enter your partner account credentials. The partner accounts on obs5, obs6 and robs must use all lowercase letters: az, inaf, lbtb, osurc, lbto
- select a MATE session.
- You may stretch the virtual desktop over all 6 monitors.
- You are now essentially working on the mountain workstation.
To copy your scripts to the mountain workstation:
This command will copy the entire directory, myscripts, to obs5 and put it under the directory /home/partner where partner is one of the partner account names (az, inaf, lbto or osurc). On obs5, obs6 and robs, the partner account names are only lowercase.
mods2 status (for MODS2)
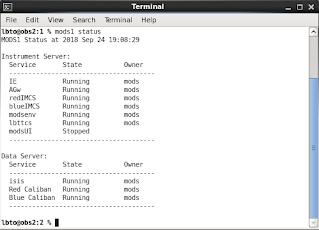
In the terminal window type:
mods1 start gui
to open the MODS Control Panel for MODS1, or type:
mods2 start gui
to open the equivalent panel for MODS2.
Setup the…

- On the right side of the Setup Screen, click Get Date to update the UT date in the image filenames. Make sure it is the correct UT date for the night; if it is before 1700 MST (00 UT), you should manually increment the number to reflect the UT date for the night. Click “Apply”.
- Check the filenames (i.e. mods1b.20130915.0001.fits) to ensure the index numbers are as expected. If you or someone else has taken files earlier during the same UT day, you may have to manually adjust the index number to reflect this. The Refresh button would do this, unless someone has clicked “Apply” already. As a rule, avoid the Refresh button.
While many scripts will set the Partner Name, PropID and PI Name (in blue below) automatically, it is important to enter default values for data taken “by hand” or for scripts in which it is not specified:
- Observer Names (can be separated by commas and spaces). This goes into headers as the value for the keyword, OBSERVER.
- Enter the Partner Name: OSURC, AZ, INAF, LBTB, LBTO. The name entered here goes into the headers as PARTNER and determines how the data will be archived. (Multiple partners can be listed, separated by commas but no spaces.)
- Enter PropID
- Enter PI Name,
- Support (SUPPORT),
- Telescope Operator (TELOPS) and a
- Comment describing the run.
Once all the necessary updates have been made, click Apply, then Save. The Partner, PropID and PI Name will be overridden later by the parameters in the “Archive” blocks of subsequent MODS observing scripts.
Launch modsDisp
Preparing for the night
Wake up MODS
The modsNWake.pro scripts turn on the IR laser, set it to the correct power level and enable it. They also reset the CCD settings and insure that what should be on during obseving is on and what should be off during observing is off.
Take test images
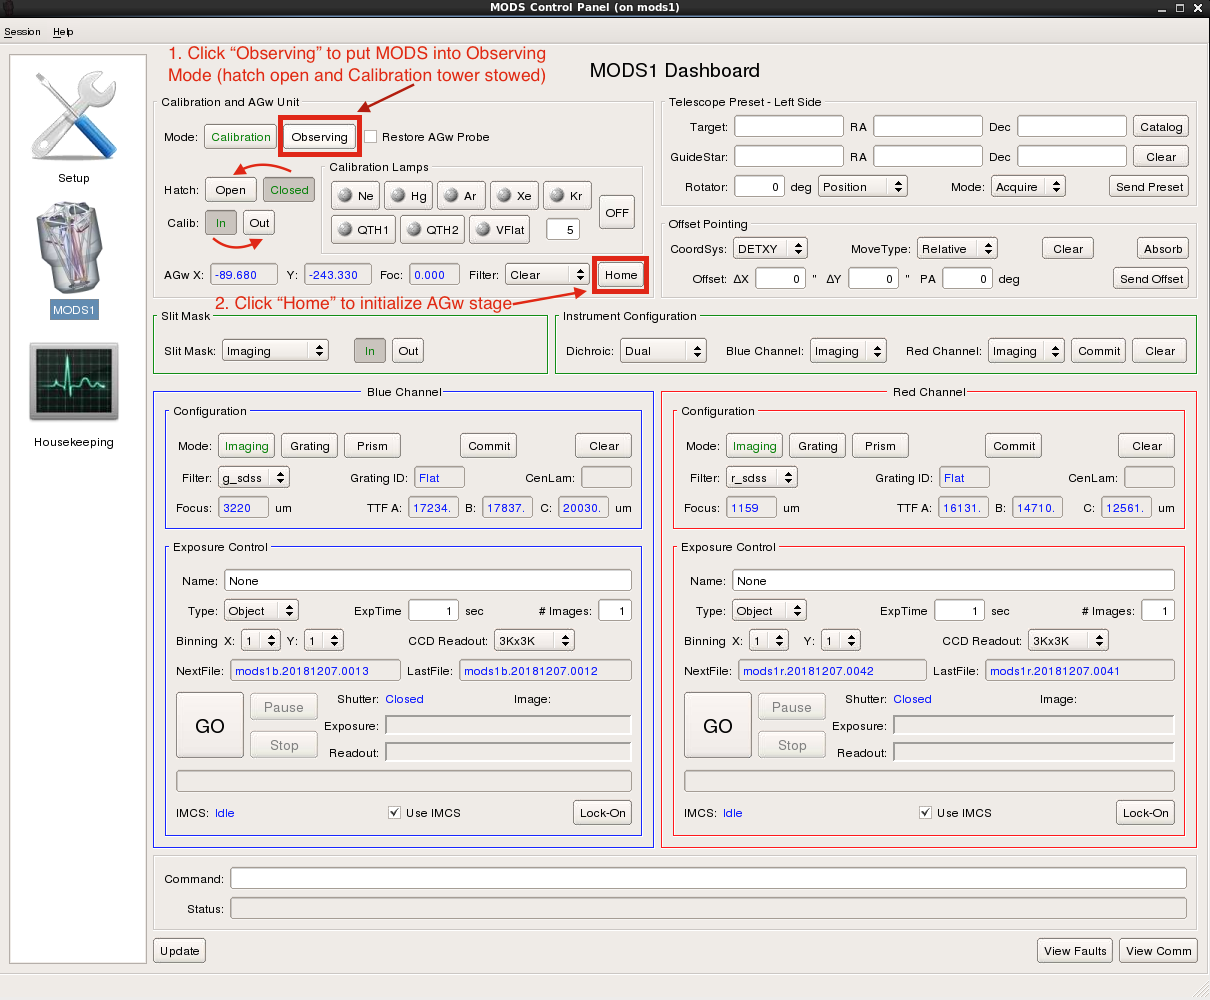
Put MODS into observing mode & “Home” the AGw stage
- Click the “Observing” button near the top left of the MODS User Interface. The text on this and other buttons will be orange while mechanisms are moving. Once they have finished moving,
- Click the “Home” button to the right of the AGw stage X, Y, focus and Filter positions to “Home” the guider stage.
Open ancillary monitoring tools
GCSGUI

