The MODS User Interface
Through the MODS User Interface, the observer can control the instrument and send presets and offsets to the telescope. Usually this is via MODS scripts, which are launched from a terminal window and send commands through the GUI to the instrument and telescope, but sometimes the observer may use the GUI directly. Even though the observer may only rarely interact with the GUI, it is essential that the GUI be open for scripts to run. The GUI has three panels labeled: Setup; MODS1 or MODS2 (aka the “Dashboard”); and Housekeeping. These panels are described below.
The Setup panel is used to set up project information and the filename root. The procedure to follow at the start of the night is described in Starting the software and only a few notes will be made here.
- The Partner, Prop ID and PI Name in the “Archive” section of the script will overwrite what is entered in the GUI, but the scripts will not overwrite any other fields, and all of the information entered here will go into the FITS file headers.
- It is essential that the Partner be entered correctly. Otherwise the PI will not be able to retrieve their data from the archive. Partner should be INAF, LBTB, OSURC, AZ, or for joint proposals, a comma-separated list of the partner acronyms. CALIBRATION or All is used for calibration data.
- Be careful of the Refresh button: it should read the last index number for the given UT date unless Apply has been clicked.
The “Dashboard”
MODS1/MODS2 (aka the “Dashboard”): The MODS Dashboard is where the action is when observing. As the scripts send commands to the telescope and instrument, the observer will notice buttons changing on this panel.
- Orange text or background indicates that the telescope or mechanism is in motion. If the button is stuck orange, this means that the motion complete signal did not reach the GUI; the most common cause is a communications glitch. Click the “Update” button at the lower left to clear a stuck button.
- Blue text indicates the position of a mechanism that is not moving.
- A red background indicates an error, such as a failed preset or an imcslock error. Usually retrying the command is indicated, but see the troubleshooting page.
The layout of the Dashboard from top to bottom loosely follows the path of photons through the instrument.
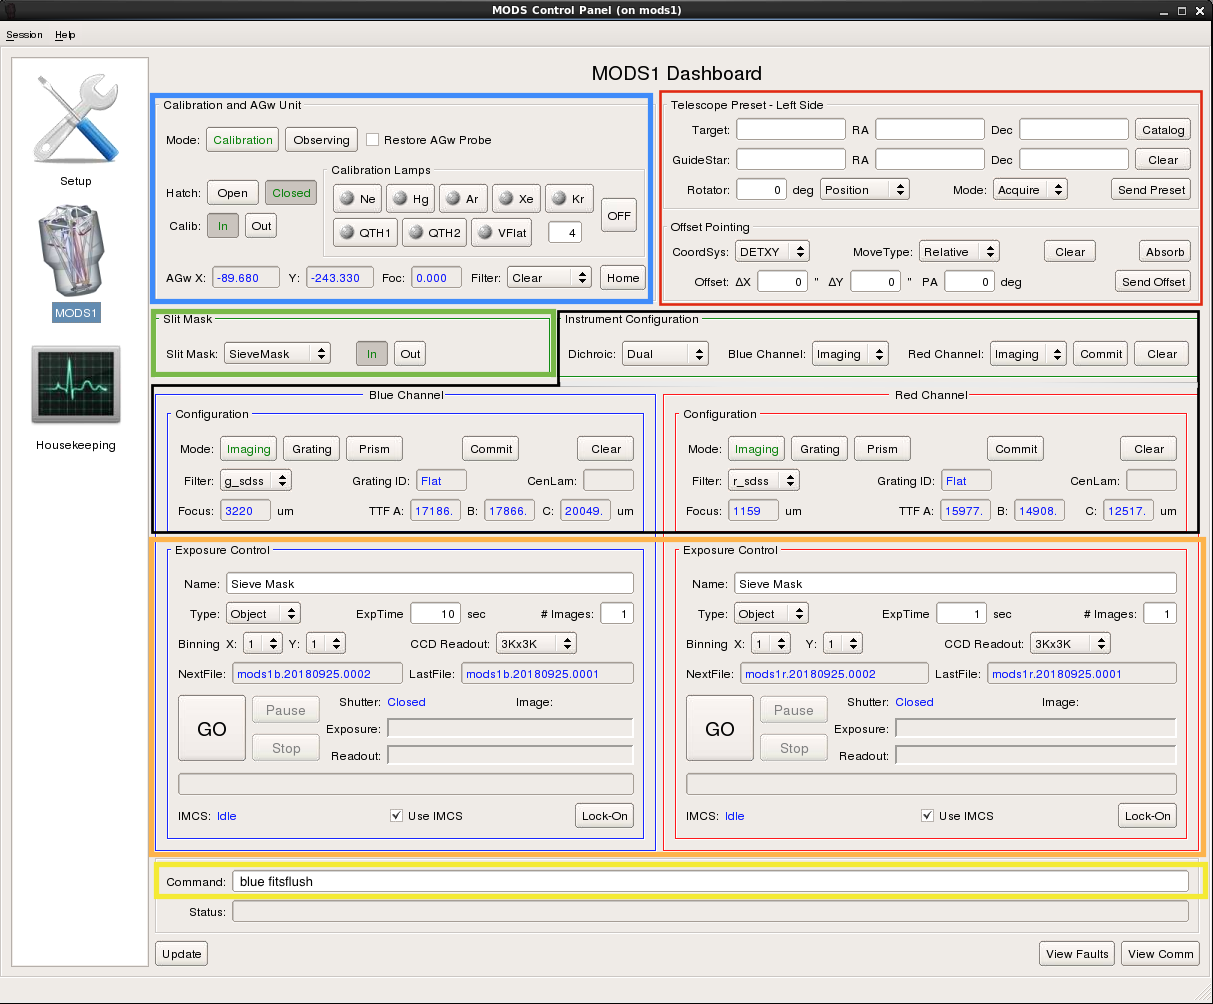
Telescope preset and offset controls are at the top right (outlined in red in the image below).
The observer often uses the Offset Pointing section to tweak the centering of a target in the slit or of the alignment stars in the boxes. To do this:
- Clear “Clear” to zero any values that may have already been entered in the boxes.
- Insure the “CoordSys” and “MoveType” are what you want. For tweaking centering, “DETXY” and “Relative” should be selected. With DETXY and Relative, positive dx and dy will move the star to the right and up.
- Enter the dx, dy (and PA if desired) values you want and then click “Send Offset”. The button will turn orange until the offset is complete.
- Click “Absorb” to update the telescope pointing so that this will become the new pointing origin, which means that any absolute offsets will be with respect to this new position.
Calibration and AGw Unit
Calibration and AGw Unit controls are at the top left (outlined in blue in the image below).
- Before the telescope operator sends the first preset:
- click “Observing”. This will put the instrument into “Observing Mode” by:
- opening the hatch;
- moving the calibration unit out of the beam and turning off any calibration lamps that may be on.
- If the “Restore AGw Probe” box is checked, it will move the AGw probe back to the previously stored position. (The box is very rarely checked since daytime calibrations are sufficient).
- and click “Home” to initialize the guide probe stage.
- click “Observing”. This will put the instrument into “Observing Mode” by:
- The position of the guide probe will not be updated until the “Update” button, at the bottom left of the Dashboard, is clicked.
Slit Mask
Slit mask controls are outlined in green.
- The drop-down menu lists all slits currently installed in the cassette. Selecting a mask will cause the cassette to move up or down to the position of the chosen mask, and then move the mask into the focal plane.
- Clicking Out will move the mask to the Stow position.
- Observers may sometimes use the GUI to retake slitmask (In) or field (Out) acquisition images.
Usually observers do not interact with these buttons, but allow the script to configure the dichroic, and the grating and filter wheels in each channel. Note that whenever an instrument configuration is changed, an imcslock command must be issued to adjust the collimator position for the new configuration.
Exposure Controls for the blue and red channels are outlined in orange in the image above.
The exposure control commands go through the IC program which runs on the CCD Control Computer (e.g. the M1.RC or M1.BC for the MODS1 Red or Blue channels) and receives the data directly from the detector. If the IC program is down, the script will hang. Script commands which go through the IC are those which set the:
- image type and title: OBJECT, BIAS, FLAT, SKY, COMP, STD, DARK;
- exposure time: EXPTIME;
- number of exposures to acquire: NIMGS;
- CCD binning: CCDBIN Nx Ny (or CCDBIN n when both axes are binned by the same factor). While binning factors of 1, 2, 4 and 8 are allowed, we support only 1 x 2 binning, as binning along the dispersion axis causes electronic artifacts in the data.
- CCD region of interest: BLUE ROI size or RED ROI size (where size is 1Kx1K, 3Kx3K, 4Kx3K or 8Kx3K). Note that the ROI must be prefaced with the channel name.
- or take an exposure: GO. Note that through the GUI, the observer can PAUSE or ABORT an ongoing exposure.
The Command Window
- The Command Window is outlined in yellow. The Command Window is the only means for observers to enter some commands for error recovery, but it is also used often for simultaneous operation of both channels or to resend offsets if needed.
- Some examples of commands which would be entered in the Command Window are:
- for recovery from error states (see the Troubleshooting page for details):
- blue fitsflush or red fitsflush
- blue expdone or red expdone
- blue reset or red reset
- The Command Window is the only means for the observer to issue these commands.
- blue fitsflush or red fitsflush
- to pause, resume, abort or take an exposure with both channels simultaneously, enter in the Command Window:
- pause
- resume
- abort
- go
- to send an offset:
- offsetxy dx dy (detxy translation only, units are arcseconds)
- offsetpointing dtheta dx dy (detxy rotation and translation; units are degrees and arcseconds)
- offsetxy dx dy (detxy translation only, units are arcseconds)
- for recovery from error states (see the Troubleshooting page for details):
- Some examples of commands which would be entered in the Command Window are:
Housekeeping
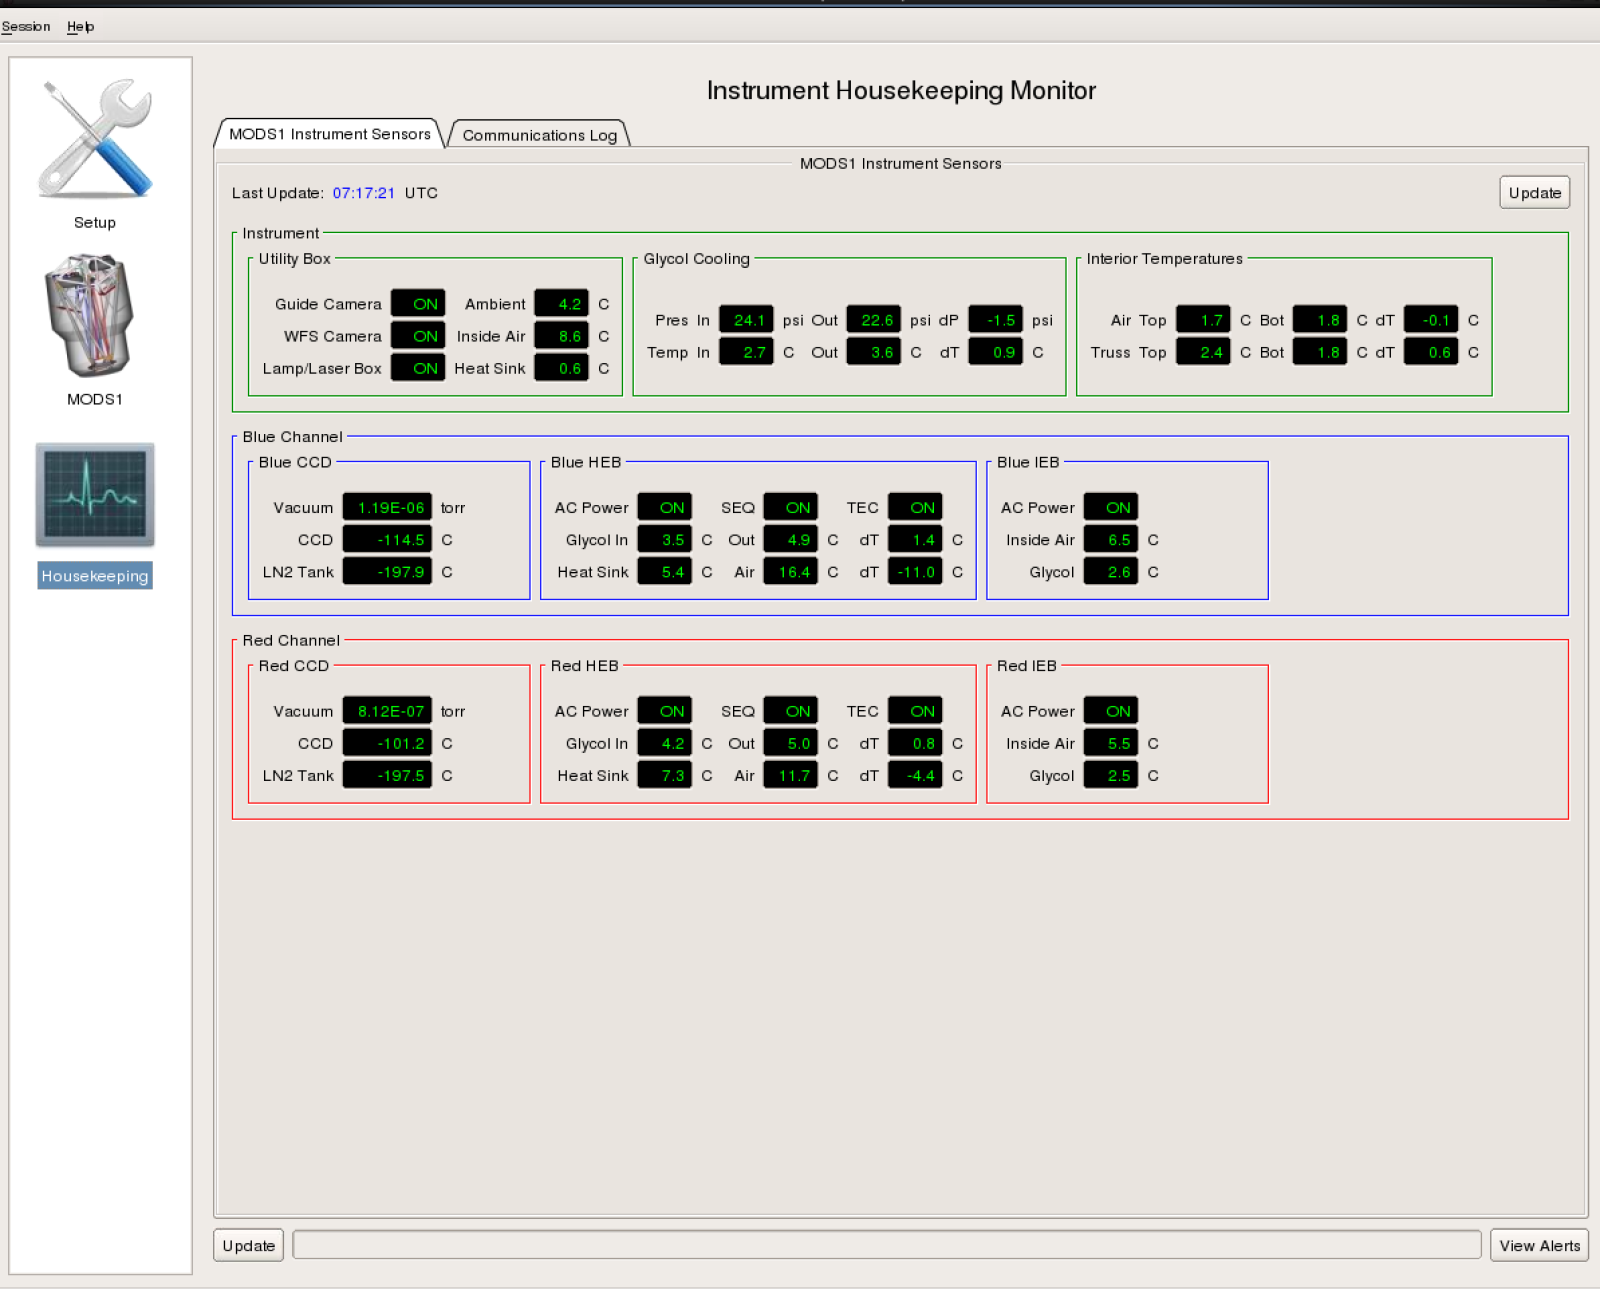
The Housekeeping page provides an overview of the status of the systems. Values that are within range are in green on black and those which are out of range will be in red.
If there is a serious problem preventing operation of the instrument, the Housekeeping icon will have a red background. If you notice any values in red or the red-background Housekeeping icon, notify the telescope operator who may need to call the ISA.
Because of communication glitches, some digits may be lost from a value causing it to temporarily exceed limits. A popup will appear. These values are read every minute and usually this sort of problem corrects itself on the next read. The observer will need to “Dismiss” the popup window.


