MMS Position Slits
Defining Slit Characteristics
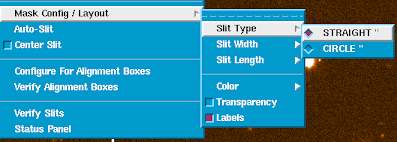
The Slit Characteristics are all defined in the “Mask Config / Layout” menu.
From here you can select the Type of Slit (Straight, Circle), dimensions, some standard display and configurations options.
There are 2 slit type options: Straight (which includes parallelogram/tilted slits), and Circular slits. Laser limitations and maintaining mask integrity limit the spacing and minimum cut width of slits.
Minimum Cut Width: 0.08mm (0.13″)
Minimum Spacing: 1.8mm (3″)
About Straight/Tilted Slits:
Straight slits can be placed using Center Slit, Auto-Slit, or clicking in place, defining the slit width and slit length from the menus. The slit length and width can be edited from the slit parameters popup brought up for each individual slit. This popup also allows the user to adjust the inclination (tilt) of the slit. The spatial length will be maintained as users adjust the tilt, and width will scale with cosine of the tilt angle.
About Circular Slits:
The diameter of circular slits is defined by the width in the menu. Circular slits can be placed using Center Slit, Auto-Slit, or clicking in place, defining the diameter by setting the width though the menu. The diameter can be edited from the slit parameters popup brought up for each individual slit.
Auto-Slit
A detailed discussion of Local Catalog Format can be found in the ESO Astronomical Catalog Library User Manual.
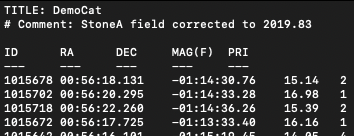
The format of Local Catalogs is a simple ASCII tab table. The line containing ID, RA, DEC, … specifies the header of each column. The keywords have to be tab separated. MMS requires an ID, RA, and DEC column, and for optimal performance the user should include a PRIORITY column as well. Lines starting with ‘#’ are considered as comments and are ignored.
NOTE: There is a bug in versions prior to MMS_V2.0 that will prevent autoslit from working at PA’s outside -89.9deg to +89.9deg. This bug is resolved in the latest version.
Slit Constraints:
- Slits must remain in the 5.6 arcmin diameter recommended FOV
- Instrument configuration set with Gratings will not allow vertically overlapping slits, Prism will allow for vertical overlap.
Center Slit
This can be used to individually place slits on an image with an updated/calibrated WCS. The center slit option will significantly improve the slit positions for point sources and other relatively compact targets.
Toggle the “Center Slit” checkbox, which opens the Pick Object window known from the Alignment target and Guide tar selection. Click somewhere with the left mouse button, hold the button while moving the mouse, wait until you see the target in the center of the Pick Object window and release the mouse button now. Centering may not be possible if the object extends beyond the Pick Object window. In this case, reduce the zoom factor of this window until the source is fully inside the window.


