MMS Getting Started
Startup, Initialize, and Setup
Contents
The following will walk you through the steps for starting up MMS, Initializing the Mask, and Setting Up Telescope and Instrument Parameters.
Startup Skycat with MMS
In a terminal, Change to the MMS directory. To run, execute the mms.sh shell script in the bin directory:
./bin/mms.sh
The command will open Skycat with the MODS plugin for MMS. (See troubleshooting tips if not).
ProTip: Keep your terminal visible or refer to it periodically. Many useful hints and warnings will appear in your terminal rather than Popup Errors in SkyCat.
Get Image and Initialize Mask
Most masks are designed based on fits image data with a reasonable WCS solution (at least in a relative sense, absolute WCS precision is less important). The slits and alignment boxes are determined from the same WCS, so it is best to get the best WCS possible. To load this image, click on Open in the File menu. Note that by default the image is assumed to be in the .mms/PREP/ directory. Note that alignment stars (see below) should be selected from this same image.
Once the image loads, it is often useful to reset the scaling to better see faint objects. The scale parameters are set with numbers in the Low: and High: entry boxes on the left side of the Skycat window.
An alternative to an input image is to use a local catalog with coordinates for the objects. Click on Local Catalogs in the Data-Servers menu and chose Load from file to select a local catalog. By default this catalog is assumed to be in the .mms/PREP/ directory. This catalog needs to be in Skycat format.
Finally, one can also use image data from various public sources. In the Data-Servers menu, mouse over the Image Servers sub-menu and pick your favorite sky survey. If you don’t have a favorite sky survey, Digitized Sky (Version II) at ESO is a good choice. Type in the right ascension, declination, and equinox and click Get Image.
MMS has a MODS pull-down menu with similar options to the LUCIFER pull-down menu for LMS. Once an image or catalog has been loaded, the Init Mask option will draw an outline of the MODS field.

An image is required to initialize the mask. The MODS field is 6×6 arcmin. Objects outside the 5.6 arcmin radius suffer significant aberrations and it is not recommended to place slits outside this radius. MMS_v2.0+ visually depicts this area when you Init as part of the base drawing of the MODS FOV.
Users can also load local catalogs which can be used for slit placement. A detailed discussion of Local Catalog Format can be found in the ESO Astronomical Catalog Library User Manual.

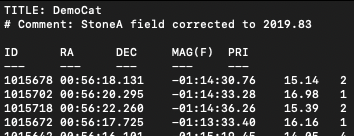
The format of Local Catalogs is a simple ASCII tab table. The line containing ID, RA, DEC, … specifies the header of each column. The keywords have to be tab separated. MMS requires an ID, RA, and DEC column, and for optimal performance the user should include a PRIORITY column as well. Lines starting with ‘#’ are considered as comments and are ignored.
To load a Local Catalog, hit Ctrl-O to bring the File Dialog Box, or maneuver the Data-Servers menu.
Set Project Name and Save
Set the Project Name. The project name is necessary for ingestion by the OT so its best to set this early. It can be changed at any point in the mask development. Select ProjectName from the MODS menu and a popup will appear where you can enter a name. Only the first 8 characters entered will be recognized.
>
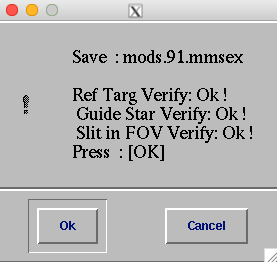
Save regularly and often! Select Save mods. from the MODS menu. The Save will go through a check for project name, guide stars, reference stars, and verification of slits.
It is ok to have interim masks that fail these final criteria, but your final product submitted to LBT for cutting must pass these checks.

The Save will generate a MASK ID and assign that to your project. It also saves an mms file (used for loading should you want to stop and pick this up later), gerber file (for mask cutting, which is more or less blank at this point), and an epsf for later viewing in the directory <HOME>/.mms/SET/ . A selected catalog will appear in the mms header.
A new addition to MMS_v2.0+ is the Update Revision mods. This will update the currently loaded MASK ID, incrementing the revision number only, and saving a new mms, gerber, and epsf file.
ProTip: Open up a Status Panel to see the current configuration, as well as an overview of the last action. This is the last menu item in the MODS menu and opens the following:
Telescope & Instrument Setup:
The Instrument and Telescope Configuration Must be defined before slits are placed. When the central pointing or rotation are adjusted all slits generated will be deleted. Wavelength calculations are based only on the initial configuration and will not correctly updated if changes are made once slits are placed.
The central pointing and rotation and be adjusted with the green dot at the center of the mask outline. Click and drag the green dot to adjust the pointing, Central click on the green dot to change the Position Angle (default 5 degrees per click). The adjustments you make will be reflected in two areas as you go.
To adjust the rotation step size for each click, select the appropriate step size from the Rotation Step Sub Menu of the Telescope Config menu. Click using you central mouse button on the green fiducial to apply each rotation step in a clockwise direction or shift-click to move in a counter clockwise direction.
Move Pointing is a new addition that allows the user to freeze the current pointing and rotation, removing the green fiducial from the center of the mask during the remaining development steps. Toggle this off when you are happy with your set up to avoid accidental movements and to more easily allow slit placement/adjustment at the center of the mask. Shifts in the mask position will delete existing placed slits!
When setting you central pointing and rotation, keep in mind the future steps: Are there suitable Guide stars, or would a flip of 180 degrees provide more options. It is often wise to select your Guide Stars before getting too far in the mask design process.
Configure the Instrument. In the Instrument Config submenu configure select your desired grating. In MMS_V2.0+ this will also configure the camera and filters.


