Starting the software
Login to a mountain workstation
The MODS instruments must be run from the mountain workstations. If you are observing remotely, open an x2go session on robs1.mountain.lbto.org or robs2.mountain.lbto.org using your partner account. Select a MATE (not Gnome or any other) session. If you are at the telescope, then log in using your partner account to one of the workstations, obs1, obs2, …, obs5, that are to the left of the telescope operator’s station. Check that you scripts, OT program files, mask design files (*.mms) and finding charts have been uploaded to the mountain workstation under the /home/<partner>/share/ directory, where <partner> is one of the partner account names: osurc, inaf, queue or lbto. The share directory is visible on all mountain workstations.
Check the status of MODS
Open a terminal window on robs1 or robs2 if observing remotely or on obs1, obs2,.., or obs5 if observing from the LBT, and type modsAdmin. This will open a “modsAdmin” tmux session with 3 panels. In the upper left and right panels, the MODS1 and MODS2 status is displayed and updated every few seconds. The bottom panel is for typing commands, although in most cases, you will only type “detach” (or “quit” or “exit”) to close the session.
Check that all of the instrument server processes, except for the modsUI, and all azcam and modsCCD processes (near the bottom, under MODS# CCD status) are running as user mods, all systemd services are active, and all subsystems are powered on for MODS1 and MODS2, as shown in the screenshot below. If power to a unit is off, the text will be blue instead of green, and if a service is not running then its status will be “stopped” instead of “running” or “active”. If you notice that a subsystem is off or a service is stopped, please check the troubleshooting page [add an item about checking for a stale status] in case the recovery is simple, but if that doesn’t help, don’t hesitate to contact your support astronomer.

Start the MODS User Interface
In the terminal window type mods1 start gui to open the MODS1 User Interface and/or mods2 start gui to open the MODS2 User Interface. The MODS User Interface (GUI) must be open when running MODS scripts, since script commands are passed through it.But the instrument can also be operated through the GUI. Go to the MODS User Interface page for more information on using the GUI.
The Setup Page
On the left hand side of the setup page, enter the names of the Observer(s), Suppport Astronomer and Telescope Operator. These will appear in the image headers. The Partner, PropID and PI Name will automatically be filled in from the script that is being run. The Comments field is obsolete and whatever is entered here will not appear in the headers. The information will automatically be saved, and will appear the next time the User Interface is run up by the same partner.
On the right hand side of the setup page, there is no action needed in most cases. The UT date of the next night will appear, starting at noon. If the User Interface is left up all day, or MODS is used through noon, then it is necessary to click “GetDate” or close and reopen the User Interface to get the new UT date. Do not change the index numbers. These should be sequential. There is no longer any need to click Apply or Refresh.
The screenshot below indicates the fields that should be entered by a red rectangle, and those which should not be changed, by a red “X”.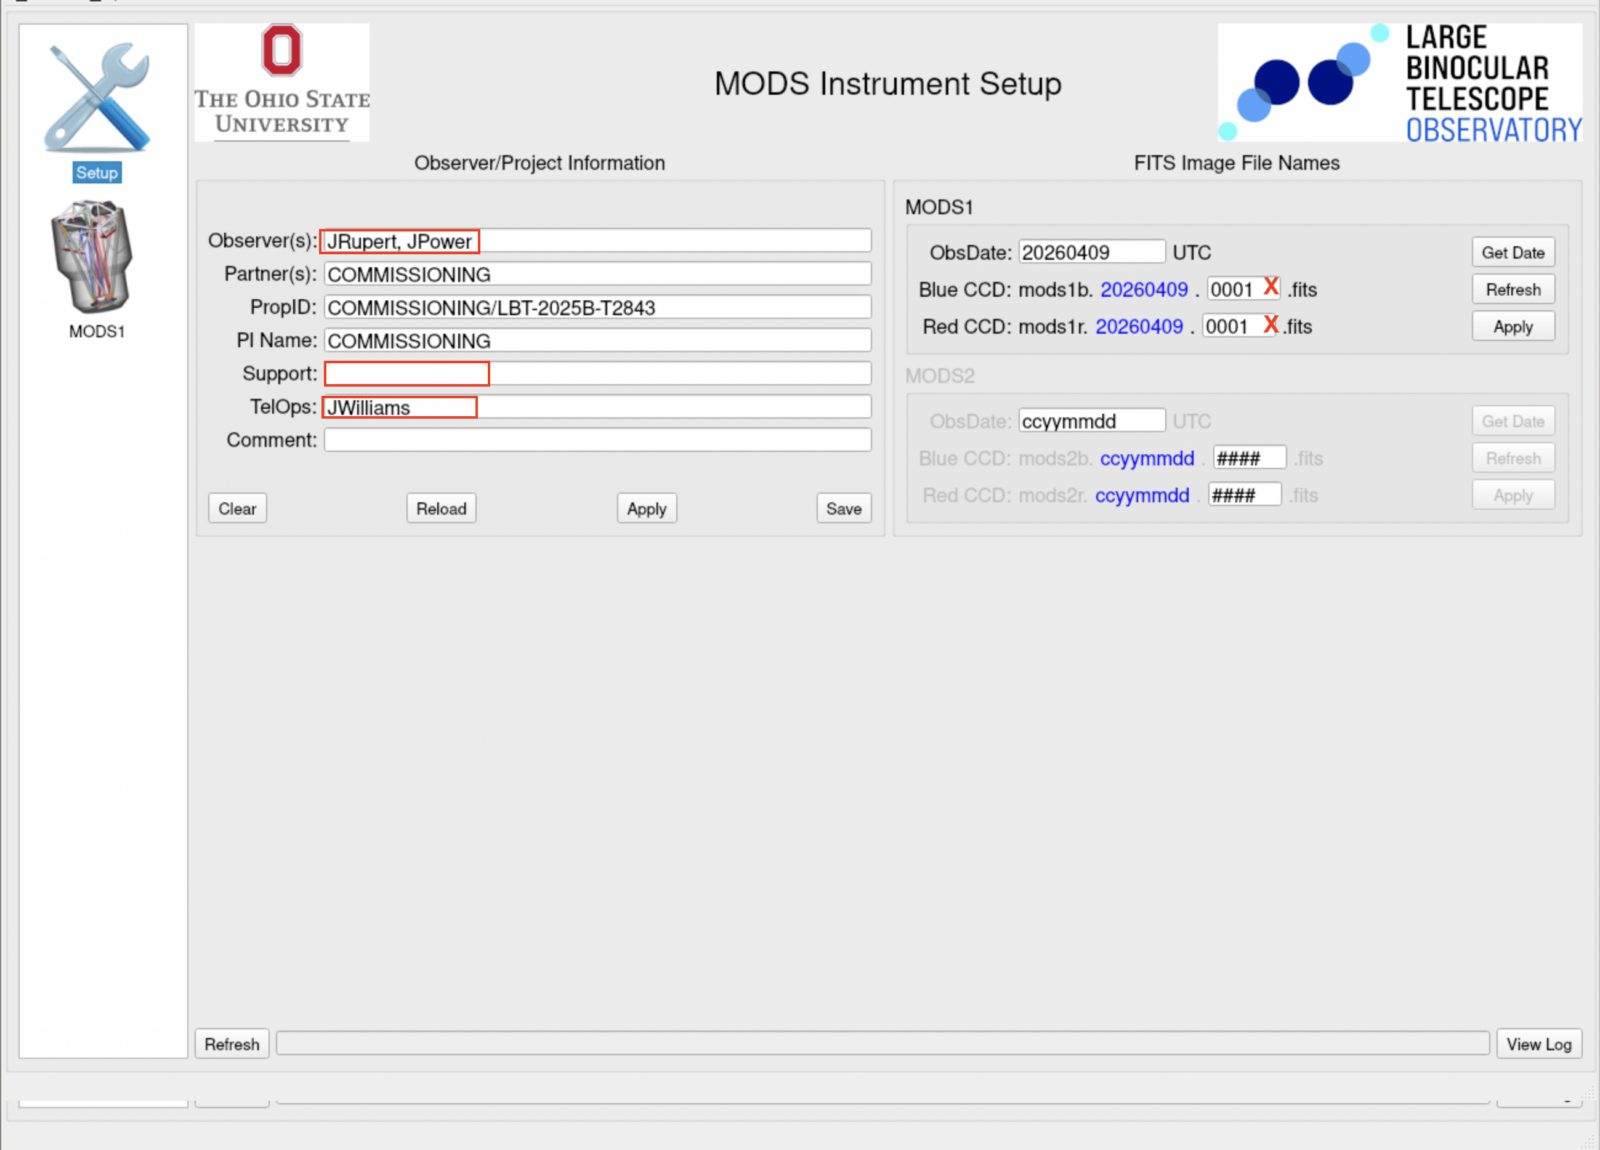
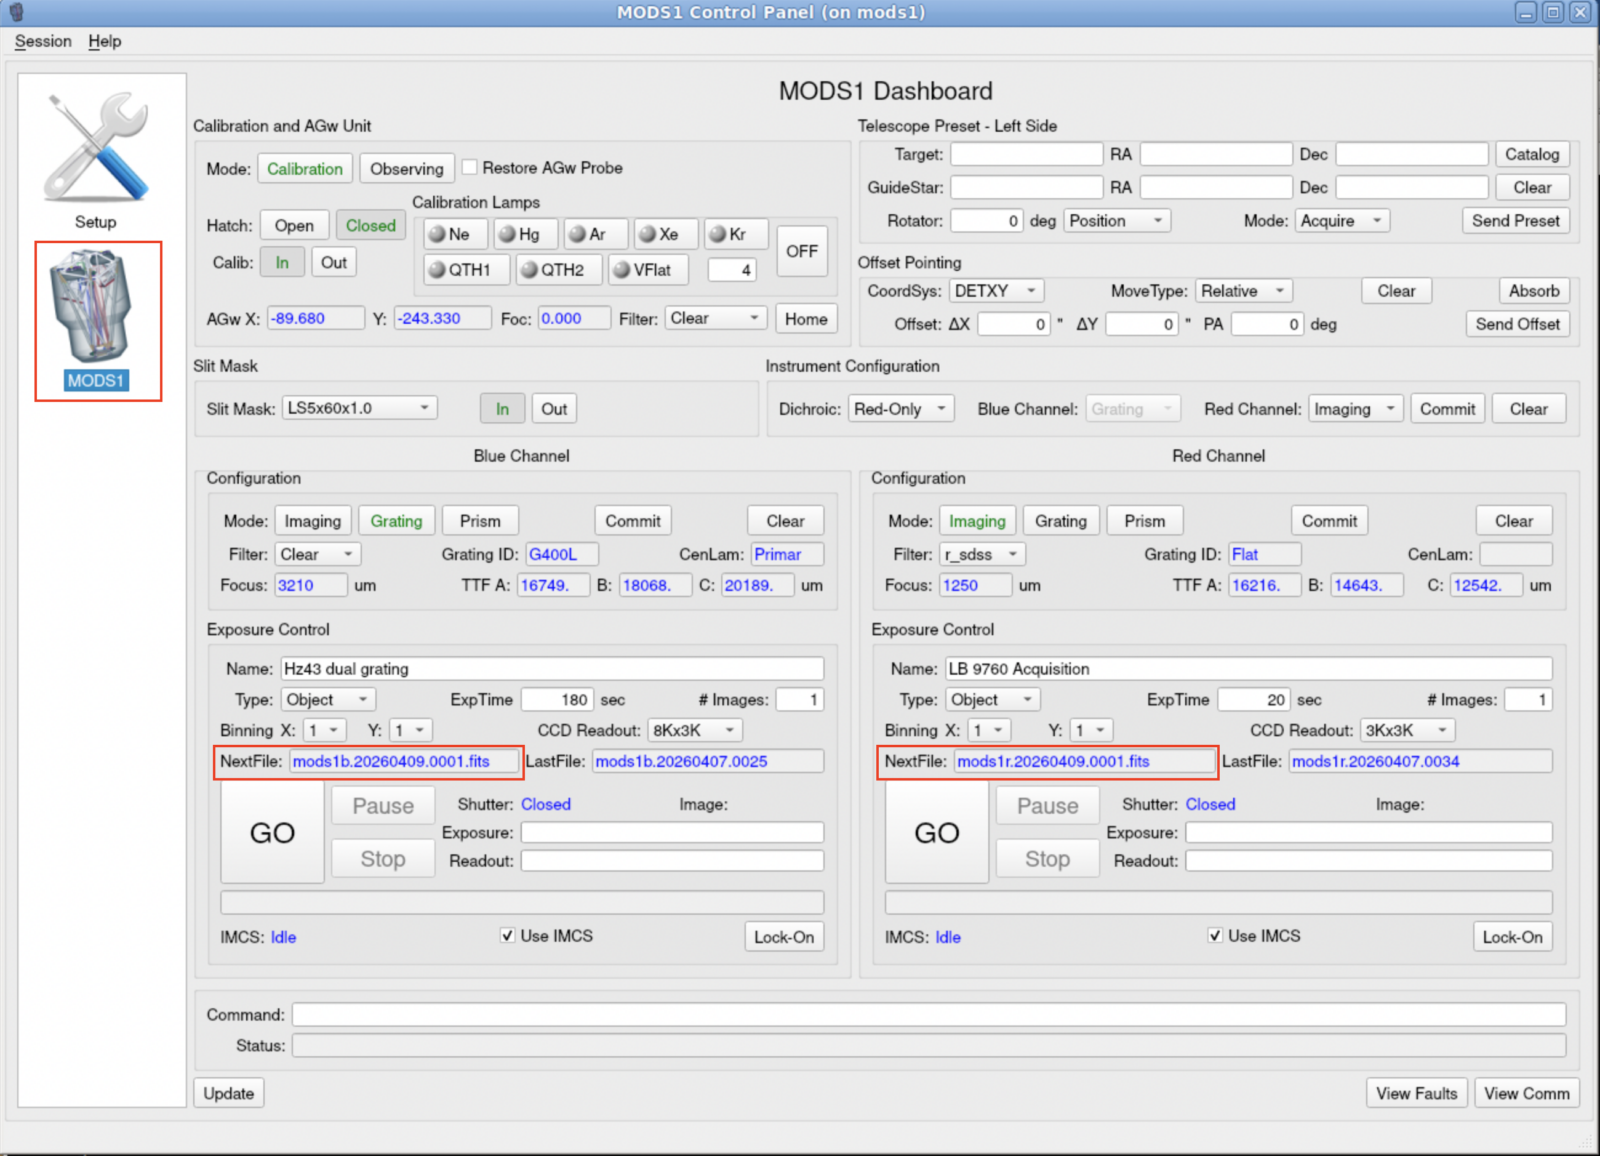
The Dashboard
On the left panel of the User Interface, click on “MODS1” or “MODS2” to open the Dashboard (below). Verify that the filename for the NextFile has the correct UT and matches what is in the upper right of the Setup Page.
Launch modsDisp
Open a terminal window and type modsDisp --mods1. This will launch two ds9 windows titled MODS1Blue and MODS1Red in which the latest blue and red channel images will be displayed. Open a second terminal window and type modsDisp --mods2 to launch modsDisp for MODS2. Each image, as it arrives in the /lbt/data/new directory, will be displayed in the appropriate ds9 window and a brief log entry will be made in the launching terminal window. Leave the terminal window visible, as you can copy the filenames to paste into the modsAlign command line when it comes time to align the target in the slit, or the alignment stars in the boxes of a multi-object slit mask. Go to the modsDisp for more information on modsDisp.
Preparing for the night
In a terminal window, type modsTerm to open a “modsTerm” tmux session. The “modsTerm” tmux was designed for binocular MODS operation, where binocular scripts will be executed from the bottom panel, and the top left and top right panels will display the MODS1 and MODS2 script progress. If only one MODS is being used, then it is recommended to run scripts from a simple terminal window instead. The illustration below shows a typical “modsTerm” session.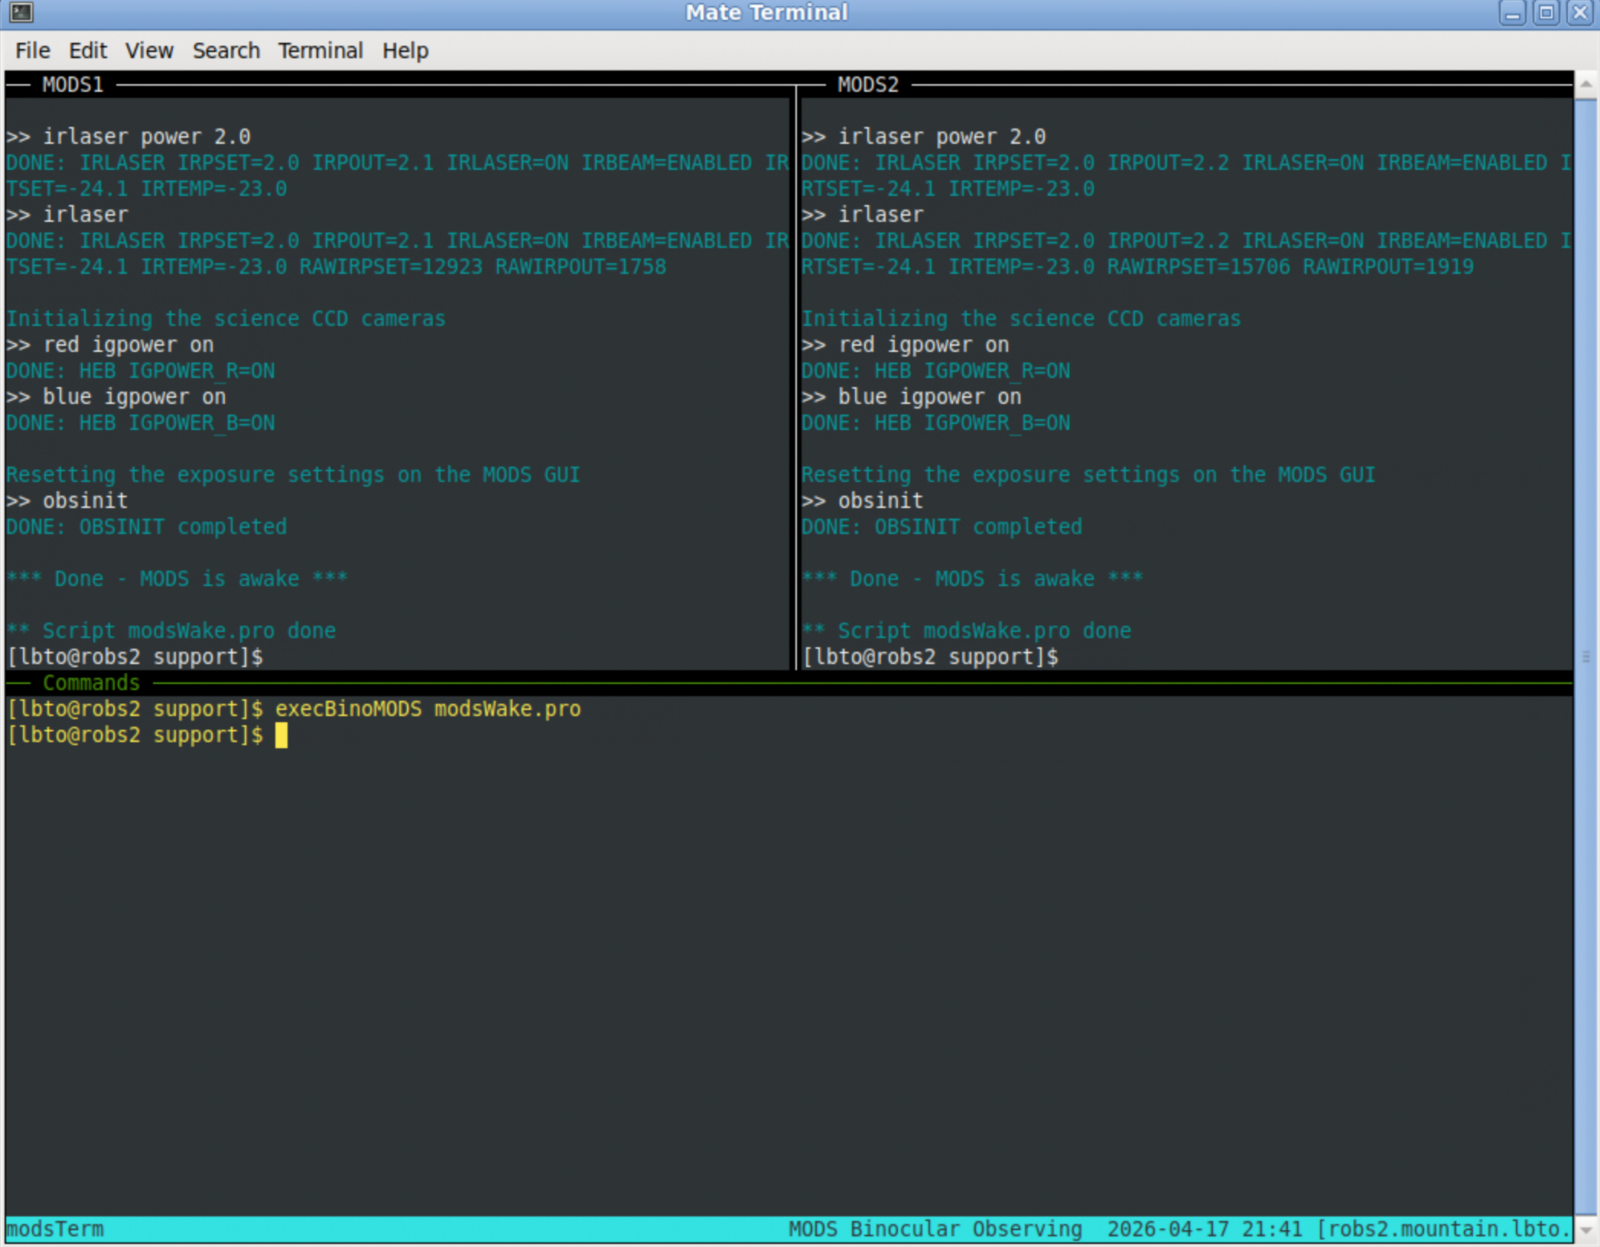
Wake up MODS
Type cd /lbt/lbto/mods/support to enter the support directory, and then execBinoMODS modsWake.pro to run the script which will wake MODS1 and MODS2. Note that the same script is used for both MODS. This turns on and enables the IR laser at a power of 2 mW, which is currently (April 2026) the appropriate setting for both MODS. The modsWake script also resets the CCD settings and insures that the vacuum ionization gauge and the thermoelectric cooler are on.
If MODS is being run monocularly (e.g. only MODS1), then in a terminal window type execMODS --mods1 modsWake.pro
Take test images
Type execBinoMODS simSnap.pro to take a pair of blue and red channel test images, first with the sieveMask in the focal plane, and then with it removed. The second set is useful check for and monitor debris on the optics. execMODS sieveSnap.pro will take only the sieveMask images. Only LBTO staff should run other scripts in this directory (some will shut down the instrument, turning off power, …)
If only MODS1 is being run, then instead, in a terminal window, type execMODS --mods1 simSnap.pro or execMODS --mods1 sieveSnap.pro
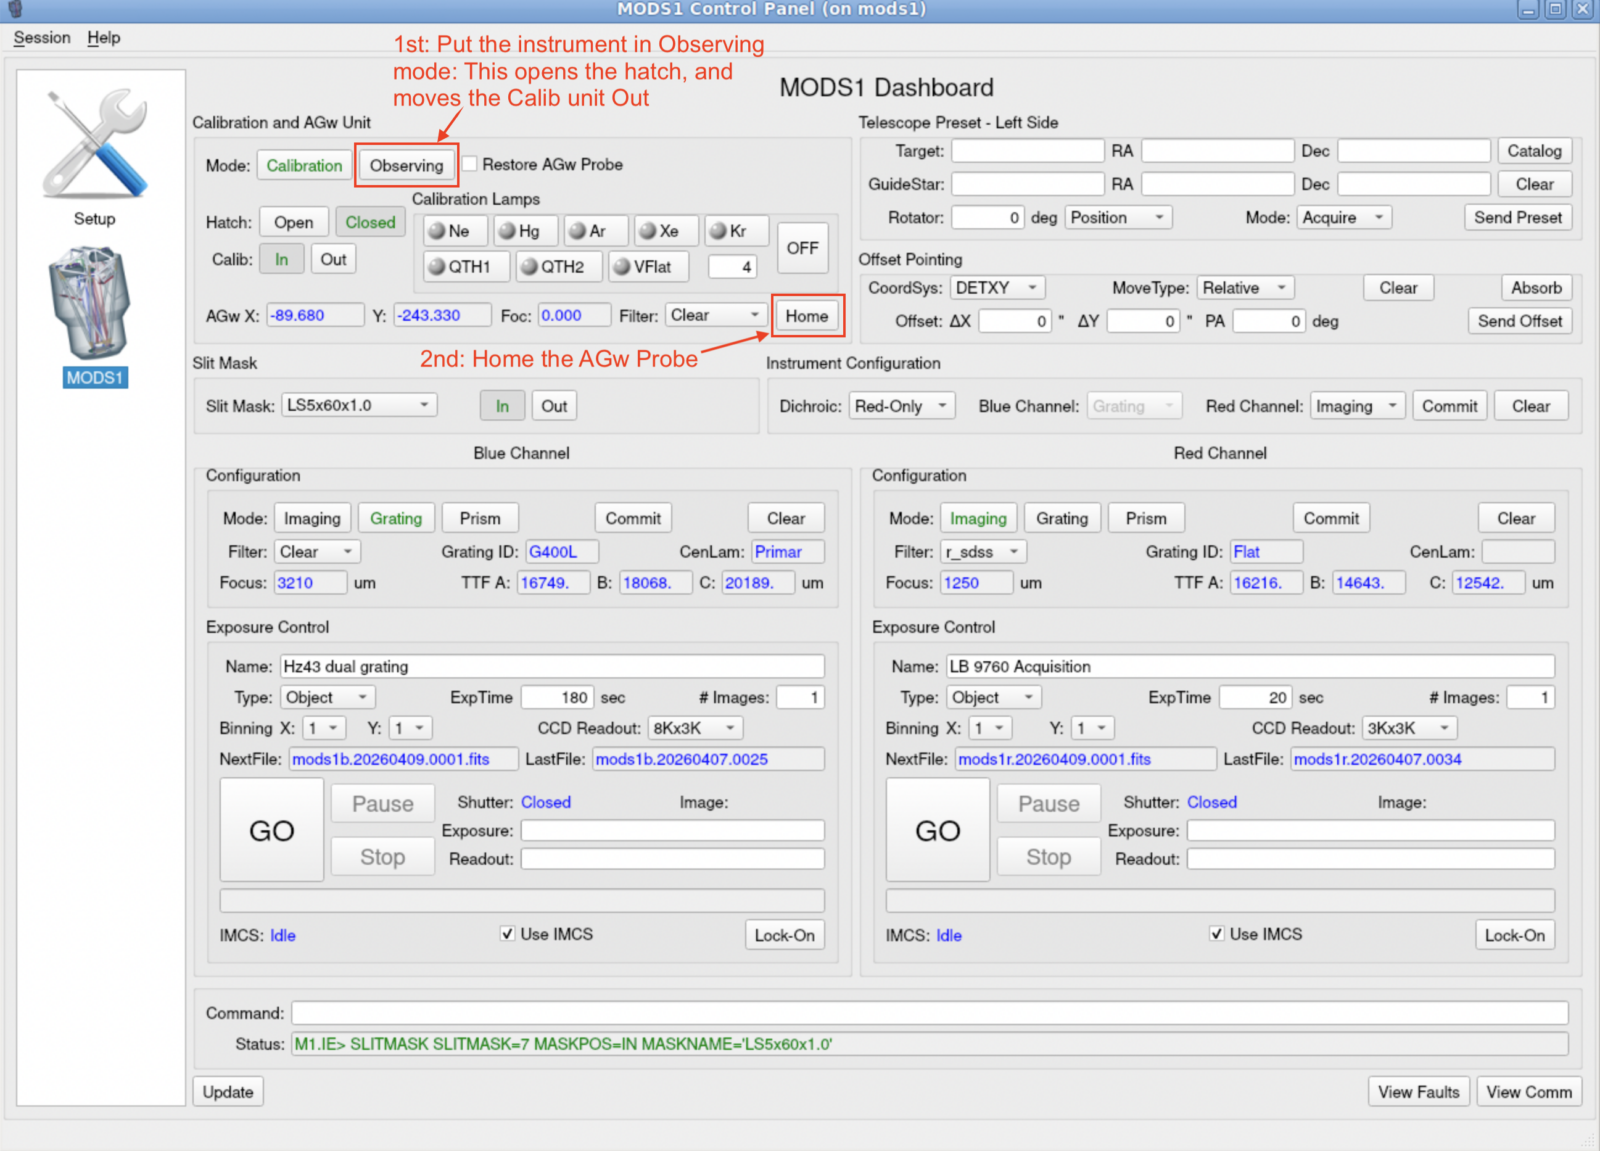
Put MODS into Observing mode and Home the AGw stage
- Click the “Observing” button near the top left of the MODS User Interface. The text on this and other buttons will be orange while mechanisms are moving. Once they have finished moving,
- Click the “Home” button to the right of the AGw stage X, Y, focus and Filter positions to “Home” the guider stage.
Open ancillary monitoring tools
GCSGUI
In a terminal window, type GCSGUI left & to open the SX Guide Control System GUI and GCSGUI right & to open the same for DX.
These GUIs display the guide and wavefront sensing (WFS) camera images, along with measures of the guide star FWHM, the WFS wavefront error (should be <400nm for good collimation), and the average FWHM of the WFS Shack spots.

LBTplot
In a terminal window, type LBTplot to open the LBTplot tool. The buttons are context driven, and for MODS observing, the most useful ones are SXguide and DXguide, as they plot the guide star FWHM and flux as a function of time.
