Observation Tab
This is the top right panel of the PIT, when Observations is selected from the “Observations/Targets” options shown below the panel.

Observation Tab Overview
Add an observation: To add an observation, you can do so by clicking on one of the four icons at the bottom left of this panel.

Each icon represents an OBSERVATION NODE. From left to right the nodes are: weather constraints (or conditions, cloud icon), instrument configuration (or resources, filter wheel icon), target information (sun icon), and observation time (clock icon). Once you click on any of the icons to create an observation node, all other components will also show up in the window. For instance, if you click on the “conditions” icon and enter weather constraints, then the other nodes (Configuration, Targets, Observation) will also show up “empty”. Double-click on each node to enter the required information.

Grouping by: To re-organize your observations, drag the Conditions, Resources, Targets labels at the top of the panel to the left or right. The options can be put in any order, but the default ordering of Conditions:Resources:Targets is recommended.

Nodes Overview:
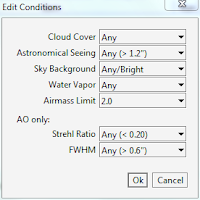 Conditions (cloud icon): Using the cloud icon, select the observing conditions necessary for your science: cloud cover, astronomical seeing, sky brightness, and water vapor. For AO observations you can use the strehl ratio and/or fwhm to further specify your constraints. Below is a key to guide your selection of conditions for each constraint.
These conditions will only be used as rough guidelines for partner service observers and PIs and are not guaranteed constraints.
| Cloud Cover | Constraint | ||||
| Clear | Cirrus | Variable | Cloudy | Any | |
| Qualitative Description | No clouds visible | Thin clouds visible | Variable guide counts; Guiding and WFS still possible | Visible thick clouds; Guiding still possible. WFS may or may not be possible | Visible thick clouds; guiding and WFS not possible (track only) |
| Astronomical Seeing | Constraint | ||||
| Best | Very Good | Good | Poor | Any | |
| DIMM/GCS | < 0.6 | < 0.8 | < 1.00 | < 1.20 | > 1.2 |
| Sky Background | Constraint | |||
| Darkest | Dark | Grey | Any/Bright | |
| Qualitative Description | Moon below horizon. | Full/Gibeous moon near horizon
Crescent moon between horizon and zenith |
Full/Gibeous Moon above horizon
Quarter moon close to target (<20 deg) Within an hour of astronomical twilight |
Full Moon near target (< 20 deg)
Astronomical twilight |
| Water Vapor (mostly LBTI) |
Constraint | |||
| Low | Median | High | Any | |
| < 3 mm | 3-5 mm | > 5 mm | NA | |
| Airmass Limit | Constraint | ||||
| < 2.0 | < 1.8 | < 1.6 | < 1.4 | < 1.2 | |
| Strehl Ratio (AO only) |
Constraint | ||||
| Best | Very Good | Good | Poor | Any | |
| > 0.8 | > 0.6 | > 0.40 | > 0.20 | < 0.2 | |
| FWHM (AO only) |
Constraint | |||
| Best | Good | Poor | Any | |
| < 0.2 | < 0.4 | < 0.60 | > 0.60 | |

Resources (filter wheel icon): Using the filter wheel icon, you can select the instrument you would like to use. For facility instruments, (MODS, LUCIs, LBCs) you can also set the observing mode, grating, slits, filters, etc. for each instrument you would like to use. The wizard will lead you through a “decision” tree of modes and their options.
More information about each facility instrument and the decision tree that accompanies it is given on the Instrument Configuration page.
Target (sun icon): This will bring up a new Edit Target window (reviewed here), where you can enter a new target manually or query SIMBAD, NED, or Horizons. Target information entered here will automatically show up under the Targets tab.

Observation Time (clock icon): Using the clock icon specify the length of time to be spent on observing the target. Overheads and baseline calibrations should be included so that the total time request made on the Time Request tab matches the sum of all your observations.
Binocular observations are easily handled in the observation time dialogue box. Simply mark the “check for Binocular Observation” box if the observation is a part of a binocular pair. You should do this for both parts of a binocular pair. Binocular observing times will be calculated differently to match those specified in the Time Request Tab to avoid double counting synchronous observations.
IMPORTANT NOTE: The INAF PIT has a space for “Run Name” in the Observation Time Node; PIs should use this to specify priority. RUN NAMES must match if observations are to be binocular.
INAF also allows for Fast and Slow Target of Opportunity requests. If you are interested in this mode, be sure to use the new ToO dropdown.
Other Node Functions:
Delete (red cross): This will delete the selected node.
Lookup: If you know the target name, then you can type it in the “Lookup:” box at the bottom of the panel. The software will first check whether this target is already in the targets list, and will use that, if it is present. If the target is not in the target list, then it will look up its coordinates and brightness from one of the three catalogs (SIMBAD, NED or HORIZONS, selected from the Menu bar).
If you have multiple targets, you can also read in a target list in one of the acceptable formats by selecting “Import targets…” from the File menu.
You may also copy/paste targets from the Targets tab. An efficient way to make observations of lots of targets that have similar conditions and resource needs is to add the conditions, and resources, load a list of targets using the Target tab, or “Import targets…”, then copy/paste the targets onto the Resources node. The observation times then can be entered manually or duplicated with copy/paste.
Vis: This column will show a red/yellow/green (bad/marginal/good) stoplight icon indicating the visibility of the target in the given semester. This is the result of a comparison between the coordinates of the target and the RA/Dec limits for the semester and observing mode. If red, please consider proposing the target for a different semester.
AO: This column will show a red/yellow/green/blue/grey stoplight icon indicating the potential availability of LUCI AO reference stars for the target. It queries the UCAC5 catalog for sources within a radius of 134″ of the target coordinates with a R-Band magnitude between 3.5 and 16.0.
| No stars found | |
| 1 star found | |
| 2 or more stars found | |
| Instrument is not LUCI | |
| Non-sidereal target or result pending |
Manipulating Observations:
Once an observation is created there are a variety of ways of editing and manipulating the nodes.
Undo/Redo: Undo/redo options are available for all changes and actions to the observation nodes. If something unexpected happens or you make a mistake, just undo!
Highlighting nodes: Click on a node to highlight it. Command/Alt-click on a node to deselect it. Whether or not a node is selected determines the behavior of other features. If a node is selected and you click one of the “add node” buttons from the bottom of the panel, the placement of the new node depends on the current organizational hierarchy. If the node to be added is lower in the current display hierarchy, then the new node is added below the selected node. If the node to be added is at the same level or higher in the hierarchy, then a new observation “tree” is created. For example, with the default Conditions/Resources/Targets hierarchy, selecting a resource/configuration node and then adding a new target will put the target under that resource node. If no nodes are selected, then adding a node will create a new observation “tree”.
Drag/Drop: A node and all sub-nodes can be drag/dropped into another place in the hierarchy. The node must be dropped into a node that is higher in the current hierarchy. While dragging, the locations where you may drop your selection are highlighted in grey as you mouse over them.
Copy/Paste: A node, and all sub-nodes, may be also be copy/pasted. This is done with key commends Cntl/Commend-c and Cntl/Command-v or by selecting options from the Edit menu. Copy/Paste works similarly to drag/drop, and nodes may only be pasted where they can be dropped. However, copy/paste also works between the Targets and Observations tabs. You may also select multiple targets from the Targets tab and paste all of them into the appropriate place in the Observations tabs.