LMS Verify and Save
Verify
There are 3 verification routines built into LMS: Alignment Target verification, Guide Star verification, and the Slit verification. These are each run when saving or can be run independently.
Alignment Target “Verify” is a routine that can be accessed through the “Align Targets” submenu. It checks that a minimum of 3 alignment stars in the FoV have been selected. This check runs automatically when saving. Note that Alignment Targets no longer require a cut box around each one, although we recommend you continue to supply 3 boxed alignment stars as a visual confirmation. You can select up to 10 Alignment Targets.
Guide Star “Verify” is a routine that can be accessed through the “Guide Stars” submenu. It confirms that at least 1 object has been selected. It does not check magnitude or whether the object is extended, so the user will need to independently confirm that there is a suitable candidate that meets the guider criteria when selecting. The magnitude information is not passed on in any way to lms, so when the user makes their scripts in the OT it is recommended that they reselect their guide star.
“Verify Slits” is a recent addition that allows the user to do a quick assessment of the mask slit placement before sending it in for a final verification/check with our mask scientist. This feature is run each time you save your mask, or can be run independently from the “Verify Slits” Menu. The routine checks that science slits are properly placed within the FoV, it looks for vertical overlap, and it checks if slits may be too close to one another.
When assessing vertical overlap, the routine does not take into account vertically overlapping reference boxes which are a potential exception to this rule. But does try to flag to the user if they may see spectral overlap from multiple slits. If your science will not be directly impacted by any vertical overlap this can be dismissed.
Similarly, a bridge gap between slits of 1.8mm (3.0 arcseconds) has been implemented. In rare cases/setups it may be possible to have a slightly smaller gap. If you have a warning about this bridge gap that you feel may be borderline, please contact the mask scientist (Jason Chu: slitmasks@lbto.org) for a more detailed assessment.
Save
For mask submission you mask must have:
Project Name
A minimum of 3 alignment Targets
No slits violated the proximity verification, unless otherwise discussed and verified in advance with the mask scientist (slitmasks@lbto.org)
Highly Recommended
At lease one Guide Star
No slit verification violations
When all slits have been created and criteria met, the mask configuration has to be saved. Saving will create 3 files, all with the same name for the form:
luci#…lms, luci#..gbr, luci#…epsf
where is a counter that increments by 1 with each mask generated. The Project Name is an up to 8 character long user defined name. If no project name is defined, this part of the file name is omitted and the mask will not load into the OT.
When saving there is often a popup asking which catalog was used for mask development. This information is used to populate the lms header. Make sure to select a catalog or hit ok to ensure your mask is saved.
Do not rename the LMS and MMS files to something different than what LMS produces.
The lms file contains the information for telescope pointing and instrument rotation, all slit parameters, including slit center coordinates in WCS units (not for the 6 reference apertures) and in mask coordinates (mm x and y), the WCS coordinates of the Alignment Targets and of the Guide Stars. This file can be reloaded to restore the LMS session. It is ingested by the OT for script generation.
The gbr file contains the information required for cutting the mask and the slits, including the mask contour, the holes for mounting of the mask, and the mask ID. The epsf file contains several known bugs including the inability to display the file number and curved slits. (see known bugs).
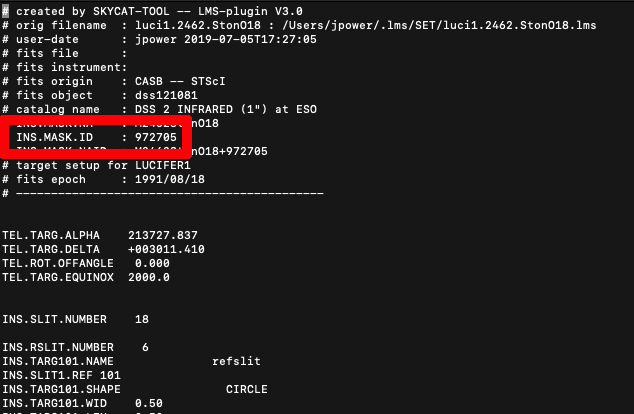
When submitting, include the lms and gerber file. If referring to a previously cut mask only the MASKID is required, although it is often best to resend the lms files for verification. The MASKID is the number cut at the top of the mask and can be found in the header of your LMS file:
We are very happy to accept, review, and discuss MOS mask designs sent to us ahead of the deadline. slitmasks@lbto.org
Gerber viewer
We recommend gerbv for viewing your mask gerber files. This will allow you to measure physical sizes and see what will be cut by our laser milling machine. Gerbv is a free open source gerber file viewer.
MAC OS X: Macports should be installed from your installation and configuration of skycat. This can be used to also install your gerbv.
Linux: Install instructions for linux and other OS can be found here: http://gerbv.geda-project.org/