LMS Alignment and Guide Stars
Alignment (Reference) Targets
Alignment Targets no longer require a cut box around each one, although we recommend you continue to supply 3 boxed alignment stars as a visual confirmation. You can select up to 10 alignment stars, and we recommend you do!
MOS target acquisitions have to be aligned using Alignment Targets. At least 3 Alignment Targets are required to check and correct the telescope pointing and the instrument rotation angle. More than three reference stars will reduce the inaccuracies. Select up to 10 alignment targets, ideally close to the slit positions.
Alignment targets can be specified at any time during an LMS session. Press LUCIFER “Alignment Targets” to reveal the submenu: Plot, Show (List), Add, Purge, Verify, and Reset.
Plot: plots the Alignment Targets on the screen.
Show: shows a numbered list of Alignment Targets and their positions.
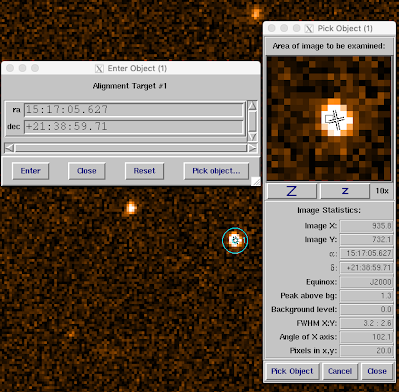
Add: opens a Popup to Enter Object Coordinates and allows the user to add Alignment Targets. To add, the user can manually enter the coordinates of the target or select Pick Object to bring up the Pick Object Window.
To Use Pick Object click near the desired source with the left mouse button, hold the button while moving the mouse, wait until you see the target in the center of the Pick Object window and release the mouse button now. Centering may not be possible if the object extends beyond the Pick Object window. In this case, reduce the zoom factor of this window until the source is fully inside the window. Once satisfied with the pointing Enter the coordinates of this reference star in the Enter Object popup.
Selected Alignment targets will be highlighted via a cyan circle. The parameters of the chosen Alignment targets will be shown in the Pick Object window. To exit the selection process press the button Close in the Enter Object window twice.
Because the telescope pointing and the orientation of the instrument (the mask) on the sky, are derived from the Alignment Star positions in the image, the Alignment targets should be taken from the same source (FITS image or catalog) as the science objects.
The alignment stars need to be visible in the exposure time you use for the acquisition imaging. For the normally recommended 60s total (NDITxDIT) acquisition, K=17 is usable in decent conditions, while K=10 may be getting close to saturation. Thus, anything even faintly visible in 2MASS (10-sigma around 14th mag) images should be usable.
Verify: confirms that at least 3 alignment targets that can be passed to LUCI have been selected in the field.
Purge: opens a popup listing a numbers list of Alignment Targets. To remove Alignment Targets enter the desired target numbers in the text field as a comma separated list (e.g. 7,3).
![]()
Reset: erases all entries in the reference target list.
Guide Stars
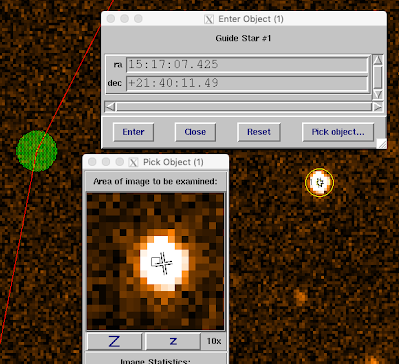
The “Guide-Stars” submenu and setup are set up nearly identically to the alignment targets. The Guide Star patrol field will be outlined in red when adding targets. Unlike alignment targets, only 1 is necessary to satisfy the verification.
Guide Stars will be highlighted with a yellow circle once selected.

It is not vital that guide star coordinates be taken from the same source as the science object as the alignment is done independently of the guide star.
LUCI Guide Stars should be point sources in the mag range of 13-16.0 in R or r’ band. Brighter work better in poor conditions.
LMS does not pass on the guide star magnitudes so it is good practice to reassign your guide star during script generation in the Observing Tool. But this step is important to ensure you have a suitable guide star for your science. Some time it may be necessary to reorient 180 degrees to acquire a suitable guide candidate so it is recommended to assess options early on in the mask development process.
A second check of your guide stars may be done using the Observing Tool (OT). Use one of the MOS templates and simply load the LMS file generated by the software. It will display the LUCI science field, the guider patrol field, as well as show if the guider may vignette science or reference boxes on your mask. The OT allows you to verify that the guidestar you selected is acceptable for observing.
AO reference Stars
Selecting an AO ref star while making your mask is currently not an available feature (Coming Soon!) but it is something to be conscious of if you are doing spectroscopy with ESM or ARGOS. Before putting the finishing touches on, make sure you have a suitable AO reference star in the patrol field ( central 2’x2′ extending east an additional arcmin). Moving the central pointing or PA will delete existing slits so this is probably best to confirm there is one available earlier rather than later!!


