Troubleshooting
Grating Unit Times Out
Occasionally the grating has trouble stabilizing at particular wavelengths. It is possible that you will not be able to get it stable even with the suggestions below.
- Manually re-select the same CWL on the LUCI IMGUI and commit.
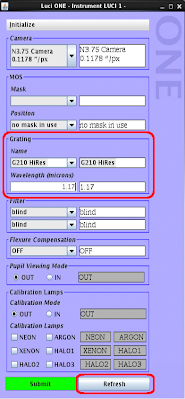
**** Remember to hit refresh at the bottom of the IMGUI prior setting any desired parameters. Selecting Submit will commit the entire instrument configuration, so any stale entries, such as mask position, will also be committed. **** - If if still fails to stabilize, change CWL +/- 0.1um or so and commit, go back to the desired CWL.
- If it still fails, change grating and CWL, go back to desired settings if this works.
- Avoid high EL observations (>80 degrees) if possible.
- Ask OSA (telescope operator) to note date, time, EL, and ROT in IT#2772
Re-submit science script once the grating has stabilized at the correct CWL. Note that the science script will resubmit the instrument configuration. If the alignment acquisition has been acheieved it may be desirable to either skip to the next obs item not containing an instrument configuration, or turn off the instrument in the observer panel and manually configure as needed. Remember to turn the instrument back on before sending next script!
Filter Wheel fails to reach position
Occasionally the filter wheel will time out, failing to reach the assigned position. If so try the following:.
- In the Instrument Manager GUI initialize the Filter Wheel(s) that failed.
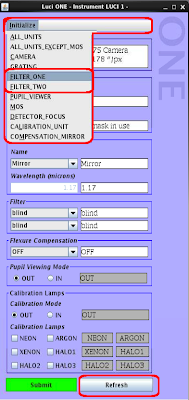
- The in the IMGUI command the filter wheels to the desired position.
**** Remember to hit refresh at the bottom of the IMGUI prior setting any desired parameters. Selecting Submit will commit the entire instrument configuration, so any stale entries, such as mask position, will also be committed. **** - If the Filter Wheel still fails to reach the desired position contact the ISA for further troubleshooting.
GUI components freeze/unresponsive
The observing GUIs are controlled by a single java wrapper. If one thread is busy, this blocks interaction with the other GUI components sharing that thread. However, the GUIs can also hang. First verify that the UI is just not busy. The two main things to check are:
- There are no popups waiting for acknowledgement. If so acknowledge.
- The RTD is downloading the most recent file. If it is waiting for a file, just wait until the operation completes and try again.
If the problem persists, and the GUI’s will not close with the red X in the corner, then you may have to force shutdown that particular GUI with
xkill
on a command line and click on the problem GUI to close it.
Restart GUIs
The open_observer script can also re-start individual components in case you run into trouble and must close something. In an xterm, type:
open_observer luci
and you will get a summary of the options.

As an example, if you close the observer GUI, it can be re-opened with:
open_observer luci observer
More on starting the software here.
Guide Probe Vignetting Science/Calibration FOV
If users note a gradient in the “lamp on” calibrations, likely the AGW probe is vignetting. This can happen if an on axis preset was sent and the probe not parked/homed afterwards. Below is an example of an LUCI1 1″ longslit K band flat with the guide probe was left on axis. The counts over 3/4 of the field are drastically diminished.
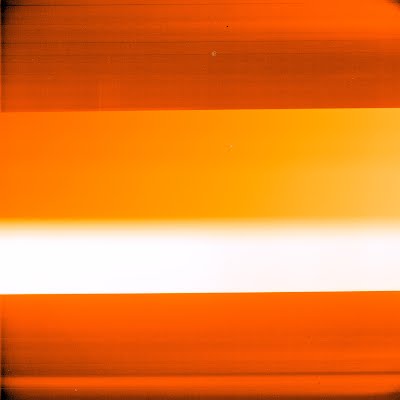
If this feature is seen noted during calibrations ask the Telescope Operator or Mountain Manager to park the probe. If the field appears vignetted during scripts with the telescope mode set to ACTIVE, ADAPTIVE, or ESM, then confirm in the OT Position editor that the guide probe footprint for the selected star does not vignette the Science FOV.
Found mask cabinet position -1
This means that the requested mask is not in LUCI. You will most often see this when a mask is re-designed after having generated the observing script. Verify the correct mask name in the Instrument GUI mask drop-down list, then Edit a copy of the script. SED works well for this:
sed -i ‘s/oldmaskname/newmaskname/g’ scriptcopy.xml
Reset the queue, load the corrected script, and Go!
Field Stop Alignment for N3.75 Imaging
Do not try to align on the N1.8 camera images! The field stop can be realigned on the N3.75 camera images using the AFC tab in the Real Time Display (last tab on the right).
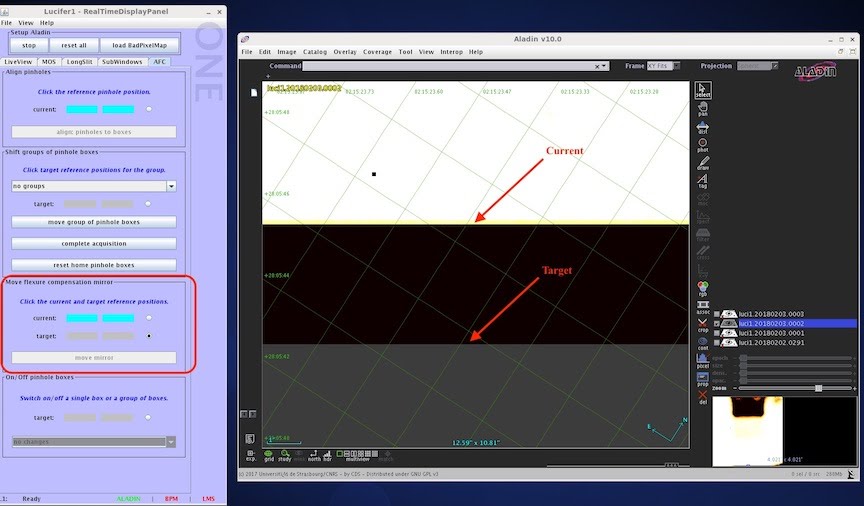
To align the FM4 mirror using this tab, go to the
- “Move flexure compensation mirror” section (highlighted in red in the figure above on the left), select “current”.
- In the Aladin Window, click on a distinguishable spot on the image (see where “current” is noted – it can also be a corner). Then select the “Target” radio button.
- In the Aladin Window, select to where you want the current spot to move.
In the example above, the mirror is offset in Y only, so one would select directly below the “current” spot (i.e make sure Y=1). Select the “Align Mirror” button to move the mirror. A pop-up window will ask you to confirm you want to do this move. Wait 20 seconds (this is to make sure the motors move – you can also verify by looking in the message log located in the Observer GUI below the “LOAD” “GO” “Reset” “refresh” “Locate” and “Other” buttons. Take a second image to confirm the move was applied. Repeat if needed.
NOTE: If move is ~10% of the field or greater, call an ISA for support.
****Alignment of the compensation mirror should be done with great care and caution.****
Field Stop Alignment for N30 camera for LUCI-AO
In the case of mis-alignment using the N30 Camera for LUCI-AO Observations, use the first section of the tab shown above labeled “Align Pinholes” – in this case you simply select the pinhole in any corner tab closest to the mask center (see image below for the bottom left corner), then click OK when asked if you are sure. Wait 20 seconds (this is to make sure the motors move – you can also verify by looking in the message log located in the Observer GUI). Take another image to confirm the alignment, repeat if needed.

PLEASE NOTE: When the N30 Camera is selected and in the FPU, a set of white boxes will be overlaid on the above image to show the default location of the pinholes (i.e. where they are supposed to be located).
Slow display or missing images in RTD
The RTD/Aladin are notified when a new image is saved on the LUCI computer and will download a local copy (to ~/.luci/readoutN) before displaying. If this transfer is interrupted, you see a corrupted filename in Aladin, or a new image is missed, you can re-download them by “sync”ing the last 3-5 images. You will then likely have to “add” them back into the RTD on the “live view” tab. It is OK to delete the existing files in the local .luci directory as they are all copies. If Aladin seems excessively slow, you can try to “stop/start” the Aladin GUI from the RTD as well as re-sync the recent files as described above.
Misc odd RTD problems (slow interaction, delays after button clicks)
Sometimes the RTD gets completely hung up, interaction with it is extremely slow, or there are extra menus or sidebars. In this case the suggestion would be to just do a complete reset of the RTD and Aladin. To do this:
- Close all currently running RTDs and Aladin windows
- In a terminal type the command: luci_reset_aladin
- Wait until the messages indicate it is done
- Restart the RTDs as needed with the command: luci_rtd 1 <or> luci_rtd 2
Exposure time negative countdown
This issue for the most part has been resolved. Although slightly negative countdowns are to be expected, if you see highly negative countdowns (over -5 seconds) contact your ISA. The negative countdown likely comes from the higher level software (readout managers) not receiving notification of the end of the exposure from the lower level software (GEIRS). Any negative countdown over -5 seconds is a symptom of this problem. To recover, the recommended procedure is:
- Insert a pause in the script where it is currently executing
- On the noVNC desktop of luci.luci.lbto.org set a short exposure time on the appropriate GEIRS control GUI (0 second LIR, will default to 2.5+… seconds)
- Click the READ button at center left
- Wait for exposure to complete and display on the GEIRS display GUI
- Resume the script by clicking “Go!”
Note that the readout status panels may come up with a gray background, sometimes with a negative countdown active. Just trigger a short readout on the RMGUI and it will clear this.
Calibration Unit (CU) fails to move in/out
Try to move it from the LUCI# IMGUI . If it still fails, notify the OSA/ISA. Sometimes the calibration unit disconnects from the controller.
Error messages in log mention problems reading/writing to the Data Dictionary (DD)
Open a telescope service GUI (open_observer luci telsvc) and click the “Reconnect to IIF” button at bottom left. Normally this will resolve this problem.
Camera Wheel Errors
Because there are FM1/FM4 mirror adjustments that are triggered on moved to/from the N30 camera and the higher level software is not aware when initializations are done on the camera wheel via the instrument GUI, the preferred recovery from camera wheel problems (as of 02/2021) is:
- – If moving TO the N30 camera:
- First: complete motion with MCU gui (do several additional +10 steps, as many as needed) and record the amount needed
- Second: init from IMGUI so the higher level SW knows where the camera is
- – If moving to N3.75 or N1.8 cameras, init from IMGUI
- – If stuck on -lim, move +50 steps on MCU gui and init from IMGUI
The camera wheels are orientation sensitive. Please note the telescope elevation and instrument rotator angles along with time and recovery steps done when reporting problems.
LUCI2: Displaced Spectra
The LUCI2 grating tilt issue is now understood, but cannot be fixed until the next time LUCI2 is opened. The problem is that the “in position” switches for the gratings (mainly G200, but has been seen with G210 and even the imaging mirror) turn on just before reaching the detent. The software interprets this as a successful reconfiguration even though the grating is out of place. When observing it is a good idea to verify this visually on the Aladin display of the first spectrum taken, see below for examples. On sky in the usual configurations of G200+N1.8 camera and either zJ or HK filters at the nominal central wavelengths, there is a prominent water absorption band between the z and J bandpasses and between the H and K bandpasses that should be reasonably centered on the N1.8 camera. For G210 you would need to use the night sky OH lines as a reference (plot in the UserManual on pages 79-80). If the spectrum is displaced, then the suggested recovery is:
- Pause script
- Have LBTO support move the grating motor +10 (G200) or -10 (G210) steps on the MCU gui
- Manually take a short exposure (20.0 sec) using RMGUI to verify position
- Resume script or jump back to the start of spectroscopy and “Go”
So far a single +10 offset has been sufficient, though you can repeat steps 2 and 3 a couple times if necessary.
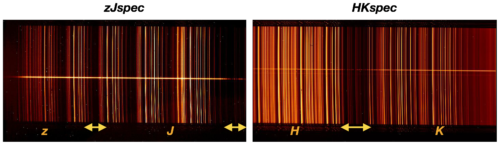
LUCI2 G200 zJ and HK spectra on sky at their nominal central wavelengths (1.17um and 1.93um). The bands are labeled, and the positions of the intra-band water absorption are indicated by the double-ended arrows. The band between z and J often shows up as a group of narrower absorption lines, though you could also match the pattern of OH lines. For G210, refer to the OH line plot in the UserManual (pages 79-80).