
PEPSI Sequence Editor
The PEPSI Iterators allow users to change the configuration of the instrument (i.e. the mechanisms and detector readout) to configure more complex observations.

Example with PEPSI Sequence Iterator
In this example we will configure PEPSI to take exposures with several cross disperser (CD) pairs:
1) We start by adding a PEPSI Sequence Iterator using the Iterator Button on the Left Sidebar. At first, we will have a completely blank PEPSI Sequence Iterator:

2) In Available Items Click on Blue Cross Disperser. A list of CDs of the blue arm of the instrument will display; the CD auto-selected will match the CD you specified in the initial instrument configuration completed in the PEPSI Instrument Element.
Pro Tip: If you change any configuration in the first line (step) of this iterator, that item will change in the PEPSI Instrument Element to reflect the new value. For instance if your initial CD was CD1 and you click on CD2 in the Sequencer, the PEPSI Instrument Element would now have CD2 as the CD selection.

3) Next, click on Blue Exposure Time (s) from the Available Items box. Again, the exposure time will be the one specified in the PEPSI Instrument Element. Change with caution.

4) Click on Blue NExpo from the Available Items box. The number of exposures will reflect the value specified in the PEPSI Instrument Element. Change with caution.

5) Click on Blue SNR from the Available Items box. This does not change anything at the instrument. Rather, it informs the observer what the desired SNR is of the exposure.

6) Repeat the above steps for the red arm of the instrument.
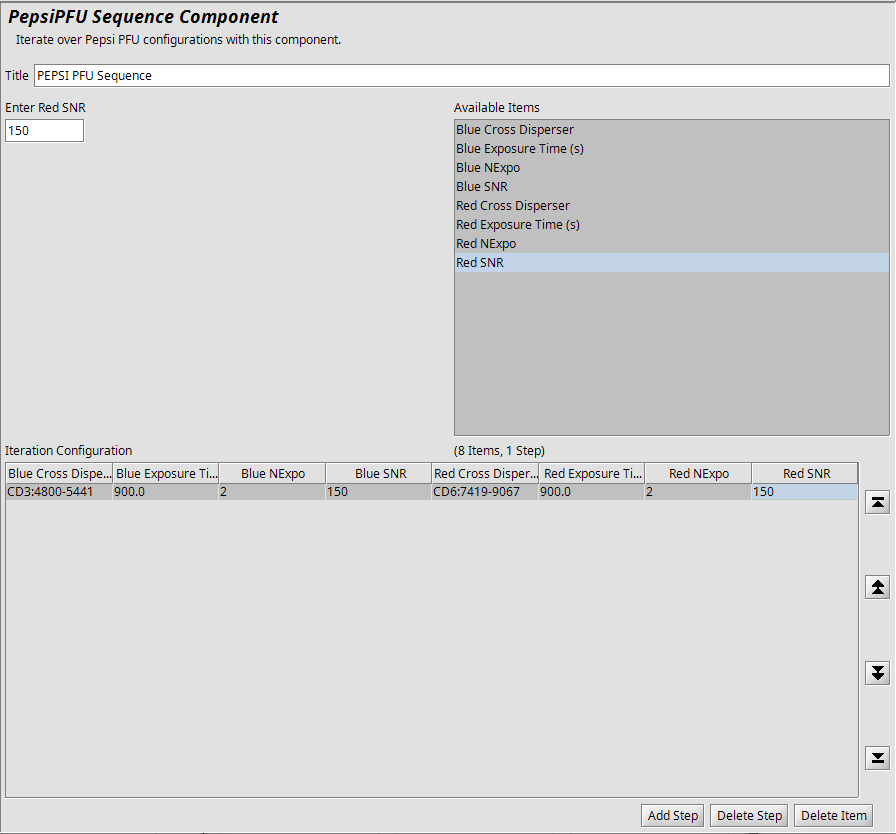
7) Now we would like to add another step to this sequence. Click on the Add Step button toward the bottom right of the Iterator. This will create an identical step to the first. Click on the Item (CD, Exposure, or Number of Exposures) in the Iteration Configuration (bottom frame) that you would like to change; in this case it is the CD of the blue arm. Once the option “Select Blue Cross Disperser” appears in the left frame, make your selection — we would like to move from CD3 to CD2, so select that option. We now have specified 2 x 900s exposures in CD3 and CD2, paired with CD6 of the red arm with the same configuration in both steps.

8) To finish this example, we will add another step, again using the Add Step button, which will create a clone of the previous step. I would like to change the red CD to CD5, the exposure time on both arms to 1200s, the number of exposures on both arms to 3, and the SNR on both arms to 100. I click on Red Cross Disperser in the bottom frame and choose CD5 from the red CD list.

We click Red Exposure Time in the bottom frame. I will see a text box appear in the upper left; this is where I should type my new value. The bottom frame is READ ONLY. The same goes for the SNR.


Finally, click on Number of Exposures and set the value in the top left text box to 3.

Now the Instrument Sequence is complete.