Left Sidebar
Within the OT, click on buttons in the science program elements toolbar to add the program elements defined in the following table. Click on the element name in the table to jump to further details below. The science program has a hierarchical structure; if an element cannot be added to the selected node, it appears grey in the toolbar (examples are given in the table).
| Element | Function |
|
 |
Observation | Add a new observation to the science program. Available only when the science program or group are selected. |
| Group | Add an observation to a new group or folder.
|
|
Note |
Add a text note to an individual observation or the entire science program. |
|
Add observing condition constraints, telescope and AGW targets or instrument configurations to an observation. Available only when an observation is selected |
||
Iterator |
Add a telescope offset (dither) sequence, a repeat loop or an instrument configuration sequence to an observation. Available only when the sequence folder or another sequence iterator are selected. | |
Observe |
Add observe command(s) to take science or calibration data. Available only when the sequence folder or a sequence iterator are selected. The Observe Class determines how observations are available in the archive |
Observation
This is the container for everything associated with an observation. Normally the observation is the smallest schedulable element and corresponds to one telescope pointing. Each new science target, PSF or other calibration star must be defined as a separate observation. Likewise, each observation in the sequence star-object-star-object… must be a separate observation. There may be many observations within one science program.
An observation must be self-contained and possess (a) a target list, (b) an instrument component (an instrument element may have to manually added to the observation element if an empty observation is selected), (c) observing conditions and (d) observe command(s). Optionally it may include telescope and instrument iterator sequences and a text note.
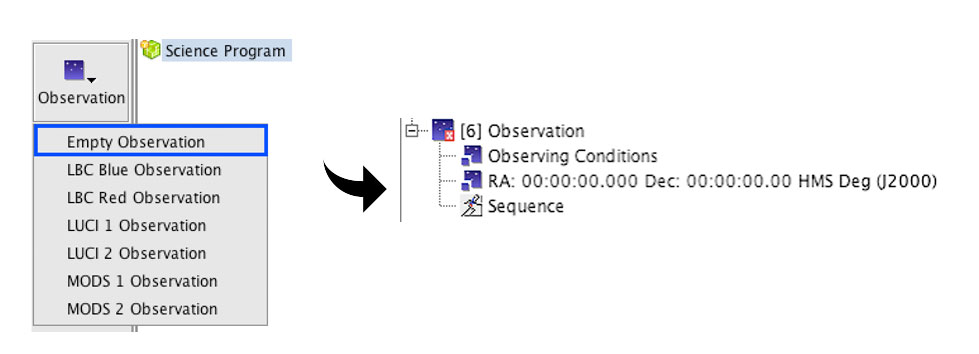
New observations from the Observation menu of the program elements toolbar are created with a default observing condition constraints component (note: all constraints are set to “Any”), an empty telescope targets component and an empty sequence folder.
The ordering of the observations in the science program does not convey any prioritization. The relative importance of individual observations within a program can be set using the low/medium/high priority flags in the detailed observation component editor.
Selecting an observation in the science program viewer opens its detailed editor.
Groups and Folders
Observations can be organized into either Scheduling Groups or Organizational Folders. These are provided to aid you in organizing all the observations in your program. We recommend using Scheduling Groups to indicate which observations will be executed sequentially and using Organizational Folders to denote Science and Calibration that are related but can be executed independently.
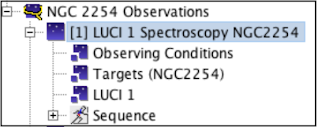
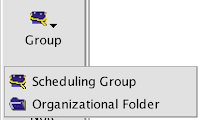
With an observation selected in the program viewer, click on the Group button to add the observation to a new group. Clicking the Group icon will reveal a menu with the options Scheduling Group and Organizational Folder (shown in the graphic above). Select the type of group that you want to create and the selected observation will become a member of this group. To change the type of group, select the top level of the group and then change the type from the Group Type menu (see below). The Group Name can also be edited from the group component.Below an example shows both a Scheduling Group and Organizational Folder. The scheduling group contains a LUCI2 observation that requires acquisition and spectroscopy of a science target and acquisition and spectroscopy of a Telluric standard. These observations must be observed sequentially and so they are in a Scheduling Group denoted by a blue icon with a yellow lasso.
Additionally the program contains a set of Calibrations (Darks, Arcs, and Flats). These are in an Organizational Folder, denoted by a blue folder icon, which keeps them organized but does not indicate when they should be observed.
Scripts (OBs) created by the OT will not necessarily preserve this information, which is why it is important for PIs to pass not only their observing scripts to service observers, but an exported xml file of their entire program.

Observations can be added to existing groups or folders in two ways: (a) select the observation and drag-and-drop it onto the group/folder element or (b) select the observation, cut (or copy) it, select the group and paste the observation. (You can use the cut, copy and paste buttons on the main toolbar, menu bar edit item, or the right-click menu).
To un-group an observation, drag-and-drop it onto the top-level science program.
You cannot manually delete (i.e. cut) a group. The group disappears when it no longer contains any observations.
Notes

A text note can be added to provide explanatory information such as the intention behind a particular offset sequence or target acquisition instructions. Notes can be added to the top-level science program, to groups and to individual observations. You can add as many notes as you like.
Selecting a note in the science program viewer opens its detailed editor. This allows you to change the name (e.g. to “acquisition instructions”) and add text.
Notes come in three flavors, regular (yellow) notes for general information and scheduling (blue) notes for any additional information related to how the program/group/observation should be scheduled. Please leave pink Planning Notes for use by Observatory Staff and Service Observers.
Components

There are three types of components that together define the base, static configuration of an observation: observing conditions, targets and instruments. A valid observation must contain one (and only one) of each. This menu allows either a target, observing conditions or instrument component to be added to an observation that does not already contain one.
Detailed description of each kind of component are in the Observing Component section of the webpages.

Observation components (described above) are used to define the base, static configuration of an observation. However, to perform any even mildly complex observation, iterators are required. Iterators are placed in the sequence node of an observation and are used to define the series of actions that will be performed to collect the data. The sequence folder is automatically created whenever a new observation is created.
There are two types of iterator available: telescope offset iterator and instrument sequence iterator. All of the iterators are optional (but extremely useful). To add an iterator select the sequence folder in the science program viewer, click on the iterator element in the toolbar and select the desired sequence type.
The only iterators available will be valid ones for the instrument already specified in your observation (i.e. if your observation is a LUCI2 observation, the telescope offset iterator will be a LUCI Offset iterator and the instrument sequence iterator will the be LUCI2 Sequence Iterator, as shown above)
The offset and instrument iterators allow you to change in a single step any configurable attributes of an item. For instance, with the LUCI iterator you can set up a series of iteration steps each of which simultaneously changes the selected filter, exposure time and number of coadds. Selecting the specified iterator in the science program viewer opens its detailed editor.
Iterators can be nested, much like nested loops in a programming language. For each step of the top-level iterator the nested iterator cycles through all of its values.
The sequence node, which serves as the root of the iterator sub-tree, has a special feature that allows you to check your work. Selecting the sequence folder in the science program viewer displays the sequence as a table and a list of actions. The sequence is re-calculated whenever you change iterators or observe elements.
More about how to build sequences is in the Sequence pages and the tutorials.
Observe

The observe elements are the only ones that actually take data. This includes (a) data on the sky, (b) bias and dark datasets (with the detector blanked off or shutter closed) and (c) flat-field and arc datasets using the facility calibration unit.
By definition, an observe element must be at the tip (leaf node) of every branch of the observation hierarchy for that branch to take any data (think of it as a “print” statement in a computer program).
Like the iterators, the only observe types available will be valid ones for the instrument already specified in your observation (i.e. if your observation is a LUCI2 observation, the observe types are object, dark, flat, and arc)
Each Observe type (normal science objects and bias, dark, flat/arc Observes) has an Observe Class associated with it. For more on Observe types and classes, look in the Observe Type webpages, under the Sequence section of the Observation Components.