OB Execution
Contents:
- Observing Procedure for the PEPSI PFU
- Observing Procedure for the PEPSI POL
- Adjusting Exposure Times
- Adjusting Active Observation
- Viewing PEPSI Data
- Taking PEPSI Calibrations
- Print PEPSI Log
- End of Night
Observing Procedure for PEPSI-PFU
- VNC into pepsi@alpha.pepsi.lbto.org:1 and ensure all software is up and running
- In the PEPSI Spectrograph Control Interface, click on LBT check button to open the PEPSI LBT GUI. This connects PEPSI to the IIF.

In the case that PEPSI has been used for solar observations during the day and you have ‘Wait for Sun’ in the PEPSI Spectrograph control interface, click Abort to be able to start the night observations. - Load the program for the night:
- If not already open, open the Observing Programmes GUI by selecting “Program” in the PEPSI Spectrograph GUI

- In the Observing Programmes GUI, open the desired dated program from the “Tables” menu. Details about OB generation can be found here on the Script Generation page.

- If not already open, open the Observing Programmes GUI by selecting “Program” in the PEPSI Spectrograph GUI
- With LBT selected in the PEPSI Spectrograph GUI, the PEPSI LBT GUI should appear in the upper left-hand side of the desktop. The spectrograph has to be engaged by selecting the “Engage” radio buttons at the bottom for the desired mirror (both should be engaged if observing binocularly). This will open the hatches for the authorized sides and enable ADC tracking.

The hatch must be opened in advance of the initial pointing checks to allow the operator to have light and align the target in position. - After the telescope is open, and pointing checks are complete, the Guider Windows can be opened. Guiding and collimation status are reported in the LBT GUI as GCS + WFS. Once the WFS error is below the acceptable threshold. This will report ok.
 The Guider windows will also provide critical feedback, showing the flux and cross profile.
 If there is ringing in the cross profile, this often suggests that the binning is too low and needs to be increased. This is adjusted through the text box in the LBT GUI and will provide feedback in the Pepsi@alpha terminal that the software was started from. Increasing the binning on one side will increase on both sides when observing binocularly. Additional notes available in the Troubleshooting section to help optimize guiding.
 - After the telescope has completed pointing and collimation, and gives permission to proceed, the Preset can be set from the PEPSI interface
- Send the OB
Highlight the desired target in the Observing Programmes GUI and send it to telescope. Sending to the telescope does not move the telescope but does reconfigure the instrument. This can be sent during an instrument readout, and should be for maximum telescope efficiency.

- Send the telescope preset and start science
- Verify the target information in the LBT GUI. Once Confirmed ok with the Telescope Operator, select Preset to send the telescope Preset

- Once the preset is complete, you will see light in the pinhole. Otherwise, a pointing check may be necessary.

- Once Guiding and Wavefront sending has converged. This is shown as GCS+WFS “OK” in the LBT GUI. It may be necessary to Optimize Guiding if conditions are marginal.
- Verify the target information in the LBT GUI. Once Confirmed ok with the Telescope Operator, select Preset to send the telescope Preset
- Optimize Guiding
- If target is too faint for guiding/wavefront sensing to converge, the Operator can adjust the filter if possible.
- An ND0 will allow for the most amount of light to pass to the guider. Adjusting one side will automatically adjust the other.

- An ND0 will allow for the most amount of light to pass to the guider. Adjusting one side will automatically adjust the other.
- If “ringing” is noted in the guider flux profile or there is insufficient flux, it may be necessary to adjust the guider binning:
- Selecting a higher binning on one side will automatically update the other side.

- Selecting a higher binning on one side will automatically update the other side.
- If the target is still too faint, a different beamsplitter may be necessary. A new preset will be needed to adjust this configuration.
- Optimal Beam splitter configurations are outlined here.
- If target is too faint for guiding/wavefront sensing to converge, the Operator can adjust the filter if possible.
- Send the OB


If one side loses guiding or requires adjustment, a monocular preset can be sent by selecting the desired side (deselecting Sync SX/DX) using the LBT GUI.
Observing Procedure for PEPSI-POL
- VNC into pepsi@alpha.pepsi.lbto.org:1 and ensure all software is up and running
- In the PEPSI Spectrograph Control Interface, click on LBT check button to open the PEPSI LBT GUI. This connects PEPSI to the IIF. In the case of Polarimetry, also select the POL button to open the corresponding POL GUIs.
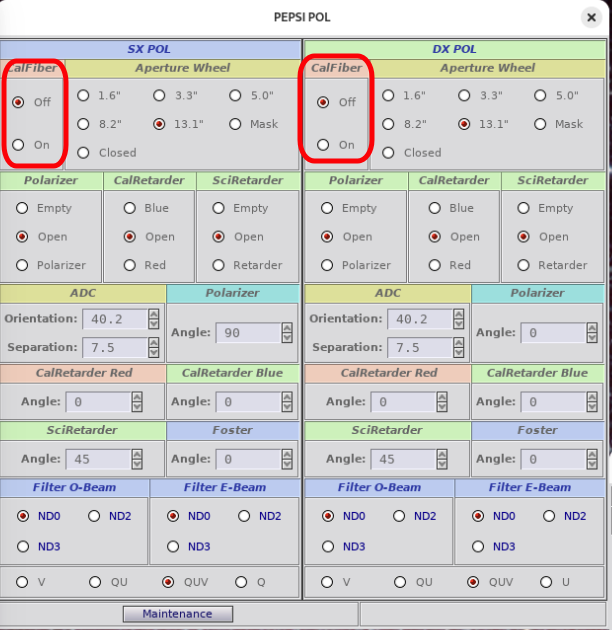
 The PEPSI POL GUI provides feedback about the current polarimeter configuration and is not interacted with unless for engineering purposes:

In the case that PEPSI has been used for solar observations during the day and you have ‘Wait for Sun’ in the PEPSI Spectrograph control interface, click Abort to be able to start the night observations. - As with the PEPSI PFU, load the program for the night:
- If not already open, open the Observing Programmes GUI by selecting “Program” in the PEPSI Spectrograph GUI
- In the Observing Programmes GUI, open the desired dated program from the “Tables” menu. Details about OB generation can be found here on the Script Generation page.
- If not already open, open the Observing Programmes GUI by selecting “Program” in the PEPSI Spectrograph GUI
- With LBT selected in the PEPSI Spectrograph GUI, the PEPSI LBT GUI should appear in the upper left-hand side of the desktop. The spectrograph has to be engaged by selecting the “Engage” radio buttons at the bottom for the desired mirror (both should be engaged if observing binocularly). This will open the hatches for the authorized sides and enable ADC tracking.

The hatch must be opened in advance of the initial pointing checks. - After the telescope is open, the Guider Windows can be opened.
- After the telescope has completed pointing and collimation, and gives permission to proceed, the Preset can be set from the PEPSI interface
- Send the OB
Highlight the desired target in the Observing Programmes GUI and send it to telescope. Sending to the telescope does not move the telescope but does reconfigure the instrument. This can be sent during an instrument readout, and should be for maximum telescope efficiency.

- Send the telescope preset and start science
- Verify the target information in the LBT GUI. Once Confirmed ok with the Telescope Operator, select Preset to send the telescope Preset
- Once the preset is complete, you should see the star somewhere in the Fiber Viewing camera, although unlikely to be aligned perfectly on the fiber. Otherwise, a pointing check may be necessary.
- Unlike the PFU, the POL has an off-axis guider. The guide star is automatically selected (Guide Star: 0 will be the brightest optimal choice). If the initially selected star is not suitable for some reason (binary, or extended source) another source can be selected in the list. The guide star list will be shown upon preset in the pepsi@alpha terminal.
- To align a target on the Pepsi pinhole, right-click on the source in the POL Fiber Viewing Camera window. This will send telescope offsets to align the source on the pinhole.
 The User can adjust the Exposure time (in microseconds) and binning. If very short exposure times are used the Lapse time may need to be increased to avoid running too fast.
 - Once aligned verify guiding is started and collimating.
Guiding and collimation status are reported in the LBT GUI as GCS + WFS. Once the WFS error is below the acceptable threshold. This will report ok.
The Guider windows will also provide critical feedback, showing the flux and cross profile.
- Once Guiding and Wavefront sending has converged. This is shown as GCS+WFS “OK” in the LBT GUI. It may be necessary to Optimize Guiding if conditions are marginal.
- Verify the target information in the LBT GUI. Once Confirmed ok with the Telescope Operator, select Preset to send the telescope Preset
- Exposures with the POL
- Each Polarimetric mode consists of 2 exposures
- Send the OB


If one side loses guiding or requires adjustment, a monocular preset can be sent by selecting the desired side (deselecting Sync SX/DX) using the LBT GUI.
Adjusting Exposure Times
This can be done one of two ways.
- If an OB is in progress, the Exposure time can be adjusted directly in the PEPSI Spectrograph Control Interface while the OB is in progress. This will update in real time for the exposure currently being taken. This has the advantage that a new preset is not required.

If in the above example the exposure time is adjusted from 30 min to 20 min, the progress bar down below will immediately update to show 9 min of 20 min (~50% complete).
Adjusting exposure times can be necessary if:- Object is saturating or not achieving the desired SNR
- Inclement weather is imminent
- To adjust for night plan, to ensure high-priority objects are reached.
- Exposure times can be adjusted before an OB is sent directly in the “Edit Observing Block” Gui for that target. Once adjusted in the “Edit Observing Block” there is no need to save (there is no save). The new updated times will be sent to the PEPSI Spectrograph Control Interface when the preset is sent.

Adjusting an Active Observation
Beyond adjusting exposure times, a user may find it useful to adjust the order of Cross Disperser settings. There is a new function to move CD settings around in the control program panel (not in OB): place mouse pointer on the exposure edit window (but do not click to edit) and press Ctrl-Up/Down arrow buttons. This will move CD setting up or down around together with the mouse pointer.
DO NOT USE THIS WHEN TAKING CALIBRATIONS.
Viewing PEPSI Data
As images are read out they are listed in the FITS Image Browser. The latest PEPSI RED and BLUE images are automatically displayed in the viewer. This viewer contains a number of tools for basic data quality assessment. Images can be added and analyzed from the “FITS Images Browser”. Double-clicking our using the “Display Selected Image Button” will send the image to the active display, not necessarily red or blue display orientations. A faint blue or red outline around the frame indicates the active frame.

To Check SNR:
- click on box – press ‘Alt’ + ‘c’ or draw with a mouse (with Macs use ‘Cmd’ in place of ‘alt’).
- Draw box across a single order to estimate S/N
- In the extracted spectra, draw a box from the max to the overscan, then hit the sun to measure the Gain/SN
- The results can be saved to the header and will be displayed in the Fits Image Browser GUI table
- Viewing Data and calculating the S/N:

To check for Saturation:
- click on box – press ‘Alt’ + ‘c’ 3 times (with Macs use ‘Cmd’ in place of ‘alt’). The first time centers a box on the full frame, the second brings up a horizontal line cut, and the third will bring up a vertical line cut
- Select the sideways sigma – extract a one-dimensional cross cut in a vertical direction – to plot the counts in the cross-cut.
- Counts should ideally be below 20K .
- Check images for saturation:

- OR a user can draw a box and compute the statistics on the pixels within it with the F6 function.
Counts should ideally be below 20K. Saturation is at 65K.
Taking PEPSI Calibrations
The taking of calibrations has been streamlined with the new function “Prepare Calibrations” opened from the Table menu on the Observing Programmes Gui, or with the function “F9”:

This function will prepare all calibration settings in ThAr, Traces, and FPE for all fibers used for the observations in the open Observing Program. This function also opens the Calibration Sequencer:

When doing calibrations, the Calibration sequencer must remain open. The CALIB button in PEPSI Spectrograph Control Interface will also launch the calibration sequencer if this is closed.
The “Prepare Calibrations” function will print to terminal how long the calibration sequence will take. It is often useful to take a set before the observing night and after. The calibration sequence will make sure combinations CD3 and CD4 are not in the same row of CD settings.
When ready click START. Cals aren’t impacted by dome lights or telescope motion, etc. Make sure the Calibration Sequencer remains open when running calibrations!

DO NOT ADJUST THE ORDER OF CD’s OR EXPOSURE TIMES WHEN TAKING CALIBATIONS. THE SPECTROGRAPH CONTROL PANEL SHOULD NOT REQUIRE INTERACTION BEYOND HITTING START.
Print PEPSI Log
Images generated are summarized in the FITS Image Browser.

- Press insert on what was observed to Mark those items.
- Select the printer to make a list. This will bring up a pop-up that will ask what columns to print.
- In the pop up there is a radio button to “Print All” or “Print Selected”, make sure the correct one is selected. Review the ticked parameters that will be printed in the summary. Select or deselect as needed (default is typically good). Print to ‘list’ which prints to a standard text file ‘list’ in the home directory. It is ok to overwrite. You can also print to a specific file name. If this is done, please remove the file after you have transferred this to your personal or partner computer.

- Copy the list to your directory from the pepsi machine. This is done by using scp from pepsi@alpha.pepsi.lbto.org:~/Downloads/LOGS/log_name.txt .
End of Night
- If you haven’t already done so take the PEPSI calibrations. This will automatically dis-engage the hatch, but make sure that “Engage” is unchecked.
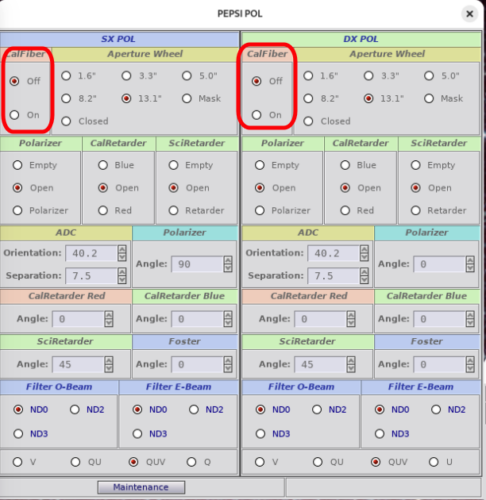
- If the PEPSI-POLs were used, turn on the Cal-fibers in the PEPSI POL interface. This closed the POL entrance and helps prevent foreign objects from falling on the entrance. This automatically happens with the start of calibrations, but unlike the PFU does not happen with reauthorization of another focal station.
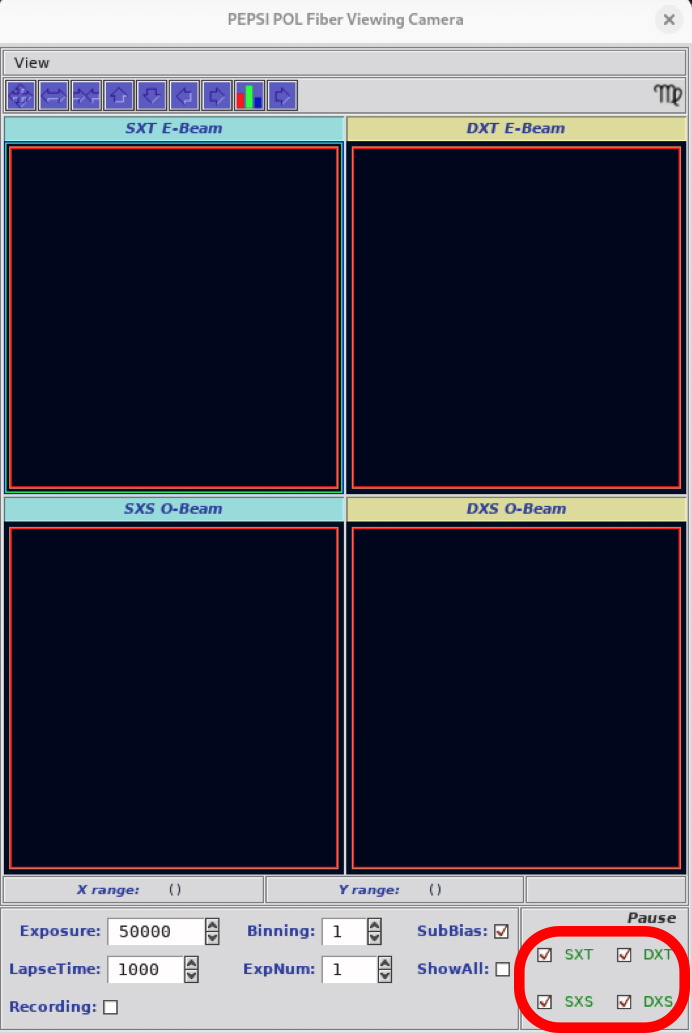
- Also for the PEPSI-POLs, don’t forget to turn off the fiber viewing camera by clicking the four pause checkboxes: