Script Generation
At this time, scripts/OB’s are prepared in advance of observing blocks by trained LBTO staff members. README files are provided in advance of an observing block. Trained LBTO staff members prepare the OB’s for future execution.
The following page may be useful for those interested in the process of script generation and for on-the-fly editing of OB’s during an observing block should that be necessary.
PEPSI includes its own instrument interface for OB generation. A PEPSI interface for the OT is planned but at the moment all generation of OB’s is completed on the PEPSI computers through these interfaces directly.
The script generation can be accessed offline on pepsi@gamma.pepsi.lbto.org or directly on pepsi@alpha.pepsi.lbto.org
Contents:
- PEPSI Scripting Interfaces
- Planning PEPSI Programs
- PEPSI OB Generation
- PEPSI Bulk Target Ingestion
- PEPSI PropIDs
PEPSI Scripting Interfaces
There are 4 Interfaces required for the generation and editing of PEPSI OB’s:
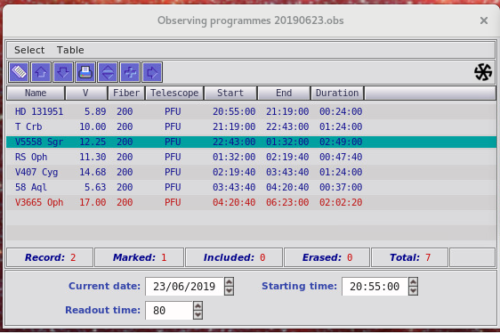
- Observing Programmes GUI
- Edit Observing Blocks
- This GUI is used to Edit the Instrument Configuration
- Opened from the “Edit Observing Blocks” button on the Observing Programs GUI (the left-most Icon at the top)
- Sets the Exposure Time, Cross Disperser, Number of Exposures, Fiber, Beam Splitter, Mirror, Guider Filter, FPE, Instrument (PFU, POL, etc), Number of Cycles, and Overhead Time (the planning nominally assumes 2 minutes of overhead per target for preset.).

- A single-line exposure line consisting of a red arm and clue arm configuration indicates the configuration to be executed at one time.
- So in the above example, the instrument will be configured with the 300 image slicer, PFU, and ND3 for the guider (a bright source). The first exposure will be 4min with CD I and CDIV simultaneously, the second will be 4 min CD II & CD V, and the third will be 4min with CD III and CD VI. The cycle of 3 will be repeated 34 times.
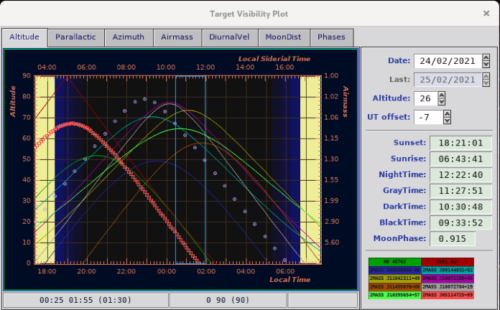
- Target Visibility GUI
- Observing Targets GUI
- The Observing target GUI is a master list of all available PEPSI targets. It is opened via the “+” icon in the top of the Observing Programmes GUI.
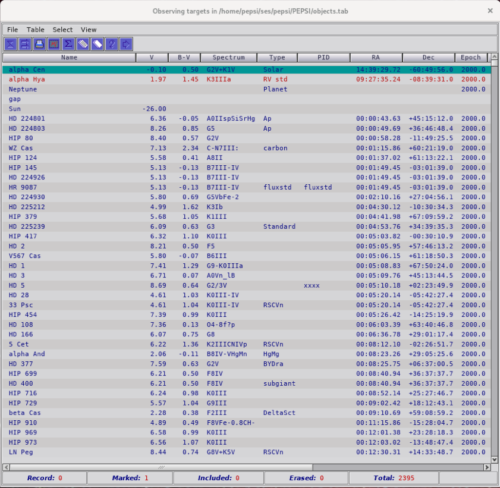
- Targets can be added, or edited (for additional information, Project ID’s, etc).
- Target searches will recognize and populate with SIMBAD-recognized ID’s.
- Targets may have a PI name Identifier (PID) associated with them. This is different from the PropID as this identifier is often used for long term (multi-semester) projects.
- When executing searches it is important to “Clear” fields between queries since the populated fields will not overwrite with blanks if the information is unknown with the next query.
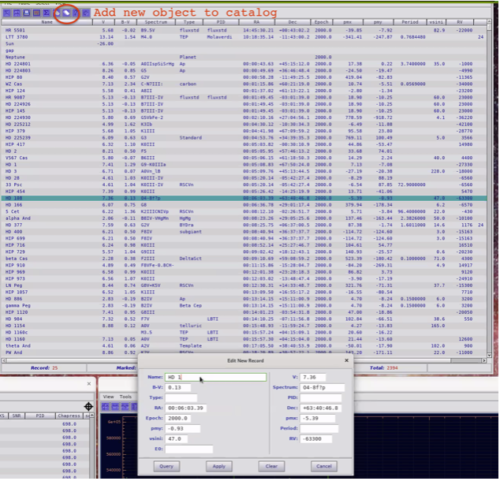
- The PEPSI ETC is also used for verification purposes, to check that requested exposure times will produce the desired SNR.
- The Observing target GUI is a master list of all available PEPSI targets. It is opened via the “+” icon in the top of the Observing Programmes GUI.
Planning PEPSI Programs
The PEPSI Readme files should contain the information necessary to generate the PEPSI OB.
It is useful to verify whether the SNR requested will be reached in the requested time. Use the PEPSI ETC to quickly verify given the target information.
The targets are added to the PEPSI database (Observing Targets GUI) according to the information provided by the PI. If a SIMBAD identifier is available, information is automatically populated from SIMBAD (such as coordinates, magnitude, proper motions, spectral type, and radial velocity if available). When preparing OB’s, the PEPSI Target Visibility GUI can be used to optimize order when possible and determine if a request for a lower elevation limit may be necessary.
A few key things to consider when generating OB’s with PEPSI:
- The filter is selected automatically according to the brightness of the target. However, it can be altered on the fly to adapt to any changing conditions (e.g. clouds).
- PFU beam splitter is selected automatically according to the brightness of the target and cross-disperser used. Optimal combinations are as follow:
Optimal configurations for Beam splitters are:Vmag Range CD I CD II CD III CD IV CD V CD VI 0-14 BS#1 BS#1 BS#1 BS#1 BS#1 BS#1 14-17 BS#2 BS#2 BS#3 BS#2 BS#2 BS#3 17-20 BS#4 BS#4 BS#5 BS#4 BS#4 BS#5 - BS1 – grey – 2% of science light reflected to guider
- BS2 – for blue – 10% of science light reflected to guider
- BS3
- BS4 – for red – 50% of science light reflected to guider
- The blue mirror is the default setting
- Red mirror can be used in a special case with 100 μm fiber
- Observations requiring good radial velocity stability may request simultaneous fabry-perot-etalon (FPE) on.
PEPSI OB Generation
- In the Observing Programmes GUI, “Open or Close” table
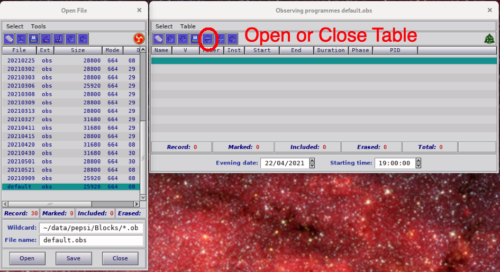
- Select the dated OB or select default.ob to open a blank template. If starting with a fresh blank template, adjust the date in the bottom of the Observing programs and then resave with the dated OB name (YYYYMMDD.obs) in the Open/Close File GUI by entering the new date in the File name and hitting “Save”. You are ready to start to edit.
- Set the Starting time at the bottom of the Observing Programmes GUI. These times are in UT. A typical start time is 40 minutes after sunset but can be dependent on the brightness of the first target.
- Bring up the Observing Targets list to add targets using the “+” in the Observing Programmes GUI. Search for Targets with the “?” or “Create a New Table Record” (the blank sheets of Paper icon) to add new targets. Targets are then sent to the OBserving Programmes GUI using the Right Facing Arrow in the Observing Targets GUI.
In the Observing Programs GUI – Open the necessary panels to edit program:

- Once a Target has been added, the Instrument Configuration should be set. Open the Edit Observing Blocks GUI
- Set the image slicer – 100, 200, or 300.
- Verify the ND filter. This is set automatically by the magnitude of the target. ND3 for the brightest of the bright, ND2 for <6mag, and ND0 for anything else.
- Select FPE “on” if requested, POL if designing for PEPSI pol otherwise PEPSI PFU.
- Select the Cross Dispersers. Remember that CD3 and CD4 cannot be observed simultaneously, but all other combinations are valid. The sequence of observation will execute each line sequentially, so the cross dispersers selected in the first line will be executed simultaneously first, then the second line, followed by the third. The cross Dispersers in each obs line can be adjusted/selected from a dropdown menu.
- Adjust the Exposure times
- Number of Exposures indicated the number of times that obs line will be executed before moving on to the next.
- Number of Cycles indicates how many times all 3 obs lines will be executed serially
- Exposure times are given in HH:MM:SS.SS (HH: Hours, MM: Minutes, SS.SS: Seconds)
- A standard overhead time of 2 minutes is allocated to each observation (lower left). For fainter objects or objects with challenging acquisitions, this maybe adjusted to ensure the overall OB remains on time. For the most part, 2 minutes is reasonable. See Overheads for additional details.
- Verify the Beam Splitter for each Cross Disperser combination
The next target to be added to the observing plan will have the same instrument configuration as the one above it. This is contrary to many observer beliefs that PEPSI remembers the instrument configurations associated with the targets themselves. You must rebuild the configuration on a target-by-target basis. In many cases, the observing configurations in a program are the same for all targets with only small changes. So it is easiest to load the first target, make the configuration adjustments to that target, then load the remaining program targets knowing the first target configuration will be copied to those targets. Adjustments can then be made on a case-by-case basis at the end.
A full printout of a night plan can be made by selecting the printer in the Observing Programmes GUI. This will print the targets and their estimated start and end times to the terminal, but not their instrument configurations so those will need to be checked manually.
PEPSI Bulk Target Ingestion
It is now possible to directly import the target list into the PEPSI software with a few clicks.
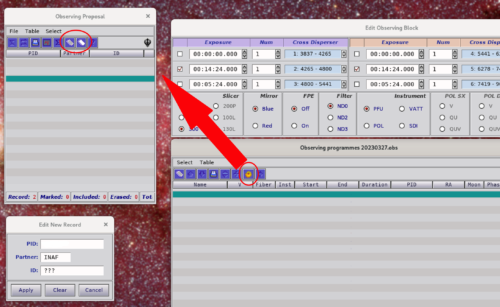
- In the Observing Programmes window open the dated obs file (green arrow in the screenshot). If this window isn’t open, it can be accessed by pressing the “Programs” button on the main PEPSI Spectrograph Control Interface.
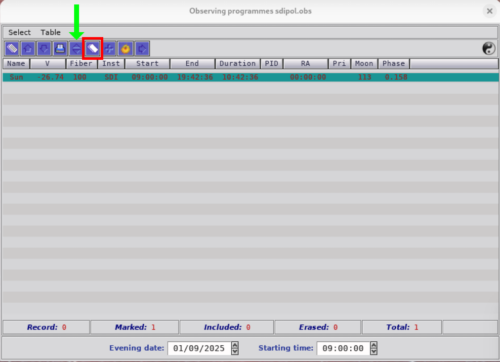
- The following window will open. Either load a preexisting *.obs file or create a new one in the “File name” field. Click open once a selection is made.
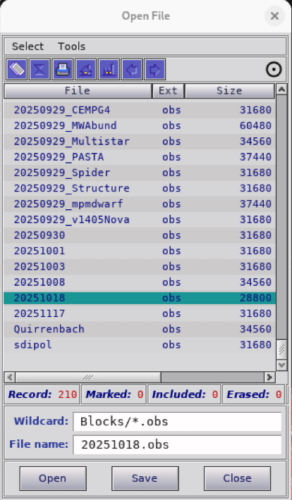
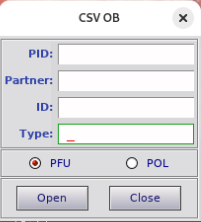
- In the Observing Programmes window, click the double white paper icon (red box). The following import window will open, which will appear with the last input information.
-
- PID: The PI’s last name
- Partner: Partner
- ID/PropID: program ID, e.g. UM-2025B-000
- Type: unofficial program shorthand name (e.g. Multistar), useful for finding e.g. flux standards. This isn’t critical but is a helpful search criteria
- Select if this is a PFU or POL target, then click Open.
- In the next window, select the uploaded readme file. The wildcard field can be used to narrow down the search results (press enter to apply wildcard filtering).
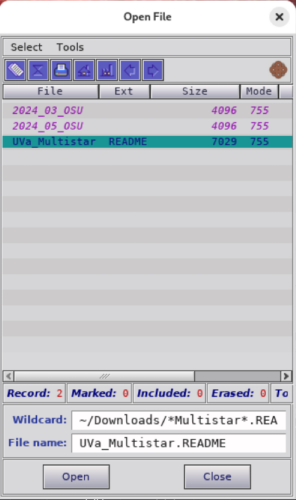
- Once ready select open. It may take a moment as the file is imported, typically ~15 sec. but can be longer. The importer is “smart” and will create a single observing block per target, and combine multiple CDs as requested while ignoring all other text. As a reminder the imported file must be comma or tab separated with 16 columns.
PEPSI PropID
Objects are entered into the Observing Targets with a PI name Identifier (PID), but for archiving purposes users should enter the PropID in the developed Observing Programme associated with each observation. This is done by clicking on the “Sun” icon in the Observing Programmes GUI.
This will bring up the Observing Proposal GUI from which the user can select the appropriate propID. The user can Add or Edit records to add prop ID’s.

