5: MOS Example
Example 5: Setting up LUCI MOS Science Observations
- Sky – Offset (x,y) to sky, Mirror in place, mask in turnout (same mask as will be used for science!)
- Source – Offset back to source, Mirror in place, mask in turnout
- Mask Image – Mask moves in to FPU, no offset
User will run alignment, once alignment is complete any offsets will be absorbed. - Source + Mask Confirmation – Mask remains in to FPU, no offset
Note that for Tellurics, they are assumed to be bright enough to require neither a sky exposure nor be used in ESM/AO mode. The Science Observation component is just as it sounds. The templates include each step and will help guide the user through the necessary elements to alter for each observation. There are separate templates for SL observations and ESM/AO observations.
Expand the “LUCI MOS Example/Templates” Folder. This Folder contains Examples and Templates for LUCI1 and LUCI2. Expand the Folder for the desired LUCI. Only twining and fraternal twinning (same base position, position angle and guide star, but different MOS masks) is available at this time for binocular Longslit/Multi-Slit observations. Set your observation up with either the LUCI1 templates (Expand the LUCI1 MOS Acquisition and Science Template Folders) or the LUCI2 templates (Expand the LUCI2 MOS Acquisition and Science Template Folders) and twin those observations when generating the scripts. Script generation is described more here.
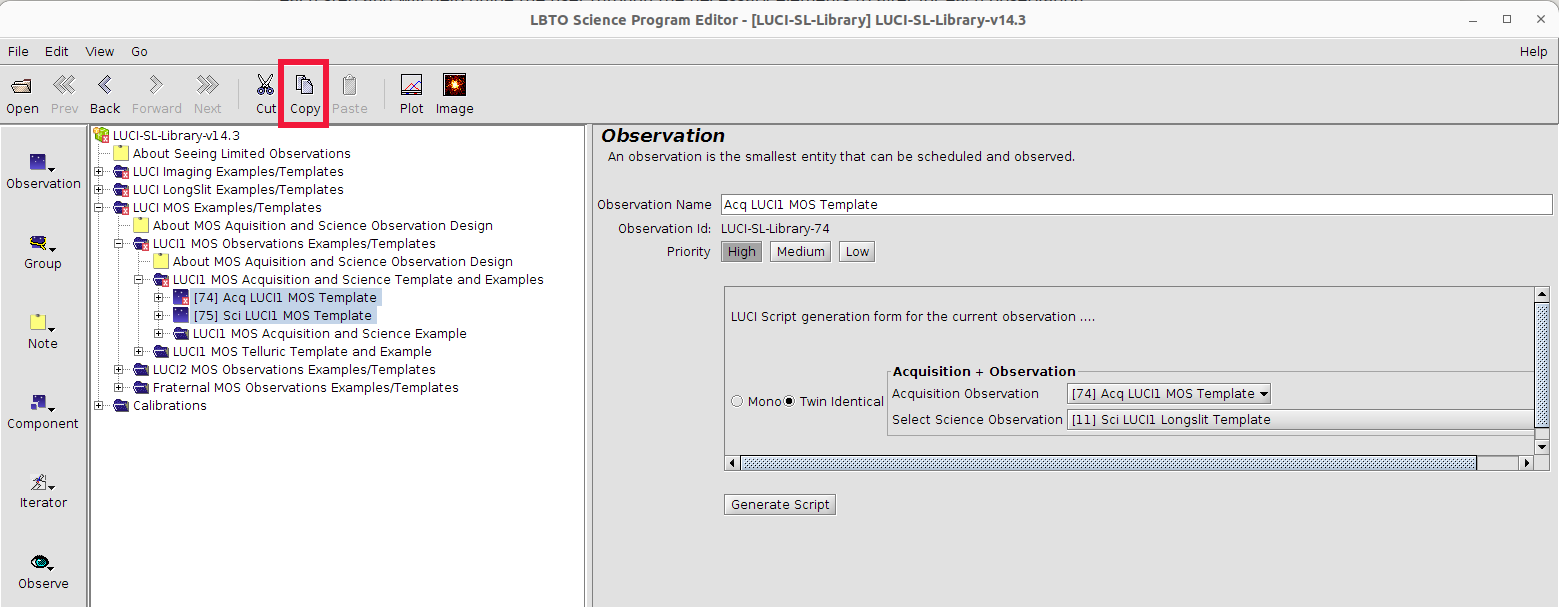
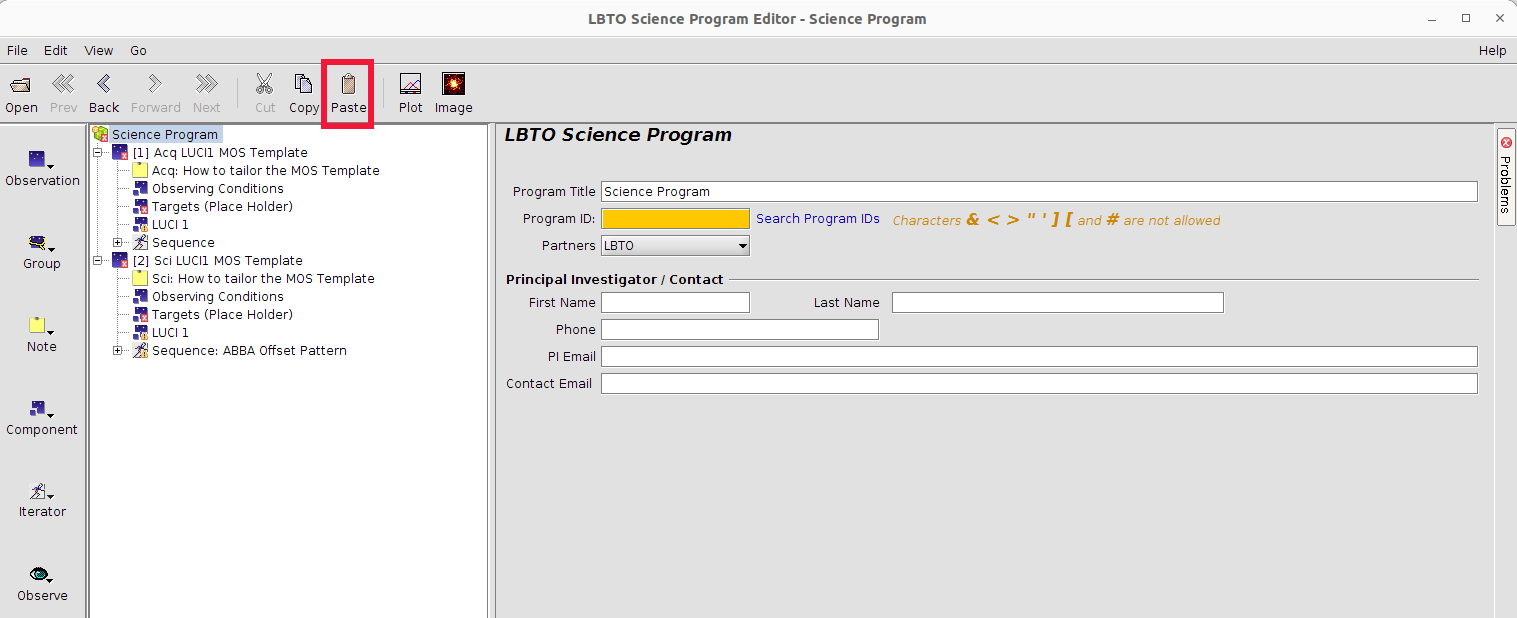
Highlight the MOS Acquisition and Science Observation Templates and then click COPY in the Main Toolbar.
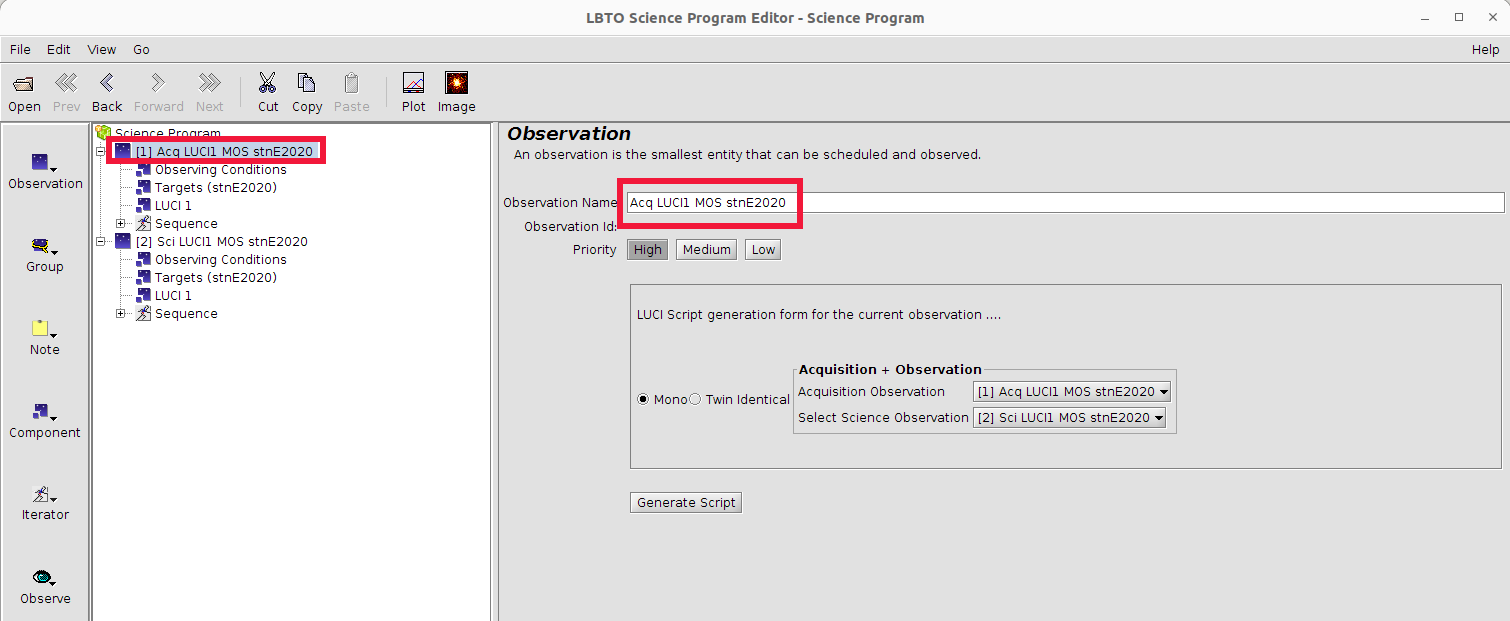
- Observation Element: Change the Observation Name in the Acquisition and Science Observation from the generic template name to something descriptive. This can help observers easily identify observations in the OT Science Program if multiple observations are provided, and will help with script generation.
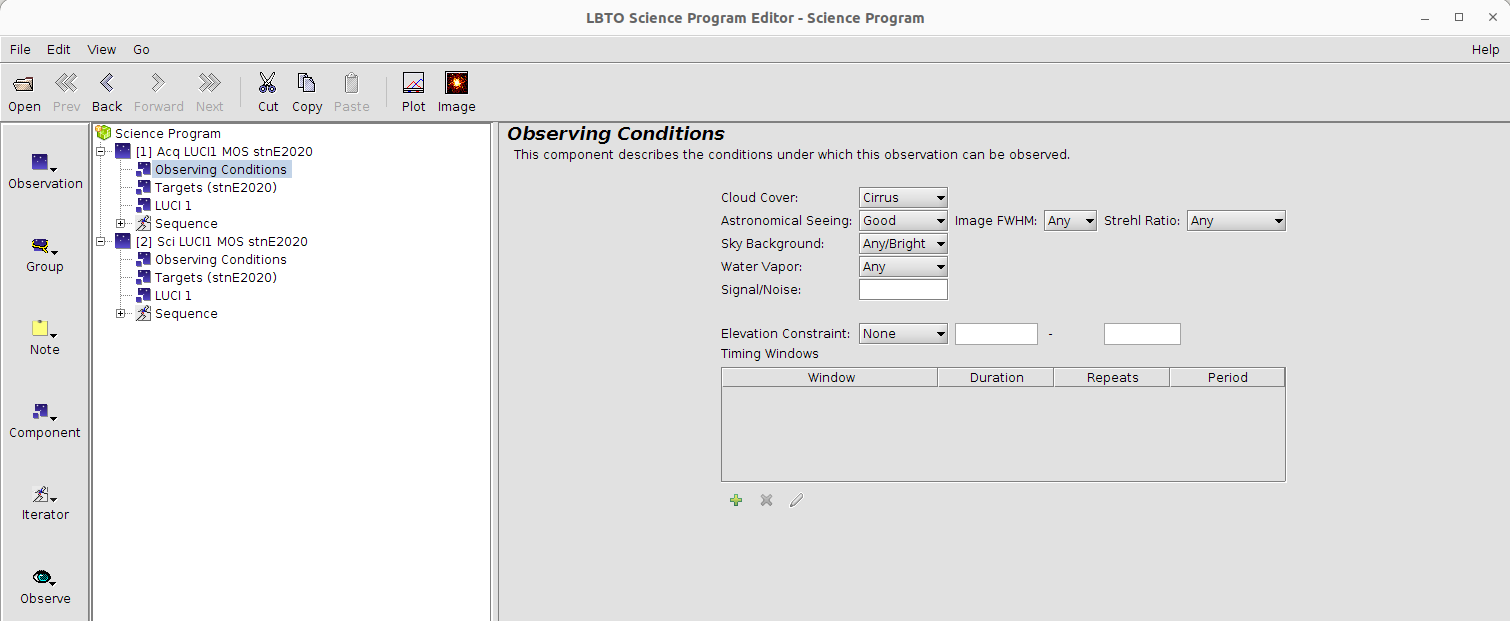
- Observing Condition Element: Complete the information in the Observation Conditions Element by selecting the nodes that roughly align with what was requested in your TAC proposal. These conditions are not guaranteed conditions in 2016B and are not passed to the script in any way. Since Observing conditions information is not passed along in the Observing Scripts, it is important to not only pass along your complete scripts but this complete OT Program as well to LBTO and the Partner Coordinator. Details for exporting the OT are available here.
Copy and paste the Observing Conditions Element between the Acquisition and Science Observations for consistency. To do this, with the Observing Conditions Element selected in the Acquisition Observation select COPY in the Main Toolbar. Select the Observation Element of the complimentary Science LUCI observation and select PASTE from the Main Toolbar.
-
Skip over the Target Element in the tree. This will be populated when the mask LMS file is uploaded.
- LUCI Instrument Element: This element will define the initial configuration of the instrument. The LUCI Instrument Elements in the OT have many configurable components, included mechanisms and detector settings. There are slight differences between LUCI1 and LUCI2 cameras, gratings, and permanent masks that may prevent twinning. See the LUCI User’s Manual for a full description of available mechanisms and modes for both LUCI1 and LUCI2.
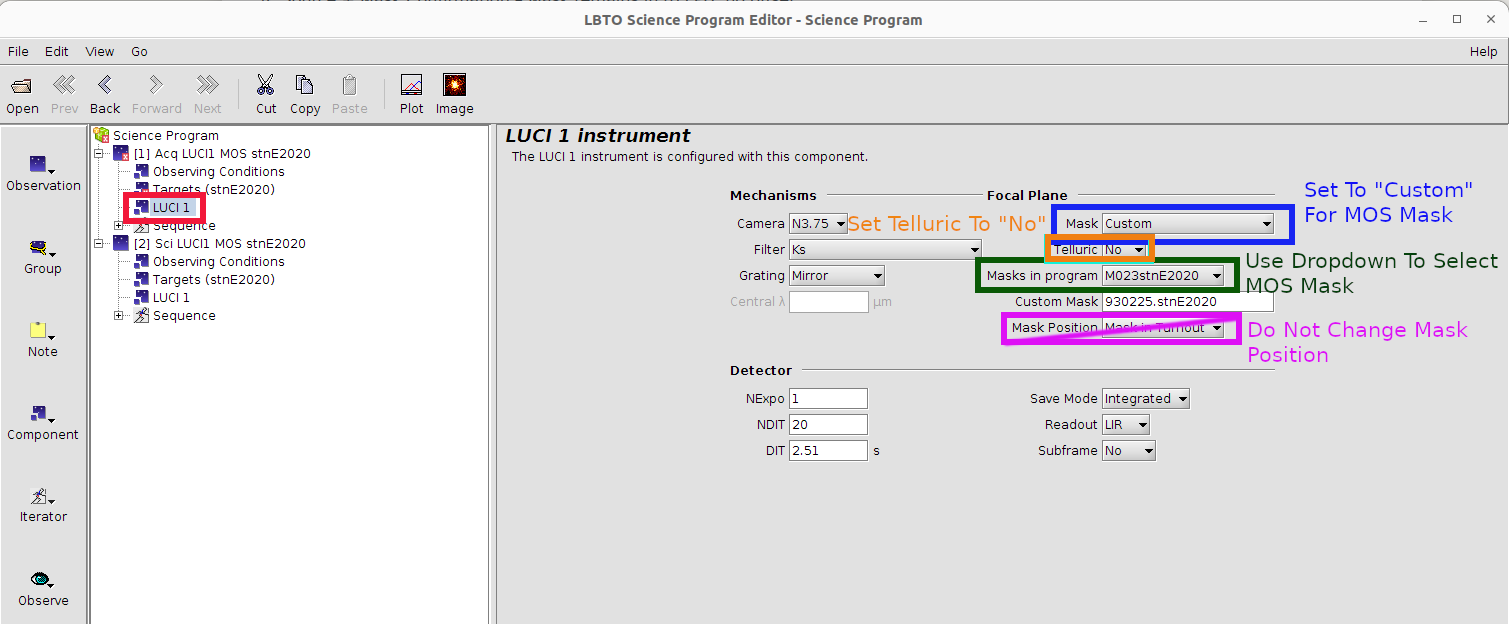
Adjust the filter, (possibly the camera and grating if defaults are not desired), DIT, NDIT, Nexp, save mode, read mode to desired values of the initial observation (note that for AO observations, the N30 camera is used). Particular disperser settings will have standard default camera settings associated with them. For example, when the G200 is in place the camera will default to the N1.8. Adjust only if science goals require. Note that for acquisitions, the mask position will always start as “Mask in Turnout” so that the Sky and Source Images can be taken first, and for Science the mask is set to “Mask to FPU”. DO NOT CHANGE THE MASK POSITIONS.
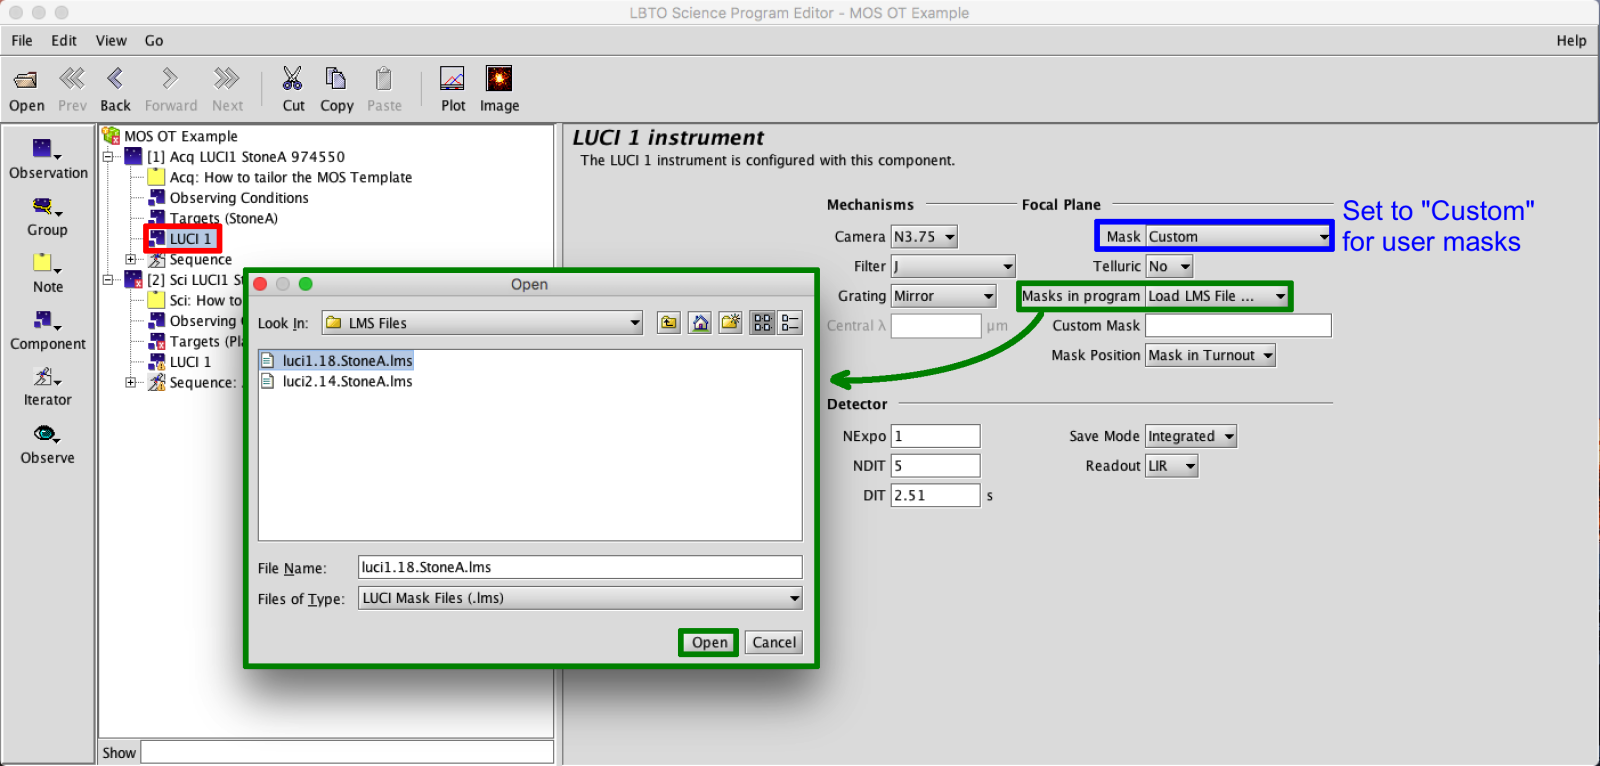
This is where the LMS file will be uploaded. Click on “—Select Masks—“. If the mask has not been previously loaded in the science program and selecting your LMS file, load the LMS File for the Custom mask by clicking the Load LMS File from the drop down menu. Otherwise the mask will appear in the dropdown menu, just select it.
Once a mask is selected, assuming the MOS Telluric dropdown is set to “No” as it should be for this template, there will be a prompt notifying the user that target information will be over written.
Upon hitting “continue” the Target Element will be populated with target and guide star information from the LMS file.
- Sequence Element:
- Acquisition Sequence:
NOTHING SHOULD NEED TO BE CHANGED IN THE LUCI ACQUISITION SEQUENCE. Below will describe the sequence, for completeness, but no action needs to be taken. This sequence can be broken in to two iterator groups:
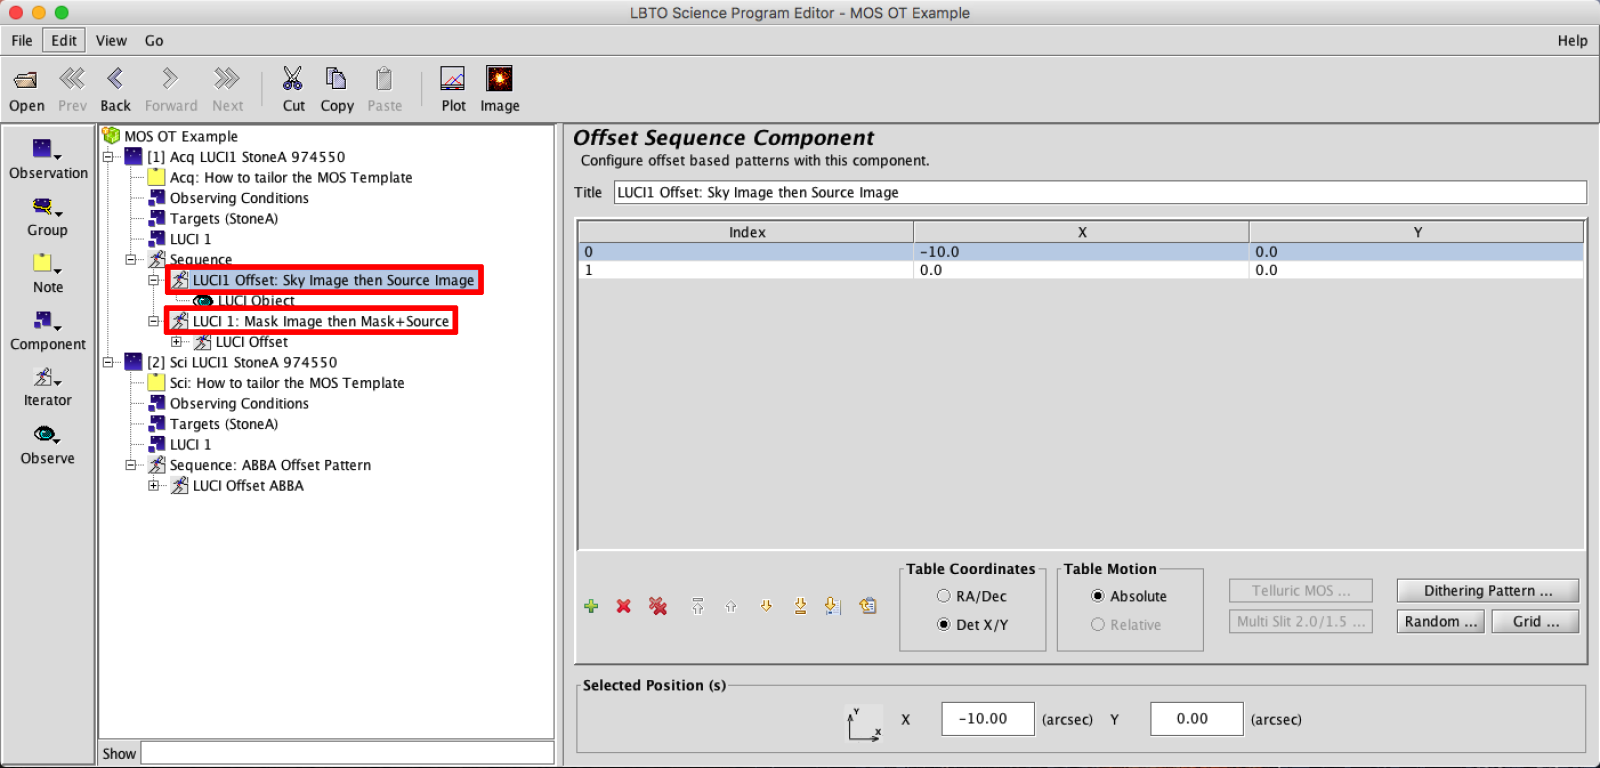
- the sky and source images (Mask in Turnout). The filter, DIT, NDIT, etc, were all defined in the LUCI Instrument Element. You can alter the Sky offset, which is defaulted to (-10,0) in det XY if you suspect an offset that may provide an ambiguous result.
- the slit and slit+source confirmation image (Mask to FPU). The filter, DIT, NDIT, etc, were all defined in the LUCI Instrument Element. NOTHING SHOULD BE CHANGED IN THIS LUCI SEQUENCE ITERATOR.
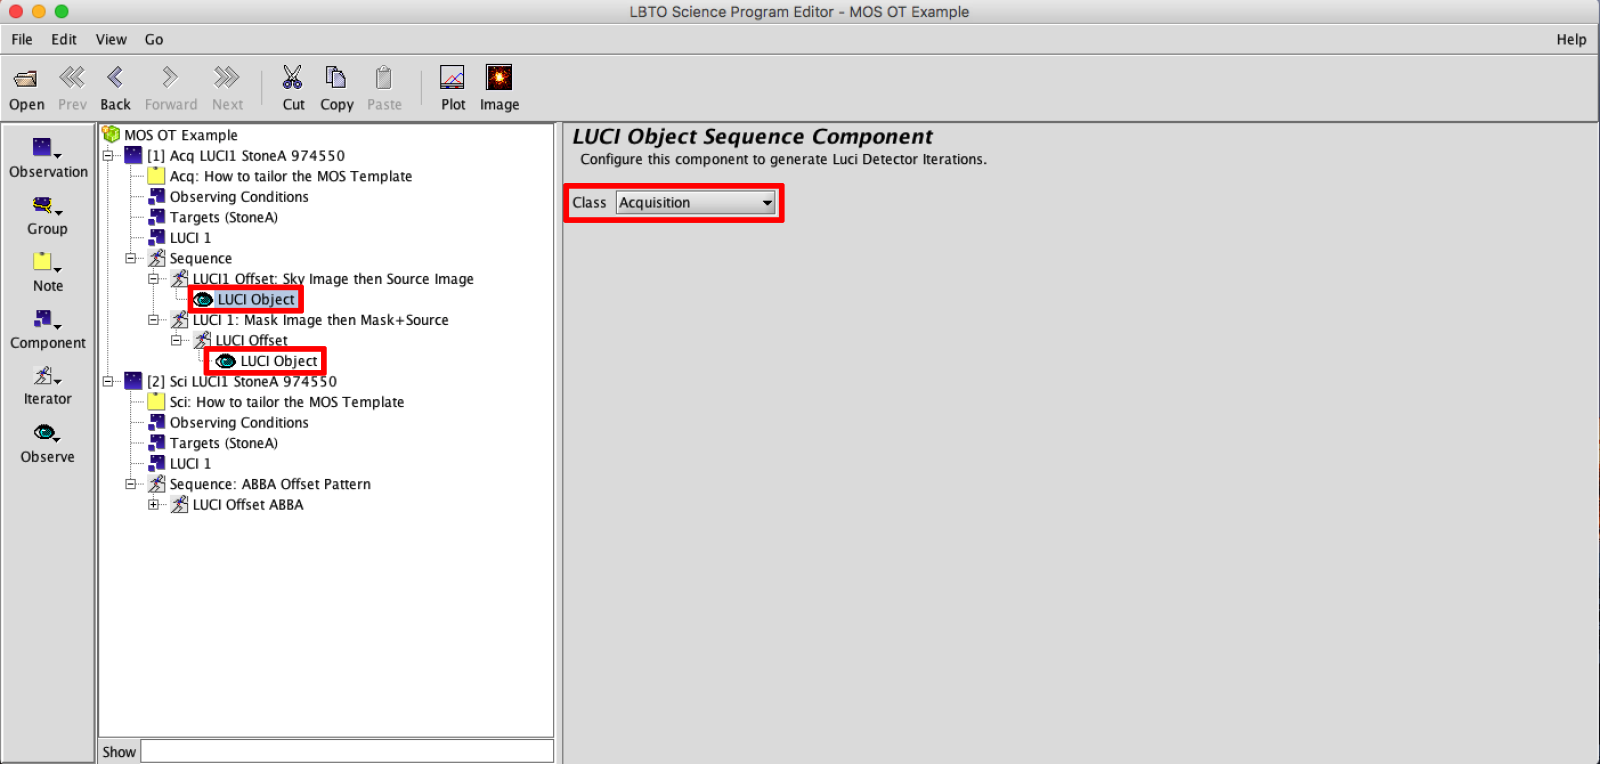
- For Acquisition Observations the Observe Type will always be set to LUCI Object, Class Acquisition.
- the sky and source images (Mask in Turnout). The filter, DIT, NDIT, etc, were all defined in the LUCI Instrument Element. You can alter the Sky offset, which is defaulted to (-10,0) in det XY if you suspect an offset that may provide an ambiguous result.
- Science Sequence: The LUCI long-slit sequence is composed of 2 -3 iterators: possibly a LUCI Sequence Iterator, a LUCI Offset Iterator, and Observe Type. Instrument Changes are not always performed, so a LUCI Sequence Iterator is not always present, but an LUCI Offset Iterator and Observe Type will always be nested in the Sequence.
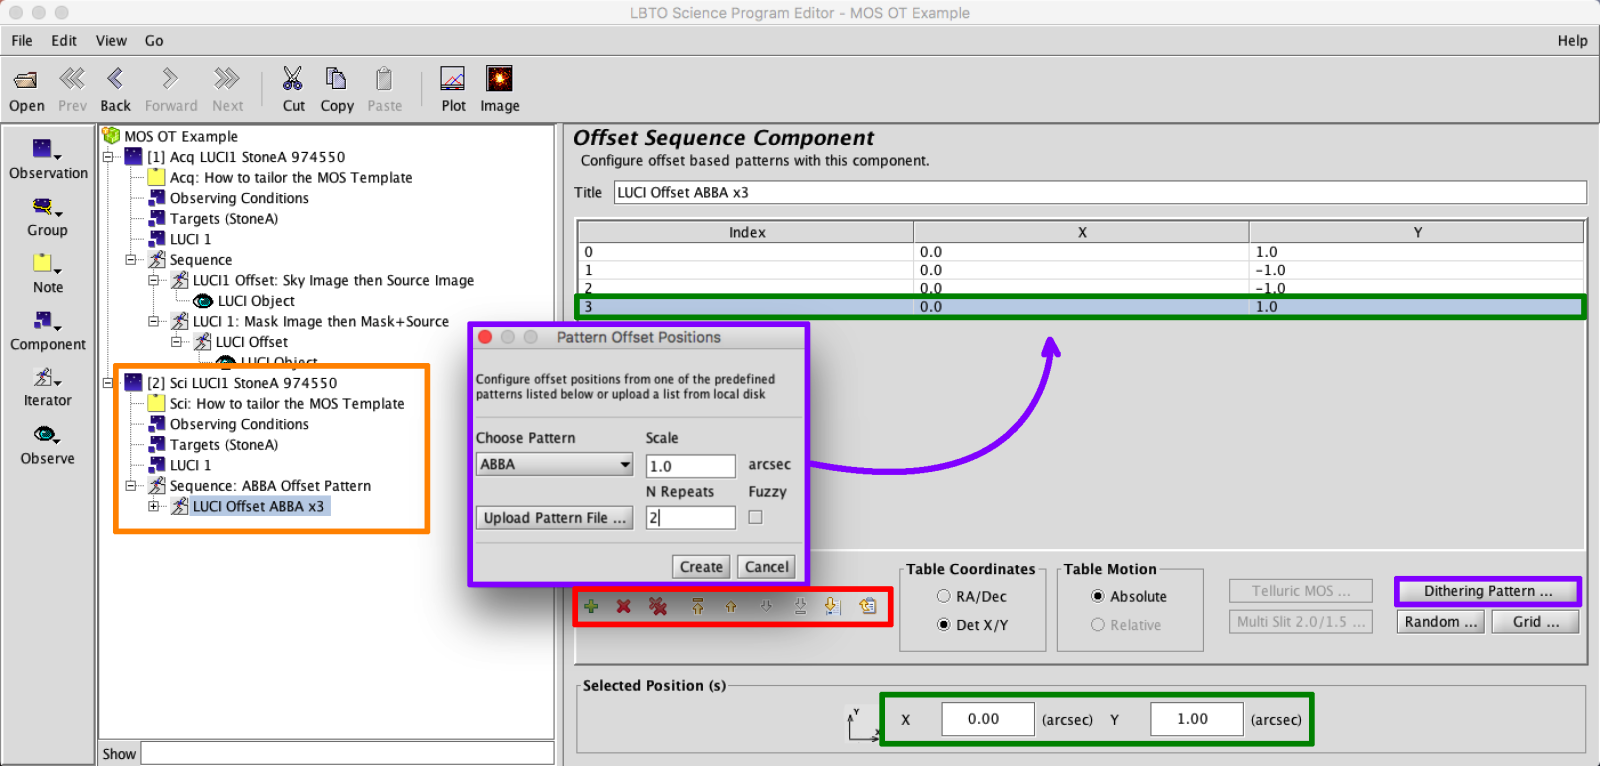
- Edit LUCI Offset Iterator: The templates come with a single ABBA offset pattern. Use the Iterator Action Items (in red box above) to add, remove, or move offset positions. Add dither patterns using the Pattern Generators, such as the ABBA shown below (purple), or upload a list from a local disk. Offsets can be adjusted by selecting the desired offset in the table, then entering the new value in the Selected Position(s) field at the bottom (green).
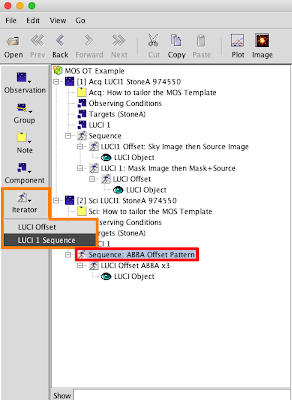
- Add/Edit LUCI Sequence Iterator: A sequence iterator is not present for all templates. To add an an instrument sequence iterator, add the LUCI Sequence to the Sequence by clicking the Iterator Button in the Left SideBar and selecting LUCI N Sequence from the menu.
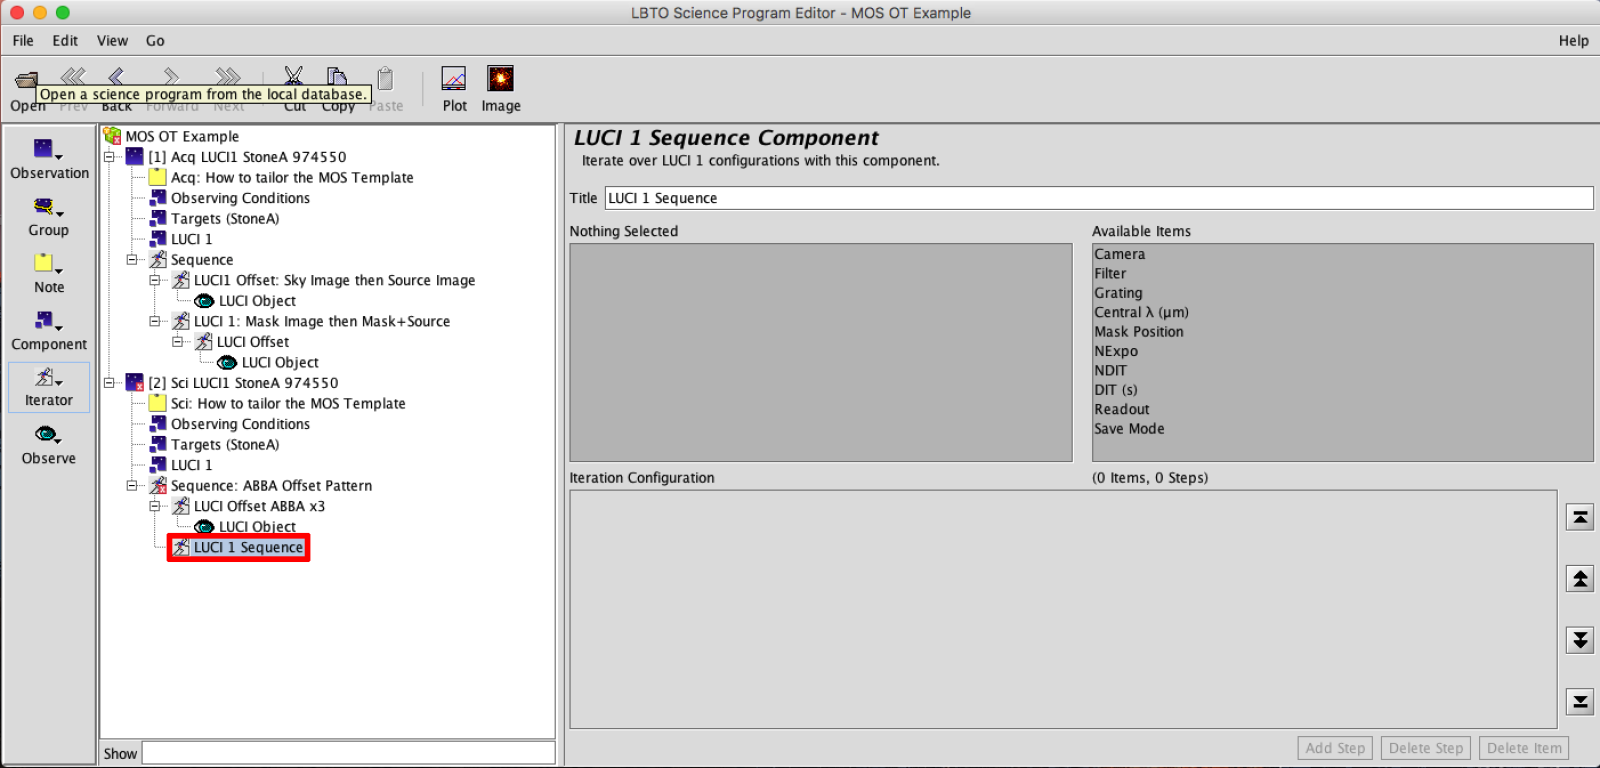
A blank LUCI Sequence Iterator will appear.
Edit the sequence of filters, DITs, NDITs, Nexp, readmodes, and savemodes in the LUCI Sequence Iterator. The item values default to those set in the LUCI Instrument Element if not changed in the LUCI Sequence Iterator. For example, if the number of exposures is set to 4 in the LUCI Instrument Element, it will be set to 4 for all filter and NDIT x DIT combinations unless explicitly changed, even if the number of exposure item is not made visible in the Instrument configuration.

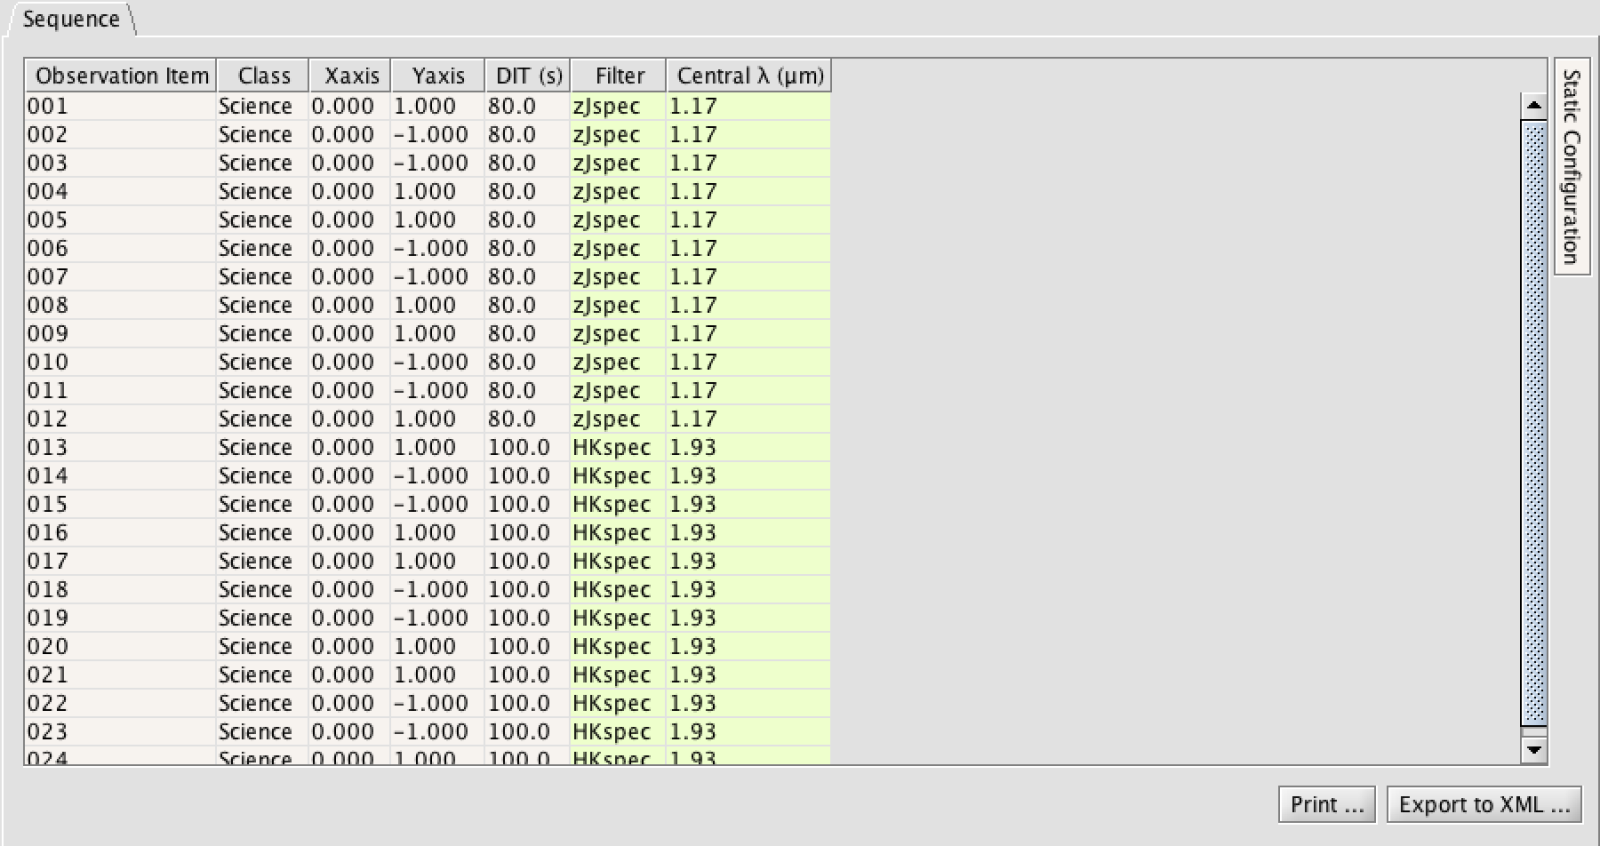
The order of the elements in the sequence can be adjusted by selecting the elements and dragging them. Rearrange the order of the Iterators in the sequence to always place the LUCI Sequence Iterator higher in the tree than the LUCI Offset Iterator, so that a complete dither pattern is completed in each instrument configuration before changing the instrument configuration.
- Observe Type: For Science Observations this will always be set to LUCI Object, Class Science. LUCI MOS Tellurics where the Object Class may be set to Telluric will be built slightly differently. Please see the MOS Telluric Example for details.
- Acquisition Sequence:

