2: Long-Slit Example
Example 2: Setting up LUCI Long-Slit Observations
LUCI Spectroscopic Observations can be done in Seeing-Limited (SL), Enhanced-Seeing (ESM), or AO mode. They are composed of 2 parts: Acquisition and Science Observations. The Science Acquisition Observations are built as follows:
- Sky – Offset (x,y) to sky, Mirror in place, mask in turnout (same mask as will be used for science!)
- Source – Offset back to source, Mirror in place, mask in turnout
- Slit – Mask moves in to FPU, no offset
User will run alignment, once alignment is complete any offsets will be absorbed. - Source + Slit Confirmation – Mask remains in to FPU, no offset
Note that for Tellurics, they are assumed to be bright enough to require neither a sky exposure nor be used in ESM/AO mode. The Science Observation component is just as it sounds. The templates include each step and will help guide the user through the necessary elements to alter for each observation. There are separate templates for SL observations and ESM/AO observations.
Expand the LUCI Longslit/Templates Folder. This Folder contains Examples and Templates for LUCI1 and LUCI2. Expand the Folder for the desired LUCI. Only twining and fraternal twinning (same base position, position angle and guide star, but different MOS masks) is available at this time for binocular Longslit/Multi-Slit observations. Set your observation up with either the LUCI1 templates (expanding the LUCI1 Folder) or the LUCI2 templates (expanding the LUCI2 Folder) and twin that observation when generating the script. Script generation is described more here.
Highlight the desired Acquisition and Science Observation Templates and then click COPY in the Main Toolbar.

- Observation Element: Change the Observation Name in the Acquisition and Science Observation from the generic template name to something descriptive. This can help observers easily identify observations in the OT Science Program if multiple observations are provided, and will help with script generation.
- Observing Condition Element: Complete the information in the Observation Conditions Element by selecting the nodes that roughly align with what was requested in your TAC proposal. These conditions are not guaranteed conditions and are not passed to the script in any way. Since Observing conditions information is not passed along in the Observing Scripts, it is important to not only pass along your complete scripts but this complete OT Program as well to LBTO and the Partner Coordinator. Details for exporting the OT are available here.
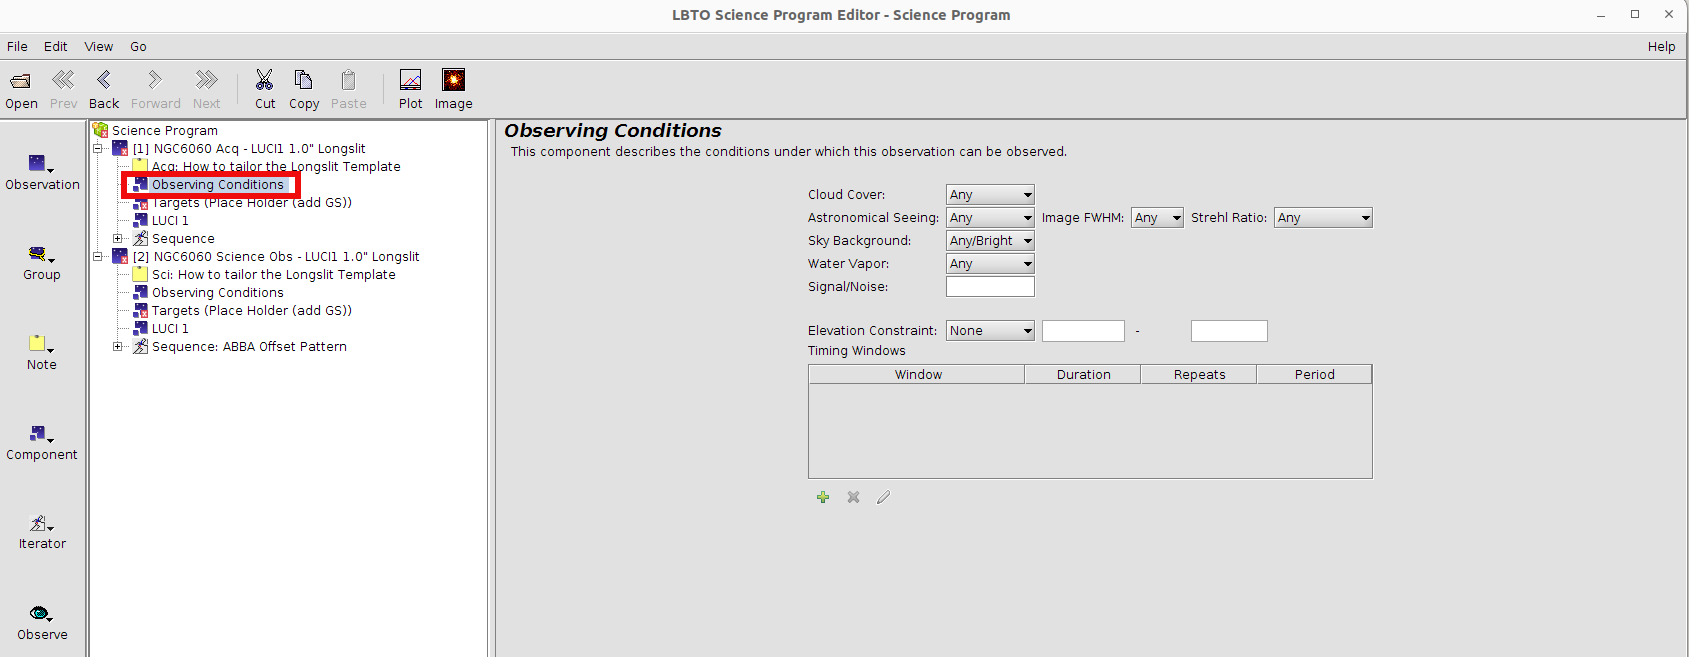
Copy and paste the Observing Conditions Element between the Acquisition and Science Observations for consistency. To do this, with the Observing Conditions Element selected in the Acquisition Observation select COPY in the Main Toolbar. Select the Observation Element of the complimentary Science LUCI observation and select PASTE from the Main Toolbar.
- Target Element: Enter Target. One can enter a valid SIMBAD Target Name and hit enter. If recognized, the coordinate field, magnitudes, and proper motion will populate. Or one can manually type in the Target Name, Coordinates, Brightnesses, and Proper Motion. In the Target Element the user can adjust the Position Angle and Telescope Mode of the observation. For SL observations, the Telescope Mode should be Active, for ESM it should be ESM, and for AO it should be Adaptive.
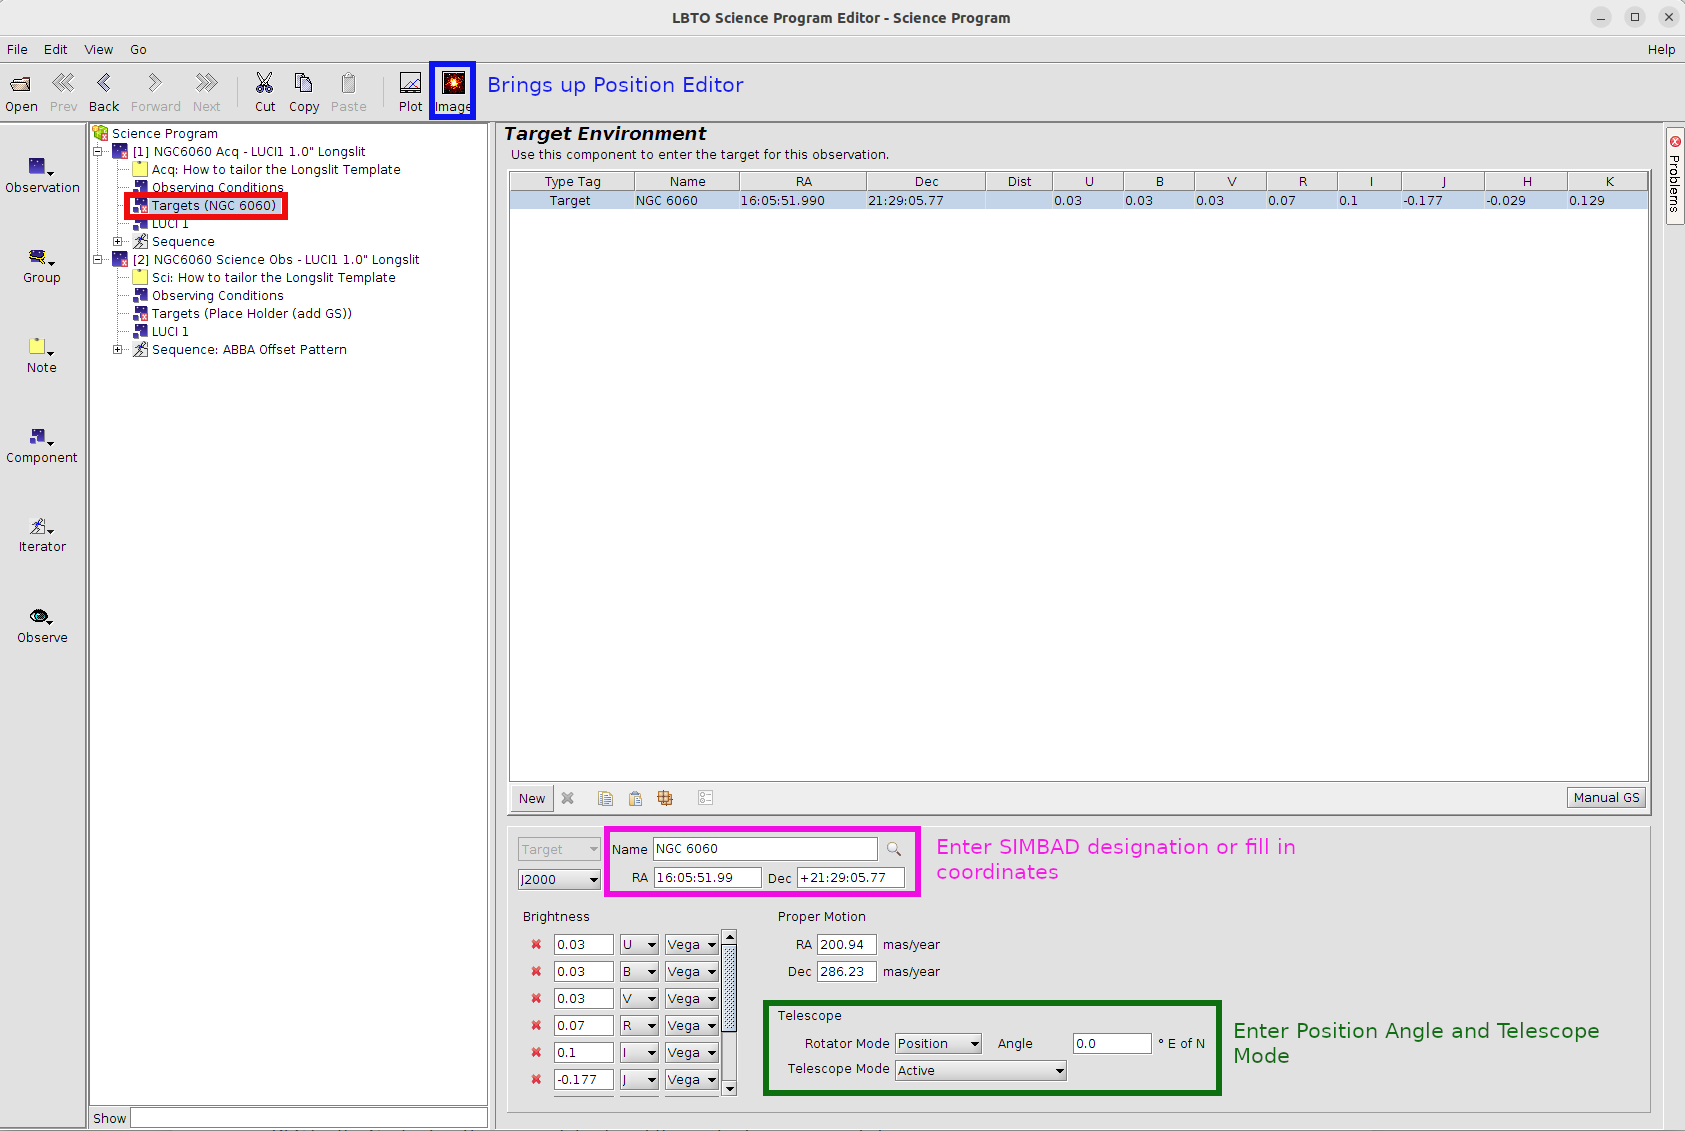
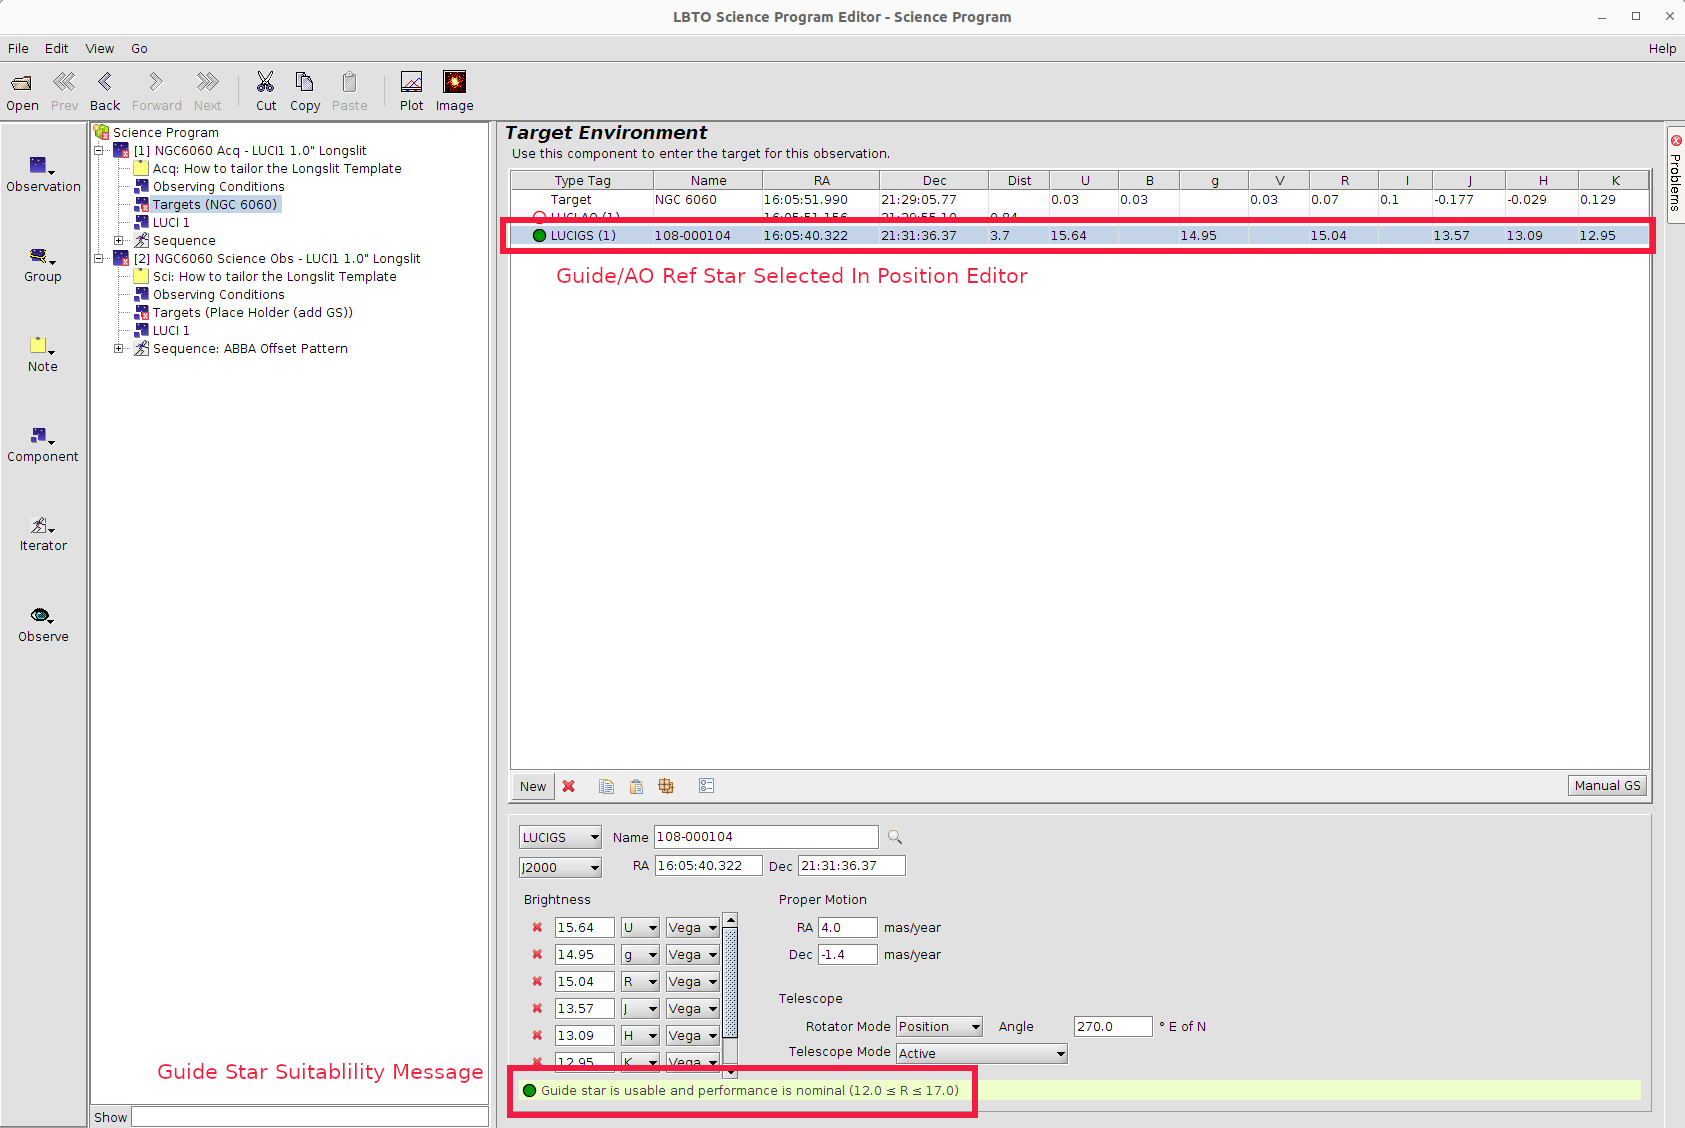
Click on the Image button in the Main Toolbar to bring up the Position Editor. The Position Editor will allow you to visualize the Target, as well as the the Guide Patrol Field, AO Patrol Field (for ESM/AO) and Mask if one is in place. This can be used to select a guide star (SL) and AO reference star (ESM/AO). Details about guide/AO ref star selection can be found here. Any Offset pattern will also be overlaid. To bring up a default Catalog Image in the Position Editor, click on Image in the Toolbar in the Position Editor.
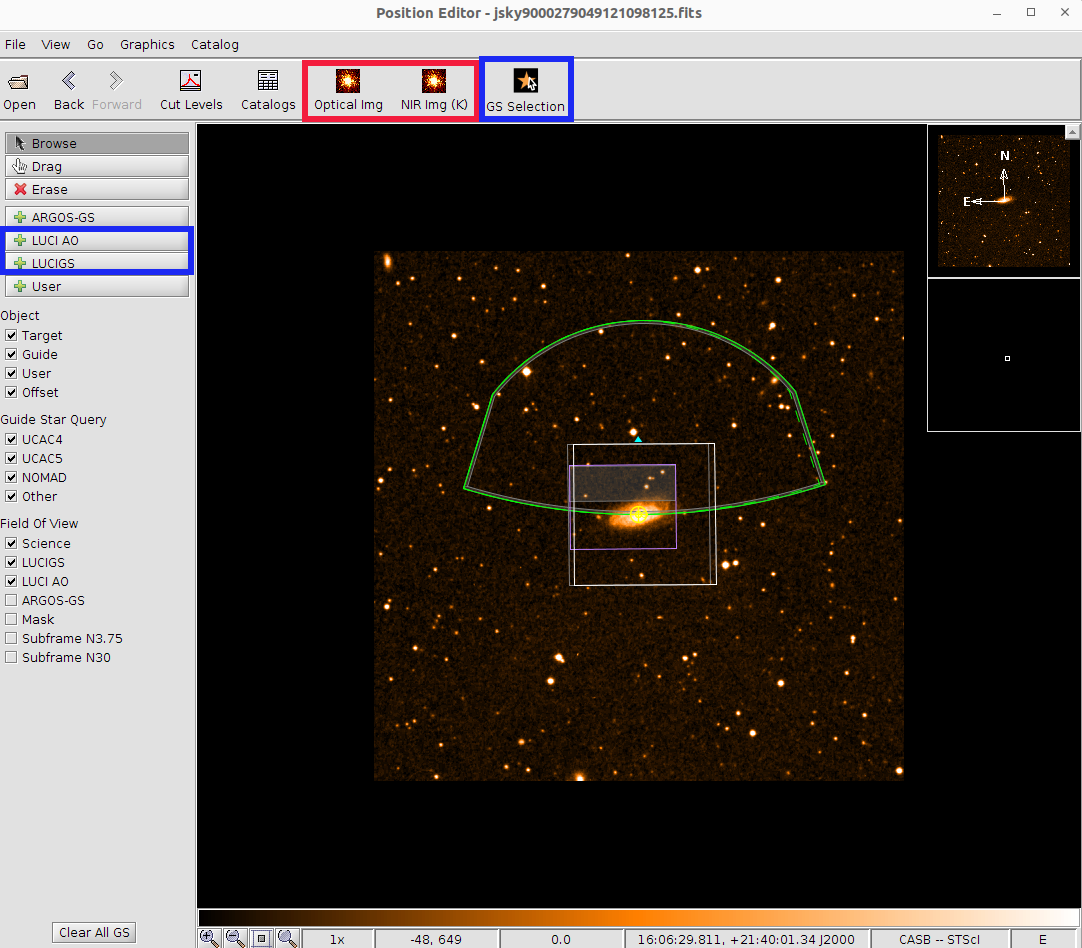
Select the desired elements in Field of View area to see their respective overlays.
- Obtain a Guide Star. This can be done 2 ways.
- With Target Element: Select New in the Target Element. In the drop down menu, select LUCIGS (LUCI AO for an ESM/AO ref star) to create a new guide star element in the Target Environment. You will need to manually enter a valid SIMBAD designation or the RA DEC for the Guide star. This is a useful option if the guide star is previously known.
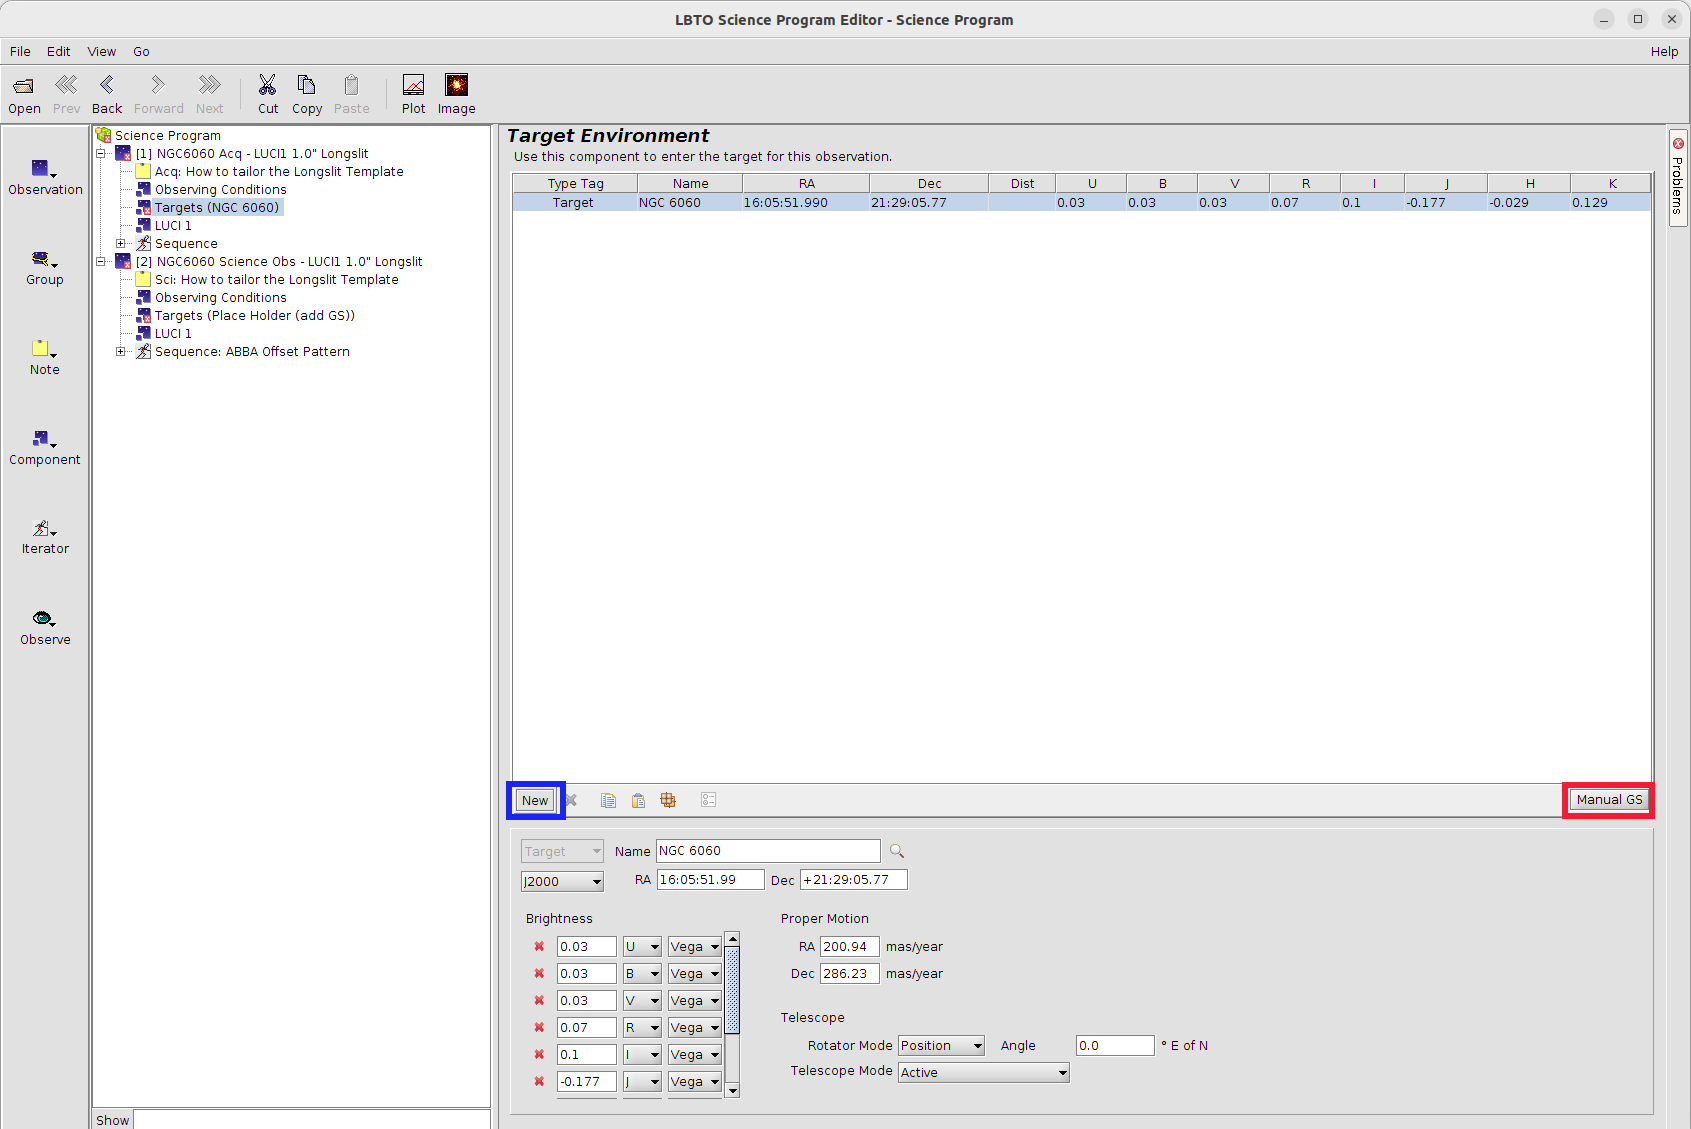
- With Position Editor: Click the Manual GS button on the right of the Target Element. This will bring up the Position Element with a popup. In the popup you can select either the NOMAD, UCAC4, UCAC5, and Gaia catalog for your Guide Star options as well as the guide star type depending on the desired LUCI Observation mode.

Once you select ok, the catalog will be queried and the catalog stars will be highlighted in the Position Editor (green for NOMAD and turquoise for UCAC4/5 and Gaia). Select the +LUCIGS (+LUCI AO) option on the Left Sidebar then click on guide stars that fall within the FOV (overlay outline green for Guide Field probe, purple for AO Field probe). You will see an overlay of the physical probe footprint appear over the selected guide stars. This will allow you to see any vignetted area. You may find it better/necessary to reorient to obtain a suitable guide star.

The selected stars will populate in the Target Element.
The LUCI Instrument Elements in the OT have many configurable components, included mechanisms and detector settings. There are slight differences between LUCI1 and LUCI2 cameras, gratings, and permanent masks that may prevent twinning. See the LUCI User’s Manual for a full description of available mechanisms and modes for both LUCI1 and LUCI2.
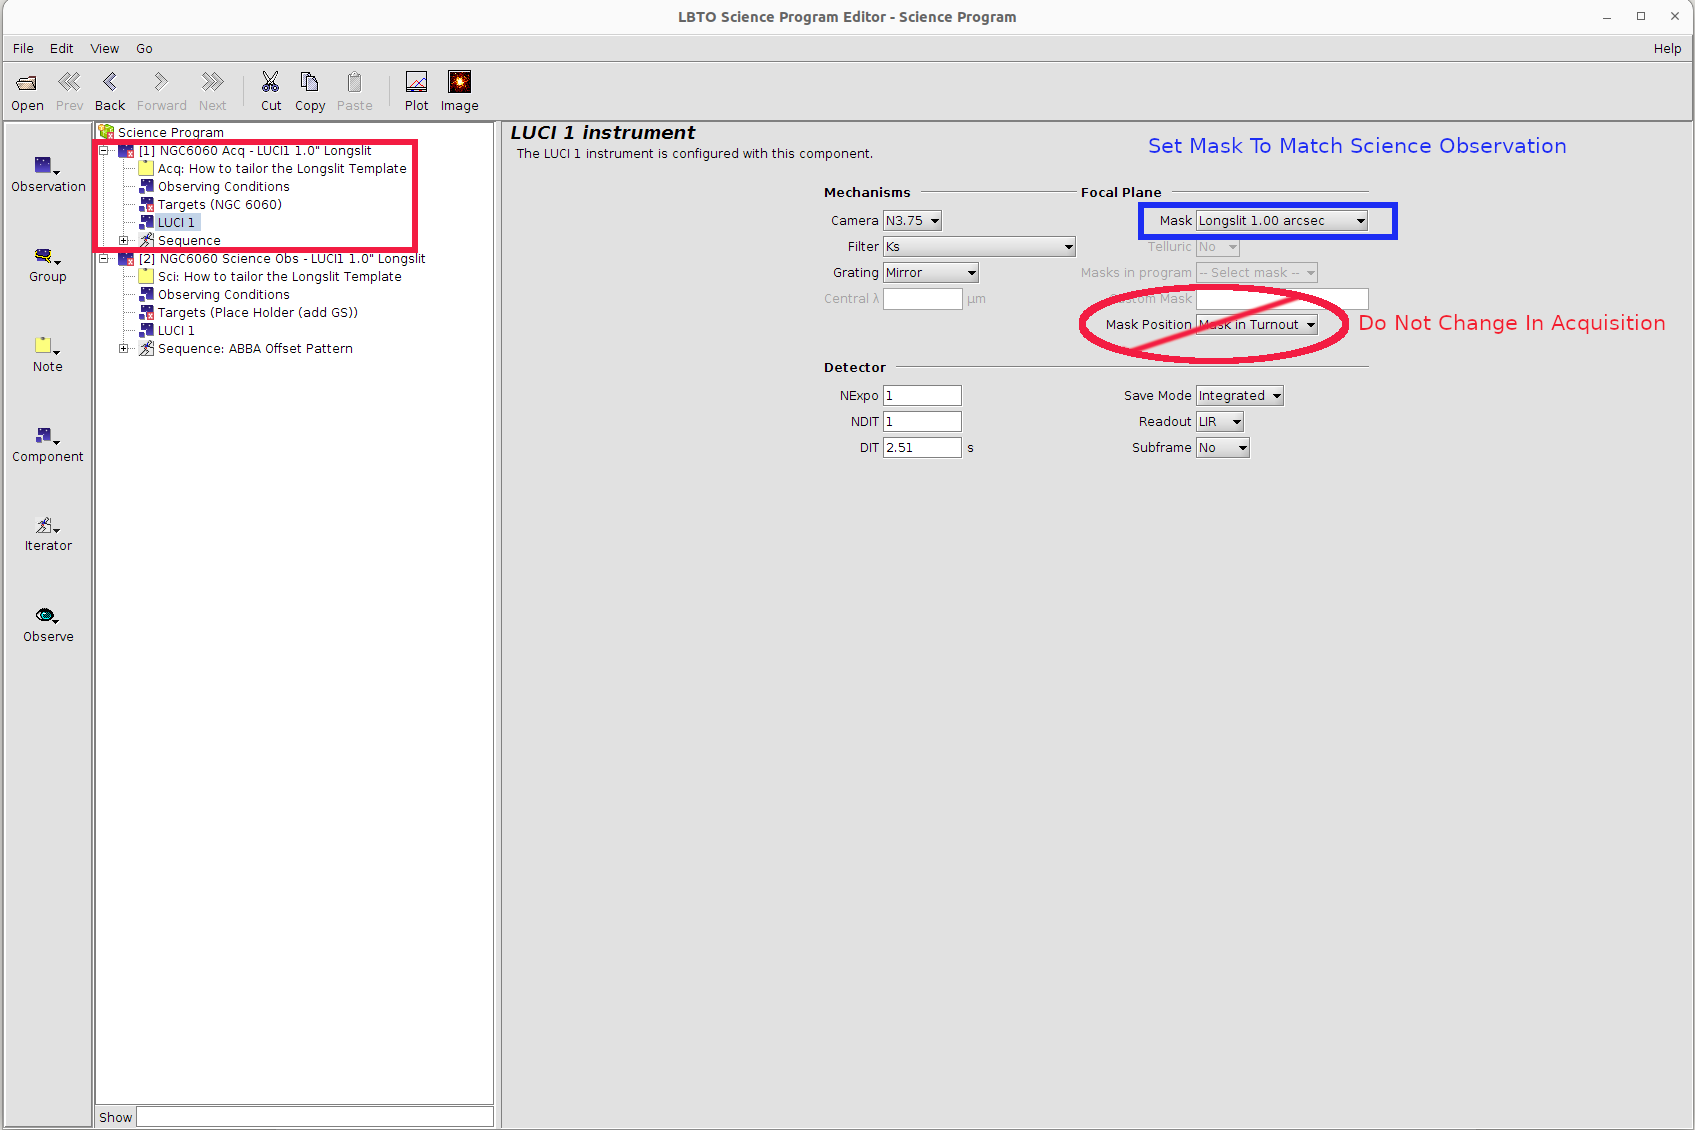
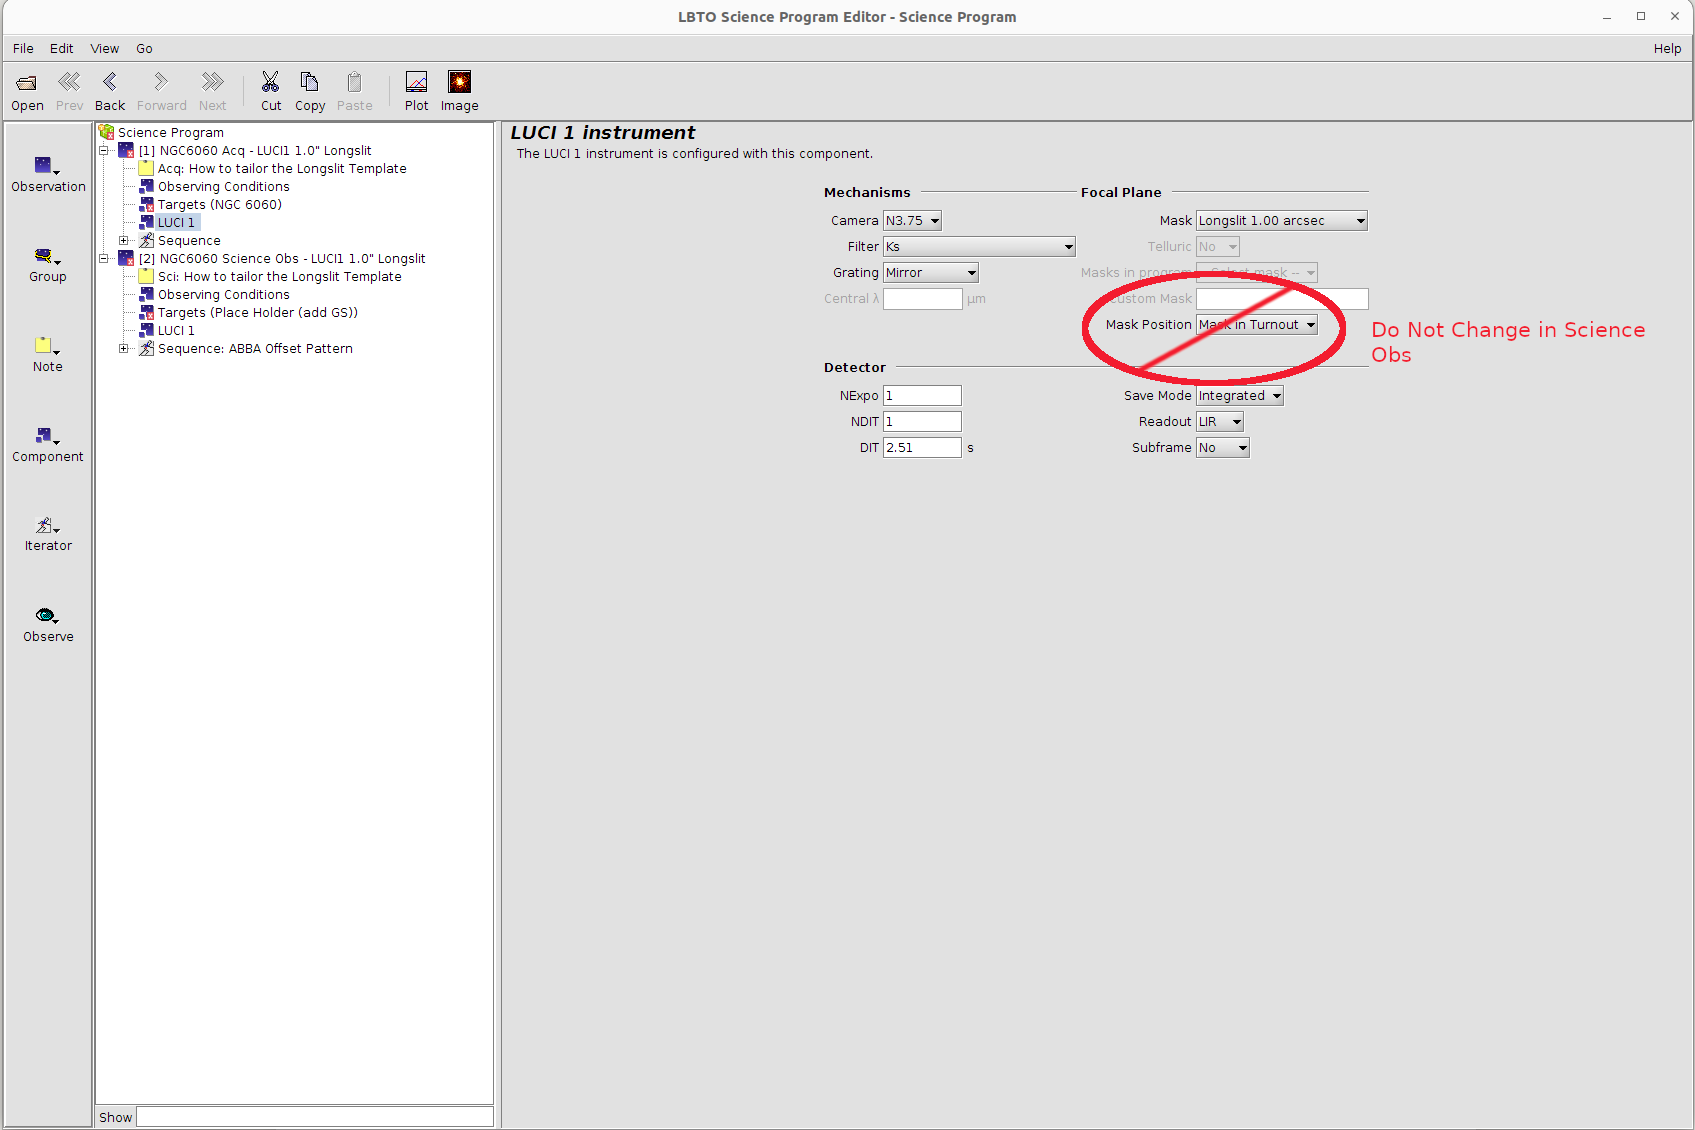
Adjust the filter, mask, (possibly the camera and grating if defaults are not desired), DIT, NDIT, Nexp, save mode, read mode to desired values of the initial observation (note that for AO observations, the N30 camera is used). Particular disperser settings will have standard default camera settings associated with them. For example, when the G200 is in place the camera will default to the N1.8. Adjust only if science goals require. Set the mask in acquisition to match that in science observation. Note that for acquisitions, the mask position will always start as “Mask in Turnout” so that the Sky and Source Images can be taken first, and for Science the mask is set to “Mask to FPU”. DO NOT CHANGE THE MASK POSITIONS.
- With Target Element: Select New in the Target Element. In the drop down menu, select LUCIGS (LUCI AO for an ESM/AO ref star) to create a new guide star element in the Target Environment. You will need to manually enter a valid SIMBAD designation or the RA DEC for the Guide star. This is a useful option if the guide star is previously known.

- Sequence Element:
- Acquisition Sequence:

NOTHING SHOULD NEED TO BE CHANGED IN THE LUCI SEQUENCE ITERATORS (EXCEPTION is the LS_2.0_1.5arcsec slit, then see notes in purple below). This sequence can be broken in to two iterator groups:
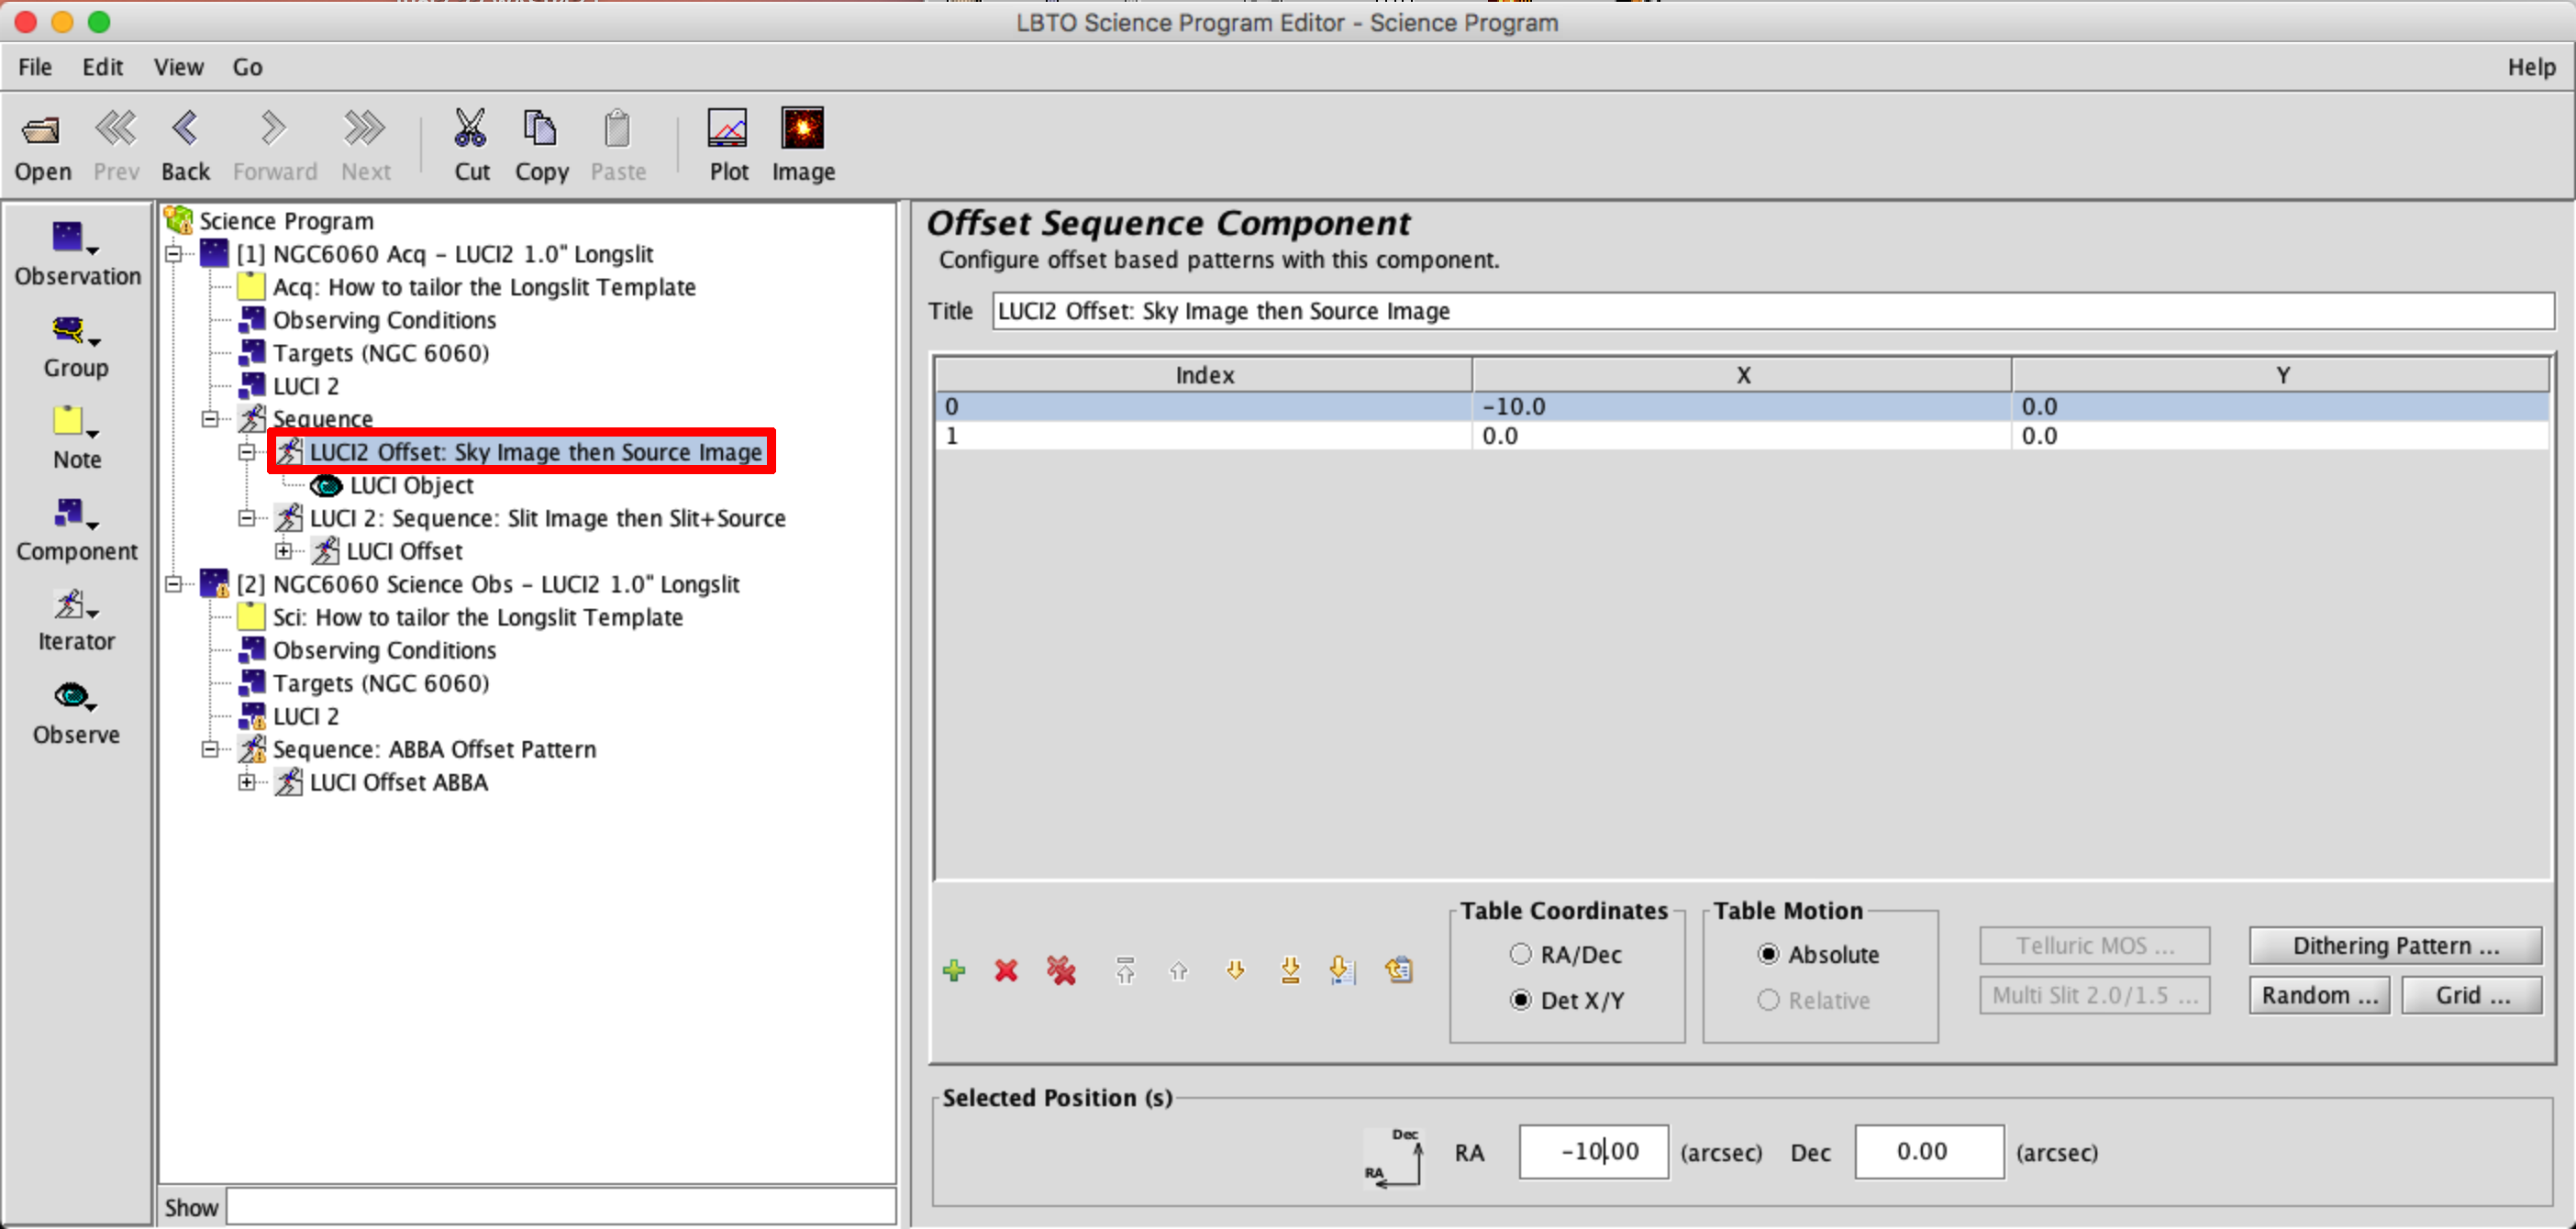
- The sky and source images (Mask in Turnout). The filter, DIT, NDIT, etc, were all defined in the LUCI Instrument Element. You can alter the Sky offset, which is defaulted to (-10,0) in det XY if you suspect it will land on a nearby bright source.

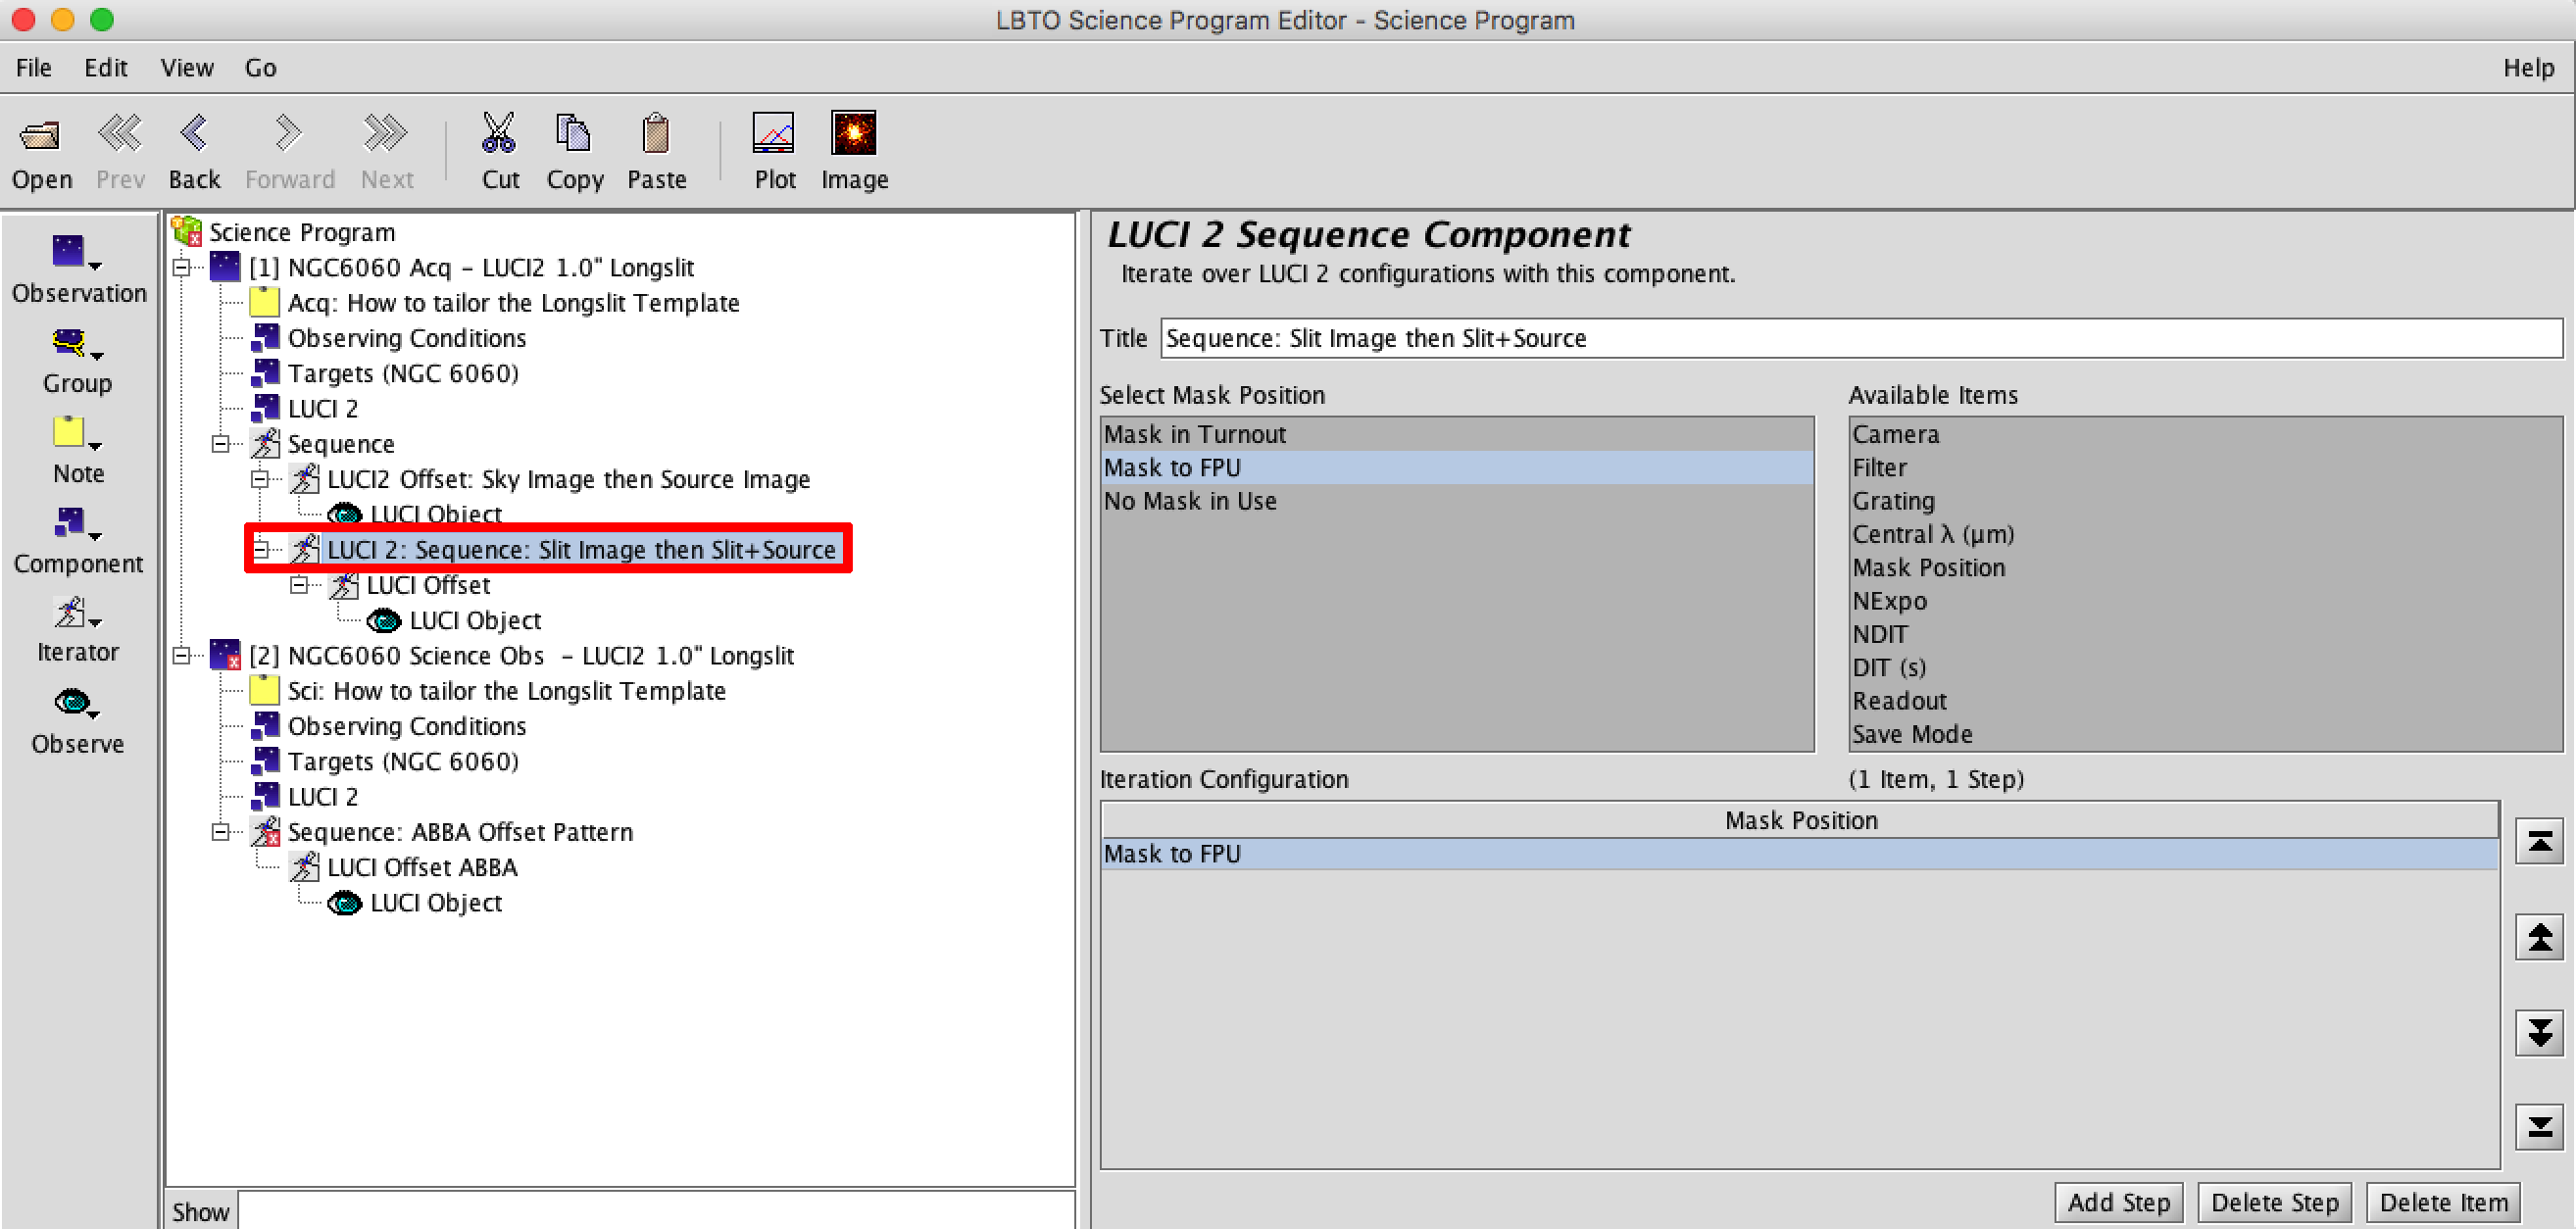
- Yhe slit and slit+source confirmation image (Mask to FPU). The filter, DIT, NDIT, etc, were all defined in the LUCI Instrument Element. NOTHING SHOULD BE CHANGED IN THIS LUCI SEQUENCE ITERATOR.

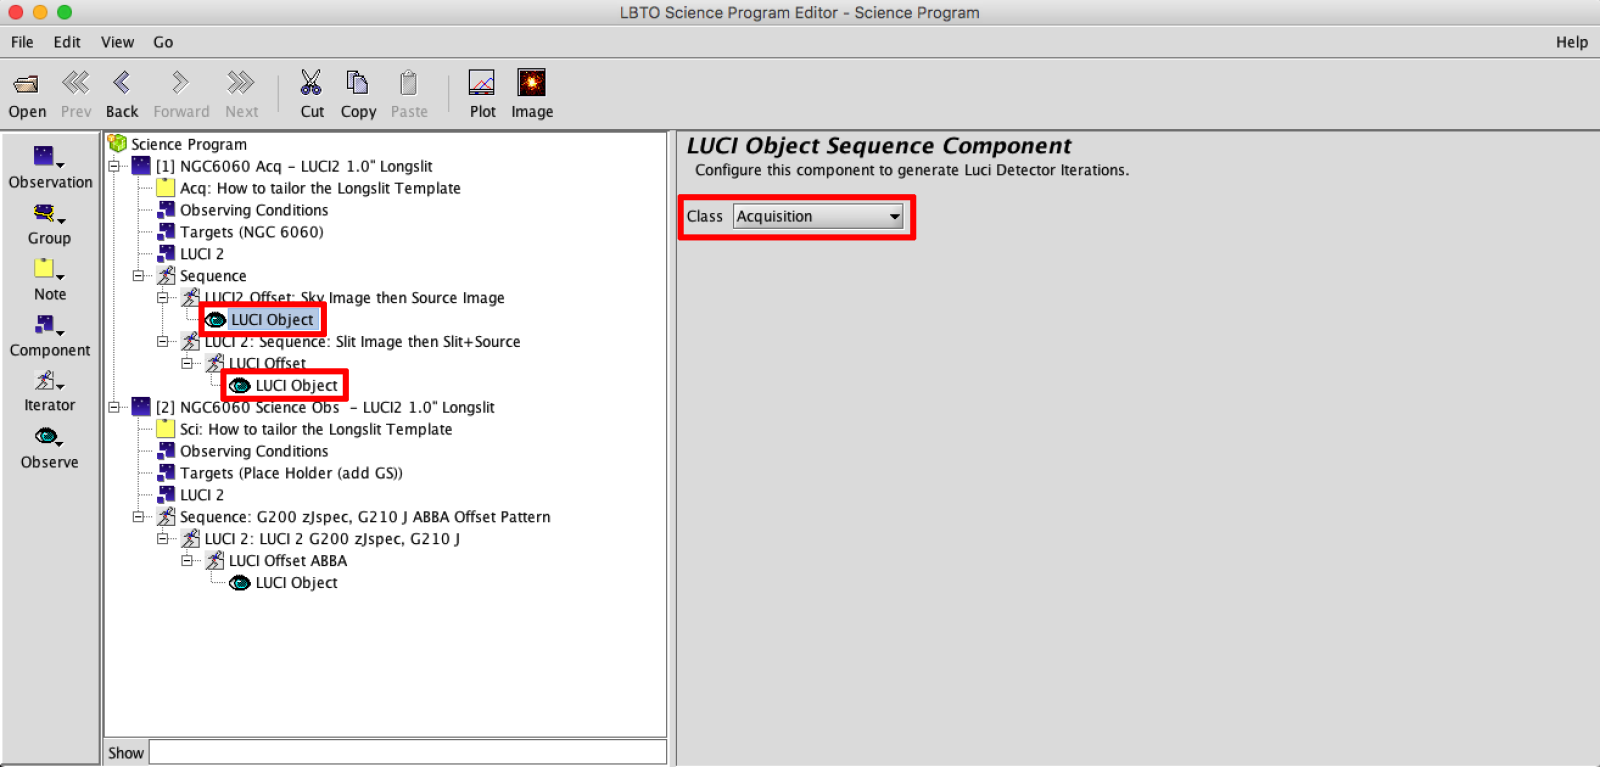
- For Acquisition Observations the Observe Type will always be set to LUCI Object, Class Acquisition.
- The sky and source images (Mask in Turnout). The filter, DIT, NDIT, etc, were all defined in the LUCI Instrument Element. You can alter the Sky offset, which is defaulted to (-10,0) in det XY if you suspect it will land on a nearby bright source.
NOTE: If observing with the LS_2.0_1.5arcsec longslit it will be necessary to apply an offset to the desired slit in the mask. For the LS_2.0_1.5arcsec make sure the mask is selected in the Target Element. Go to the first Offset Iterator in the Acquisition Sequence.

Select the “Multi Slit 2.0/1.5″ button. This will bring up a Pattern Offset popup. Make sure the Acquisition Radio button is selected. Select your slit, and select your sky offset. The default of 10” in detXY is suitable for most cases.
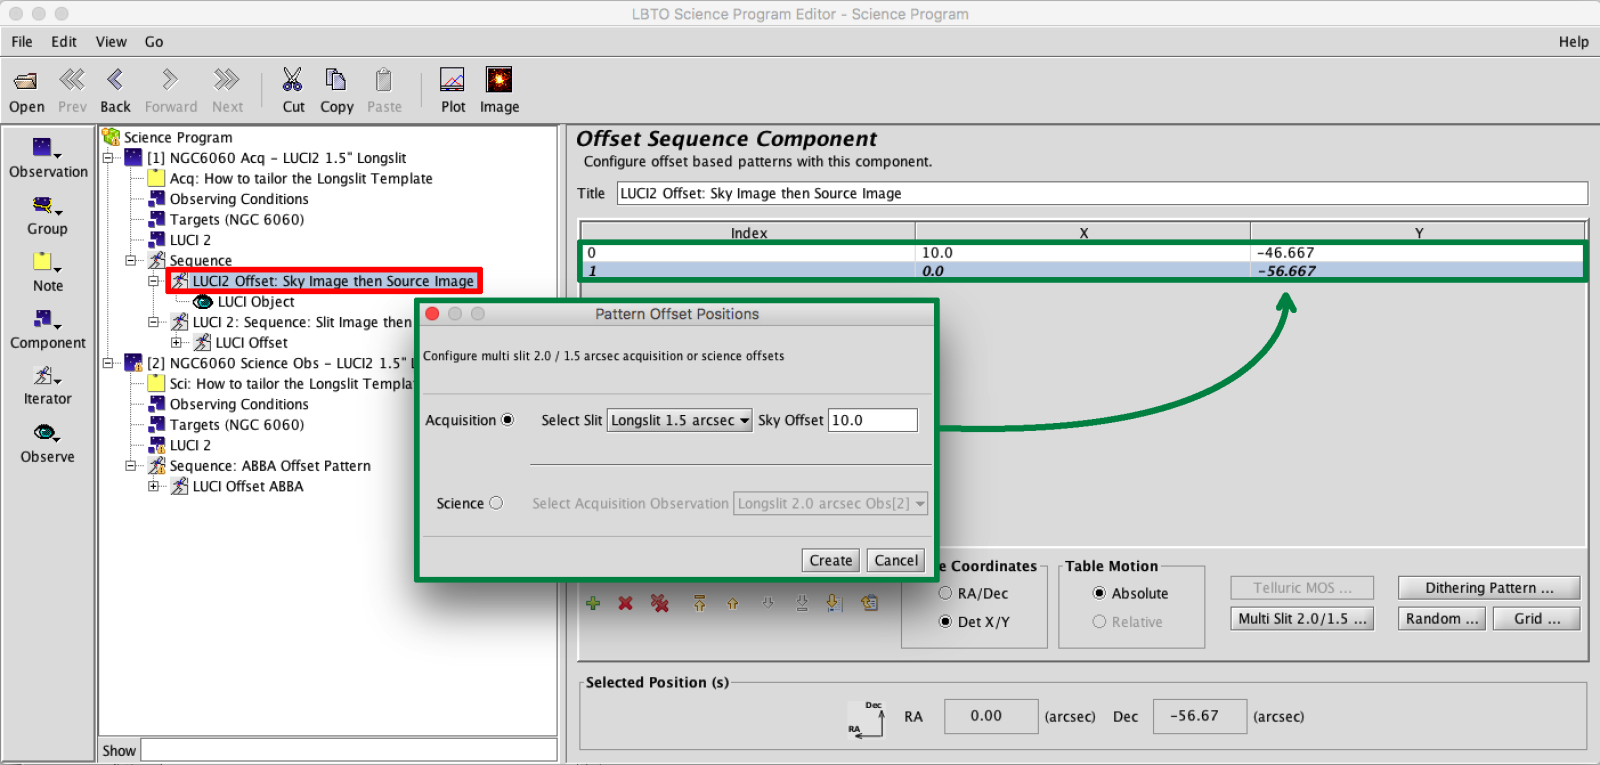
Once selected, the Y offsets will be applied, along with the necessary absorb. The offset that appears in the sequence in bold and italicized will be absorbed by the telescope. All future absolute offsets will be relative to that point. The acquisition sequence for the 1.5 arc sec slit will appear as follows:

- Acquisition Sequence:
- Science Sequence: The LUCI long-slit sequence is composed of 2 -3 iterators: possibly a LUCI Sequence Iterator, a LUCI Offset Iterator, and Observe Type. Instrument Changes are not always performed, so a sequence iterator is not always present, but a LUCI Offset Iterator and Observe Type will always be nested in the Sequence.
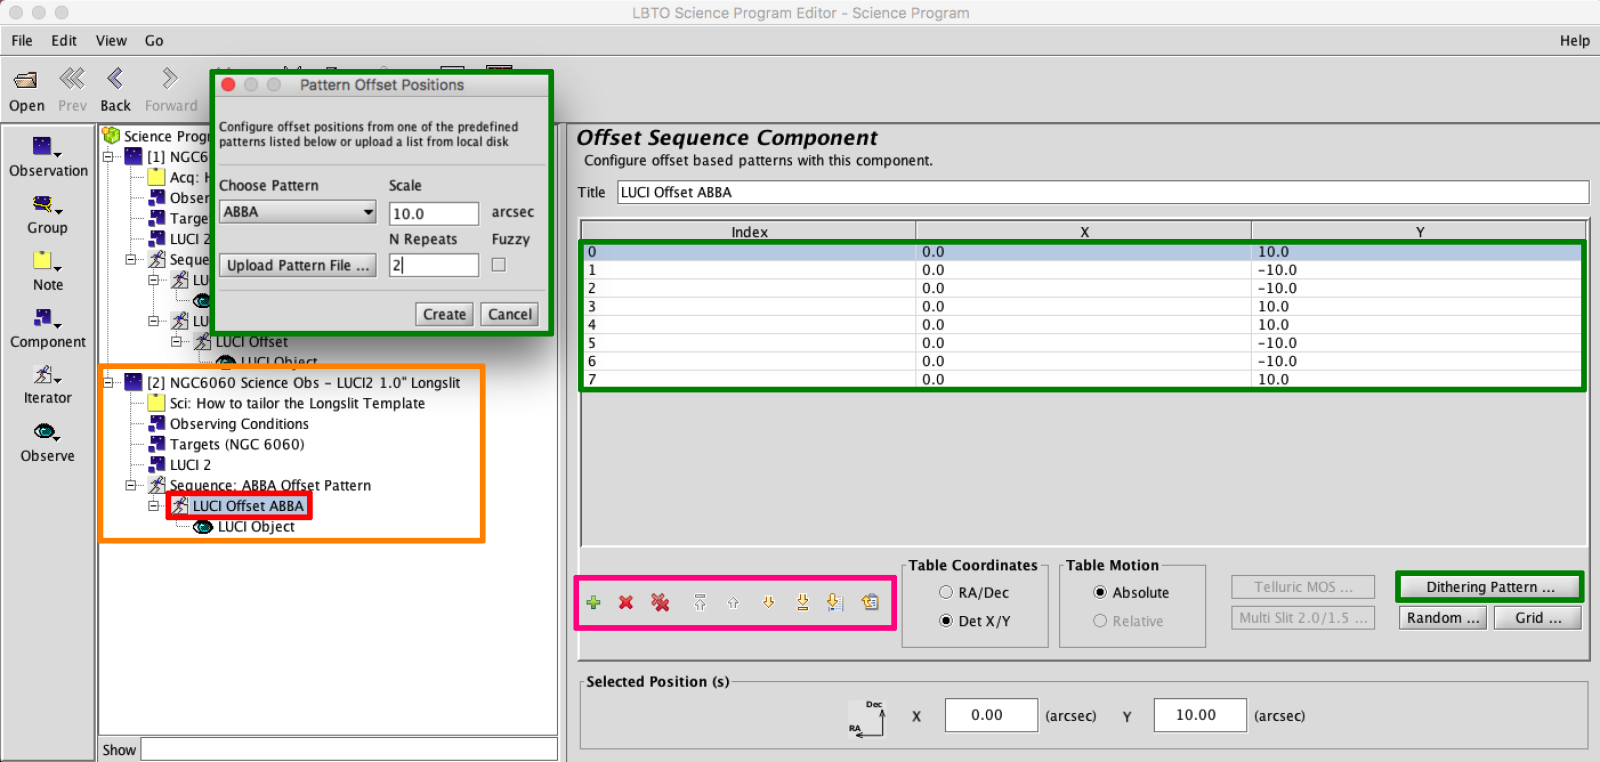
- Edit LUCI Offset Iterator: The templates come with a single ABBA offset pattern. Use the Iterator Action Items (in red box above) to add, remove, or move offset positions. Add dither patterns using the Pattern Generators, such as the ABBA shown below (green), or upload a list from a local disk. Offsets can be adjusted by selecting the desired offset in the table, then entering the new value in the Selected Position(s) field at the bottom (green).
NOTE: If using the LS_2.0_1.5arcsec longslit, it will be necessary to apply an “offset” in the Offset Iterator to make sure that the visualizations show correctly. In the offset iterator, select the “Multi Slit 2.0/1.5” button. A Pattern Offset pop up will come up.
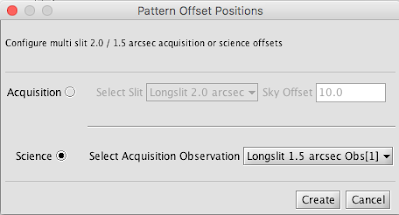
Check that the “Science” radio button is selected, then select the appropriate slit. Once satisfied, “Create”. This will generate a light grey, italicized offset in the Offset Iterator.
 This offset is physically performed in the acquisition and not the science sequence. This greyed out offset is a place holder summarizing the acquisition steps, ensuring that visualizations are accurate. It will not appear in the Final Sequence. Be aware, this offset will remove any previously generated offset patterns
After this offset has been added, add any desired offsets in the same manner as a regular Long Slit mask.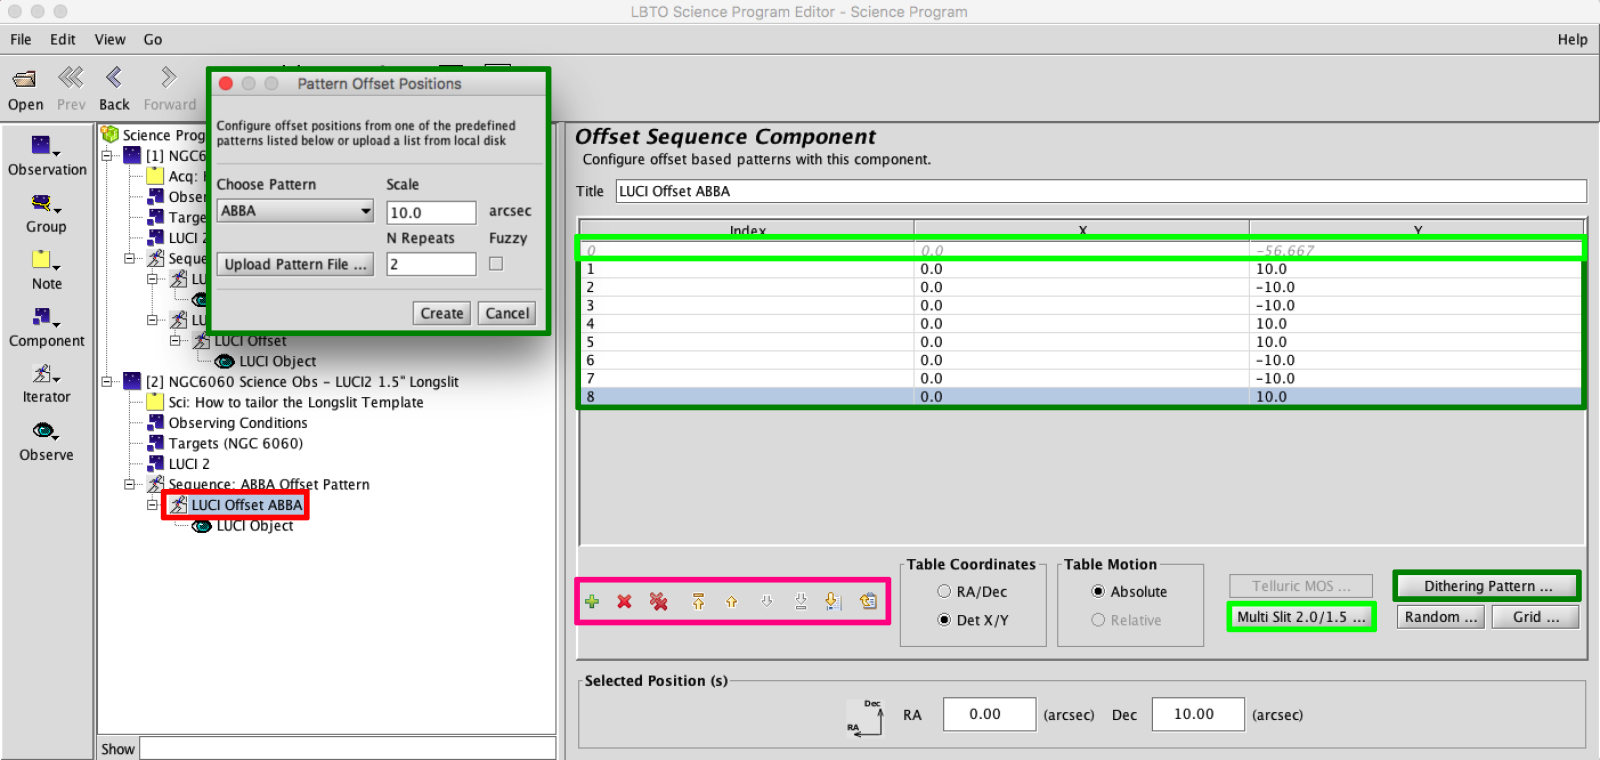
- Add/Edit LUCI Sequence Iterator: A sequence iterator is not present for all templates. To add an an instrument sequence iterator, add the LUCI Sequence to the Sequence by clicking the Iterator Button in the Left Sidebar and selecting LUCI N Sequence from the menu.
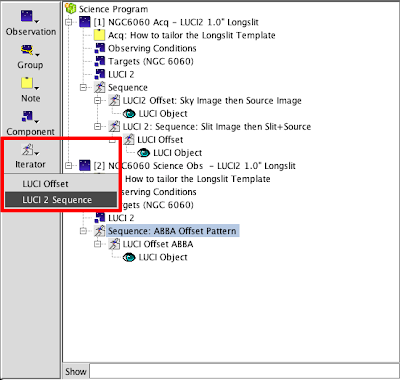
A blank LUCI Sequence Iterator will appear.

Edit the sequence of filters, DITs, NDITs, Nexp, readmodes, and savemodes in the LUCI Sequence Iterator. The item values default to those set in the LUCI Instrument Element if not changed in the Sequence Iterator. For example, if the number of exposures is set to 4 in the LUCI Instrument Element, it will be set to 4 for all filter and NDIT x DIT combinations unless explicitly changed, even if the number of exposure item is not made visible in the Instrument configuration.
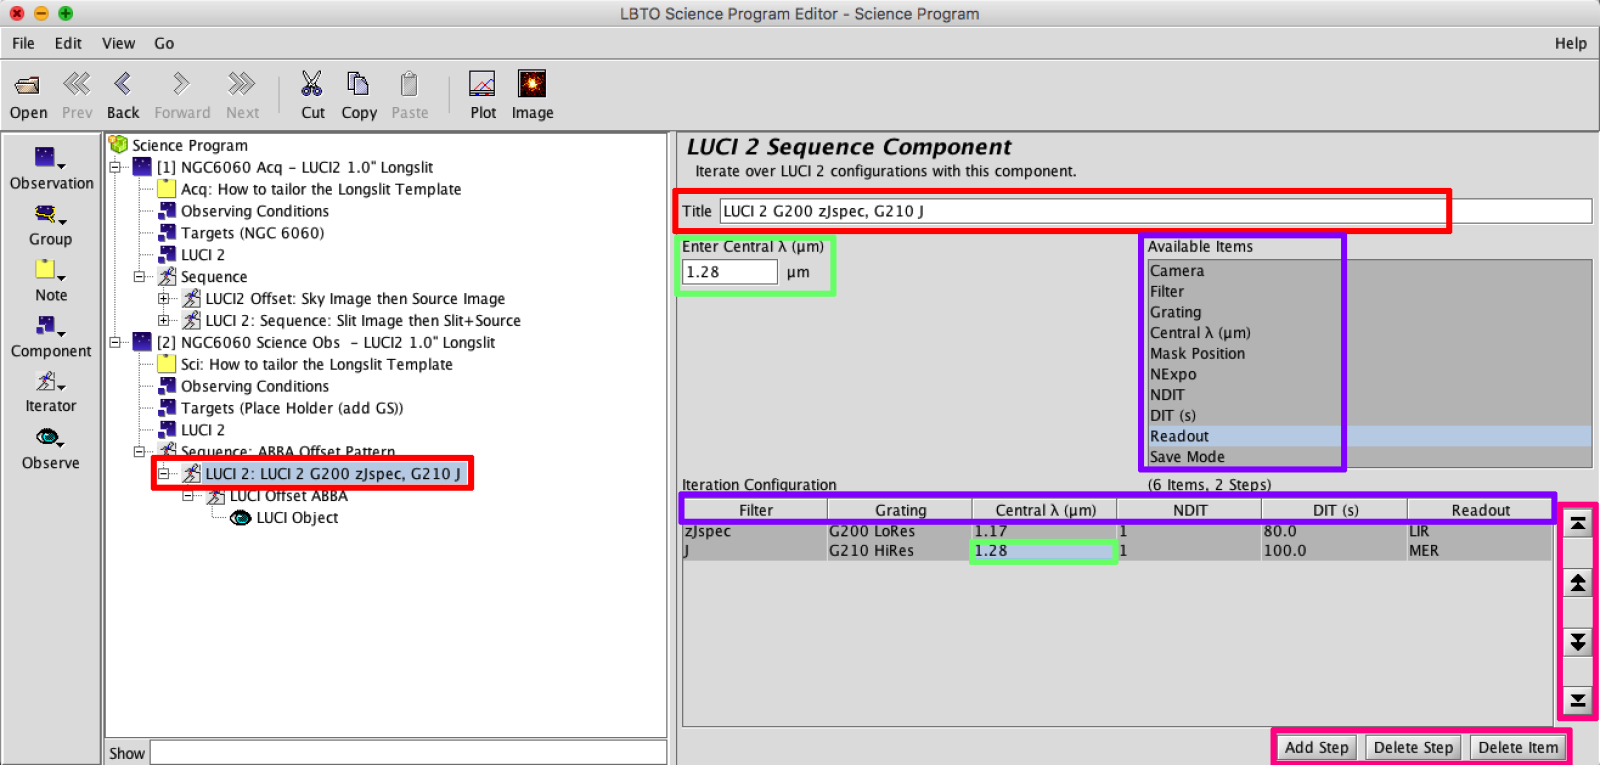


The order of the elements in the sequence can be adjusted by selecting the elements and dragging them. Rearrange the order of the Iterators in the sequence to always place the order such that the LUCI Sequence Iterator is higher in the tree than the LUCI Offset Iterator, so that a complete dither pattern is completed in each instrument configuration before changing the instrument configuration.
- Observe Type: For Science Observations this will always be set to LUCI Object, Class Science. For Standard Stars you may change the Class to Standard.

- Edit LUCI Offset Iterator: The templates come with a single ABBA offset pattern. Use the Iterator Action Items (in red box above) to add, remove, or move offset positions. Add dither patterns using the Pattern Generators, such as the ABBA shown below (green), or upload a list from a local disk. Offsets can be adjusted by selecting the desired offset in the table, then entering the new value in the Selected Position(s) field at the bottom (green).