LUCI GS and AORef Selection
Currently available modes include seeing limited imaging and spectroscopy and diffraction limited imaging. Some details about the available guiding modes and how they work are available in the LUCI Instrument Pages here. The figure below shows the AGw patrol field with respect to the LUCI Field of View.
The OT has tools, such as the Field of View overlays and Catalog Query Parameters in the Manual Guide Star Selection, that will help the user select a suitable guide star. The following will discuss how to select and verify suitable guide stars.
To start, bring up the field in the Position Editor and overlay the NOMAD, UCAC4, UCAC5,and/or Gaia Guide Star Catalogs. This can be done 2 ways:
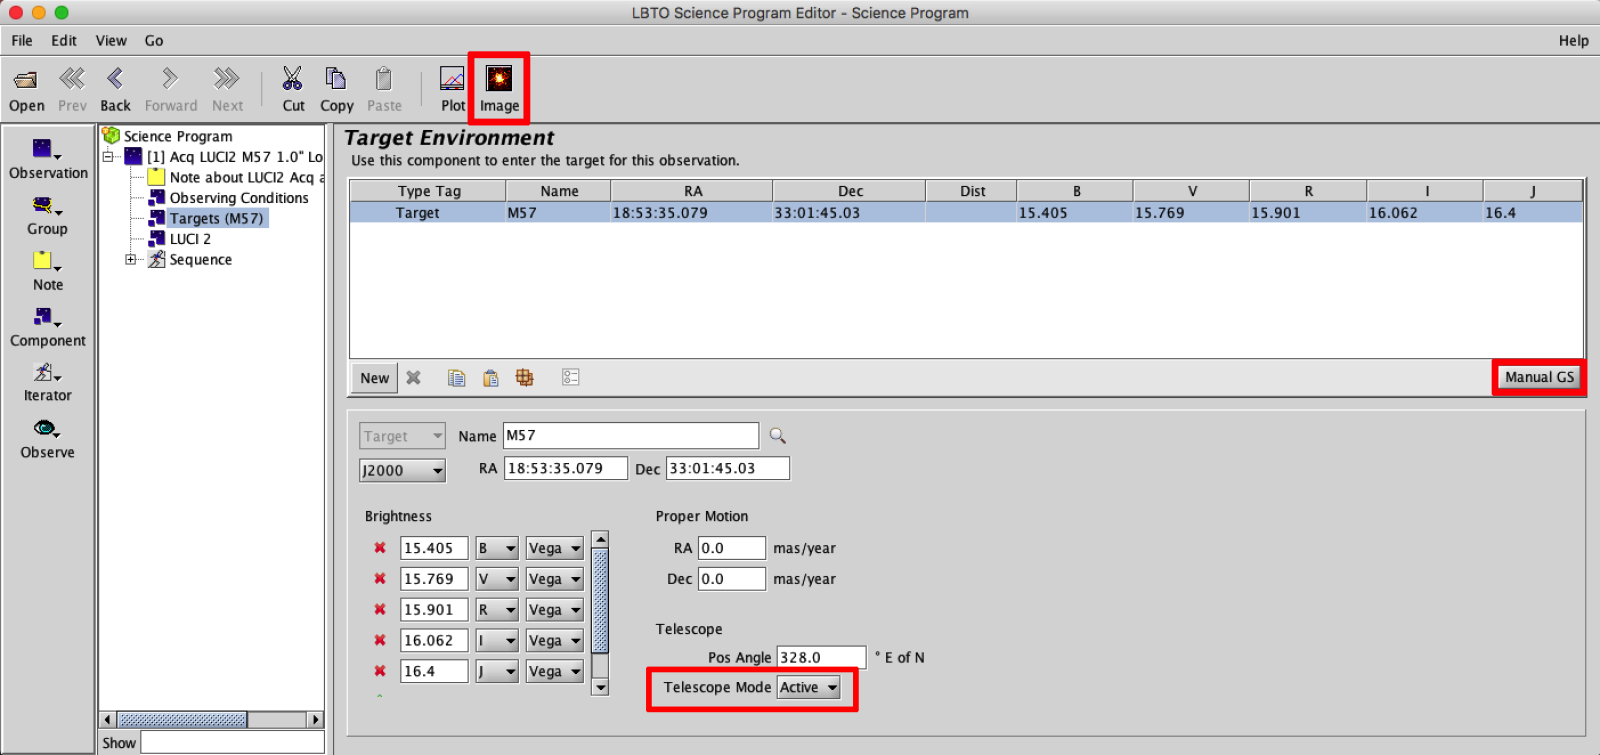
- In the Target Element, if observing in seeing limited mode select ACTIVE for the Telescope mode to send an Active preset (Guiding + WFS), or ADAPTIVE to send an AO Preset. (ACTIVE is selected by default). Select the ManualGS button from the right side.
- Open the Position Editor by clicking the Image Button in the OT Main Toolbar. In the Position Editor, select the ManualGS from the Position Editor Main Toolbar.
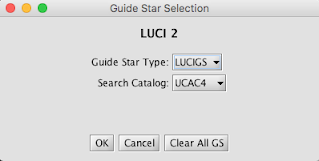
This will bring up the Position Editor, along with the Guide Star Selection pop-up.
From this pop-up the user can select which Guide Star Type, in this case LUCIGS, and the catalog they desire to query: NOMAD, UCAC4, UCAC5, or Gaia.
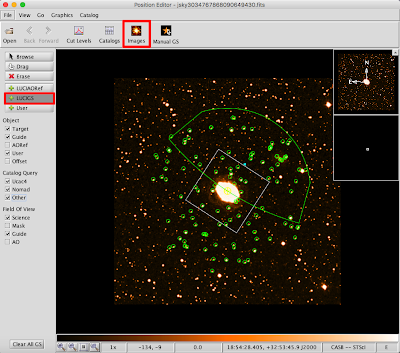
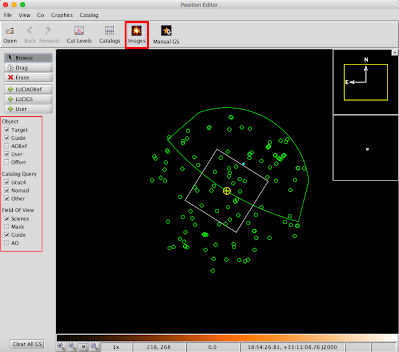
By default, if ACTIVE preset option is selected in the Target Element, all Viewing Options in the Position Editor Left Toolbar are selected except AO, AORef, mask and offsets. If ADAPTIVE telescope mode is selected in the Target Element, then the AO and AORef will also be displayed. The position editor typically will show an overlay of the science field, guide patrol field, any user added targets, etc. If these Field-of-Views are not overlaid if may be good to overlay them.
Once a catalog is selected from the Guide Star Selection pop-up, those will be overlaid with either green circles (NOMAD), turquoise squares (UCAC4), or turquoise diamonds (UCAC5/Gaia) with the magnitude limits corresponding to the type selected from the Guide Star Selection pop-up, in this case LUCIGS. Make sure that appropriate Catalog Query is selected in the Viewing Options in Position Editor Left Tool Bar or else it may not be visible.
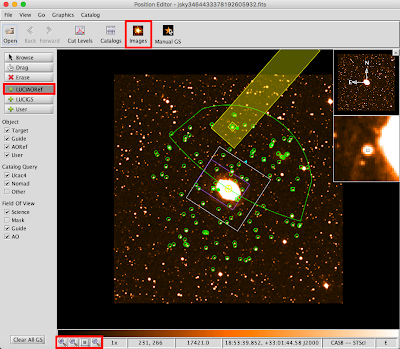
Note that an image of the field does not automatically appear. An image of the field can be downloaded from an image server one of two ways. Hit the Images button in the Position Editor Main Toolbar to query the the default image server using the base coordinates of the observation selected in the Target Element. Or one can use the Catalog button to open the Catalog Navigator. Keep in mind that the catalog overlay may not align perfectly with the image. There is some distortion in the SDSS images.
To add a Guide Star, activate the +LUCIGS button. Click within a catalog overlay box. A yellow overlay of the probe vignette area will appear over the selected Guide Star if it falls within the Patrol Field and the +LUCIGS button is activated. This probe is in the optical path and WILL vignette (shadow) the science FOV as shown, so be sure that it does not cover your imaging target, slit, or MOS reference box.
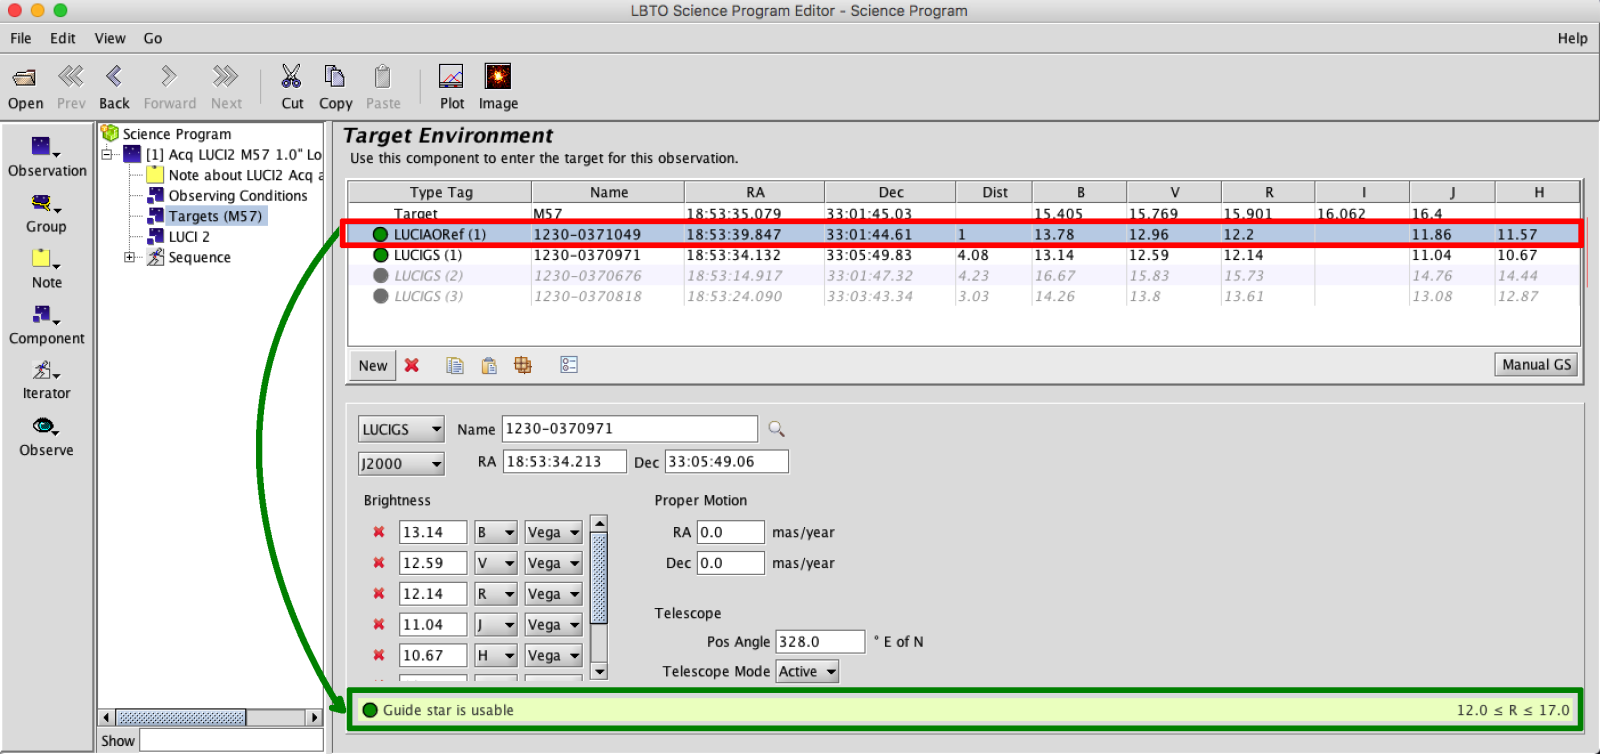
If the user clicks within the catalog overlay box, the catalog information will then be sent to the Target Element and recorded as a numbered LUCIGS element. If the user clicks outside the catalog overlay, the coordinates of the clicked point will be recorded to the Target Element as the numbered LUCIGS element.
 |
 |
It is often good (when possible) to select guide stars of varying magnitudes to accommodate varying seeing and sky conditions if the science program will allow for it. Only one guide star will be written to the script during script generation. But if these guide stars are predetermined in the OT Science Program it can make for easy adjustment should conditions require it. Details for exporting the OT are available here.
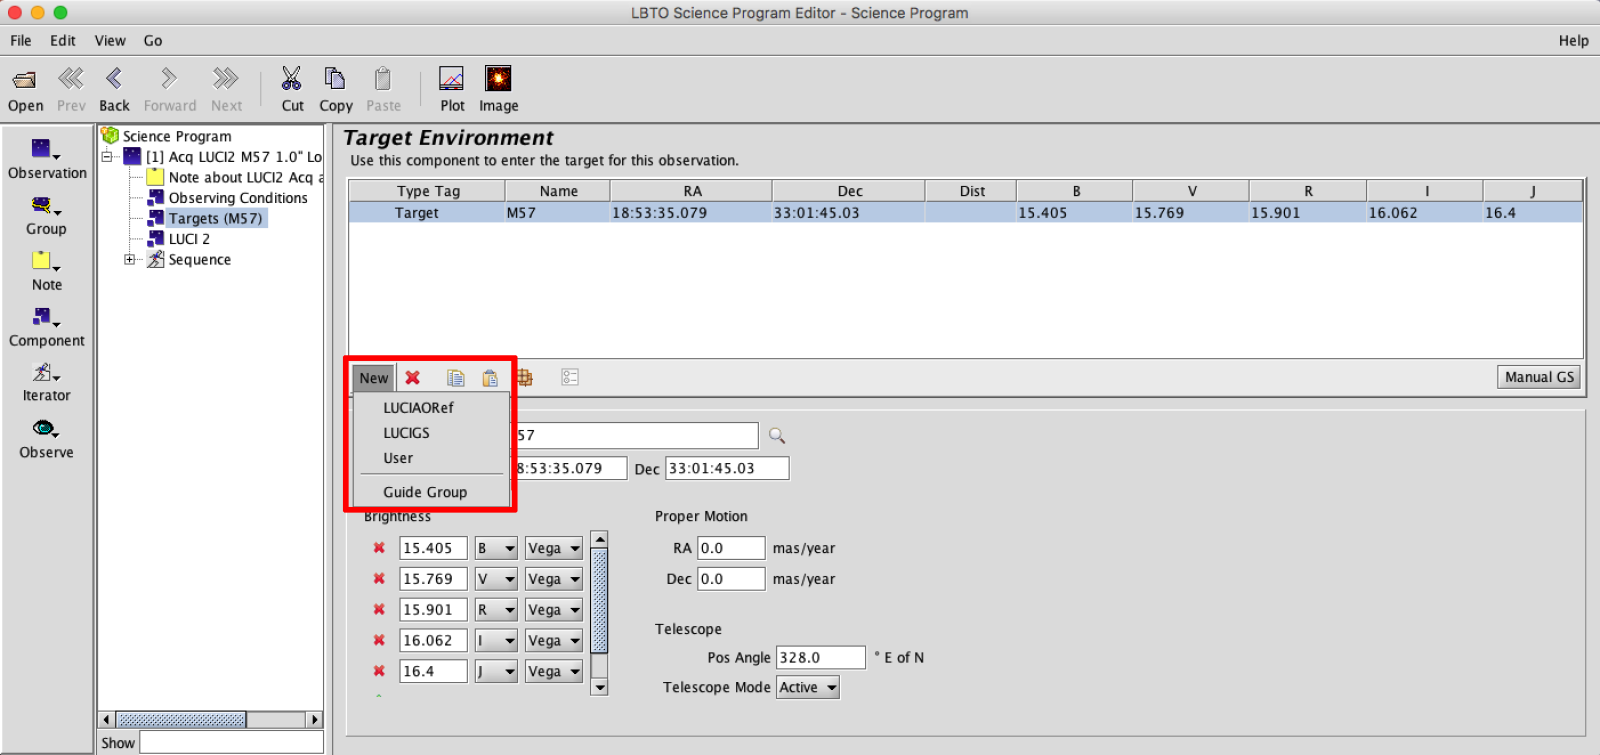
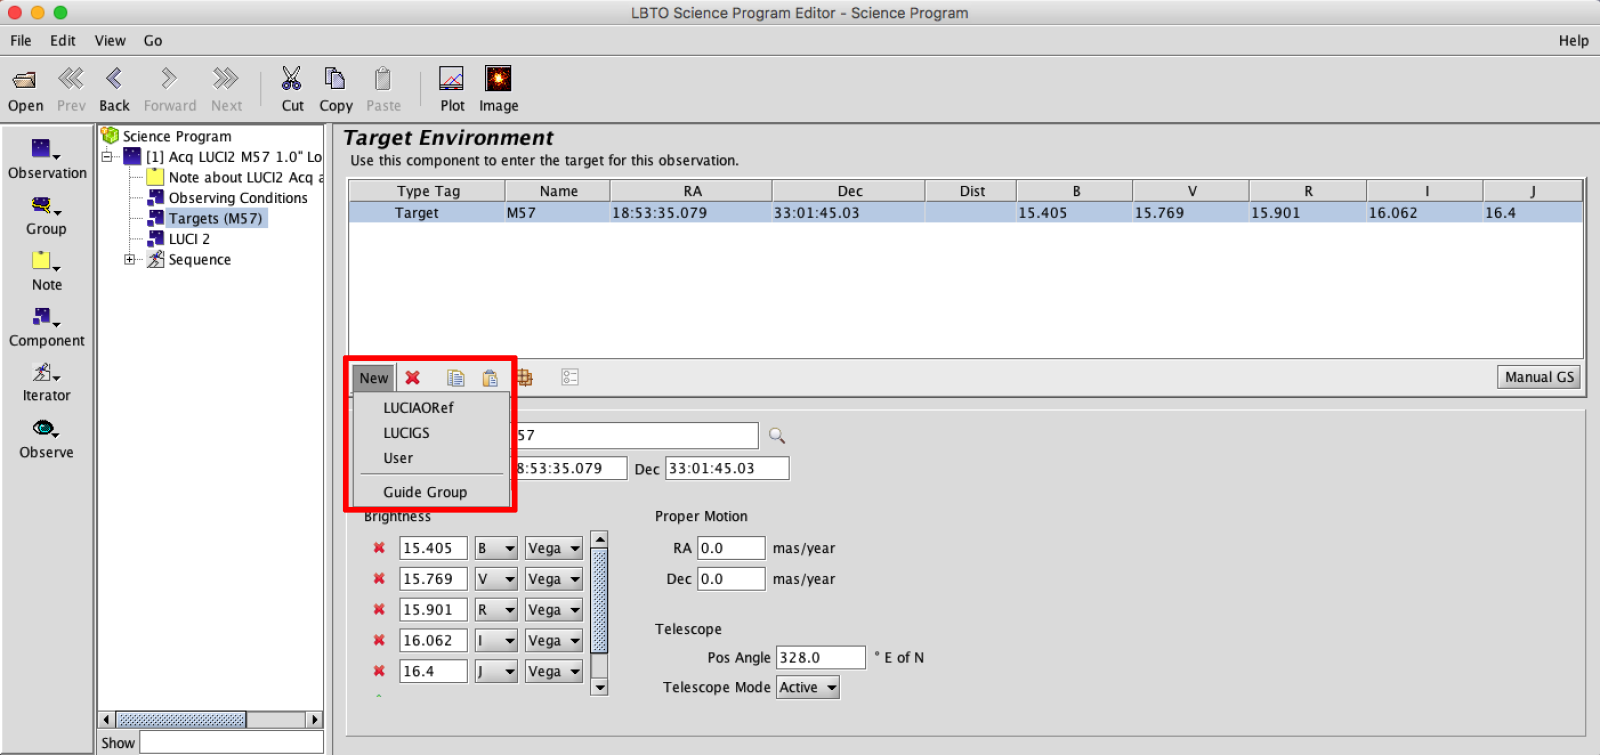
If this is a previously observed target or well known field the user may have a guide star in mind and can enter it in manually. With Target Element: Select New in the Target Element. In the drop down menu, select LUCIGS to create a new guide star element in the Target Environment. You will need to manually enter a valid SIMBAD designation or the RA DEC for the Guide star.
LUCI AO Reference Star Selection
In AO mode the on-axis high-speed wavefront sensor uses your selected AO reference star to correct atmospheric turbulence, delivering a diffraction-limited image to LUCI in a 30 arcsecond field of view. The reference star patrol field is about 2×3 arcmin in size, and is shown shaded in blue in the image above of the LUCI AGw unit Patrol Field.
Presently, the instrument is available for reference stars in the magnitude range 3.5 to 9.8 with degraded performance, and at design performance for fainter reference stars (down to ~16 mag). See the recent LUCI/AO Shared Risk Science Release for details.
One still needs to provide an off-axis guide star as well as the AO reference star for diffraction limited observations. This is because the telescope may not be collimated enough at a new position to directly close the loops, so the off-axis star is used to collimate the telescope first. Also, if the active loop fails, it will “fail back” to active guiding. Follow the procedure above for finding an off-axis guide star.
The procedure for selecting an AO Reference Star in the OT is similar to that of selecting and off-axis guide star. To start, bring up the field in the Position Editor and overlay the NOMAD, UCAC4, UCAC5 and/or Gaia Catalogs. This can be done 2 ways:
- In the Target Element, select the Telescope mode as Adaptive to send an AO preset (the default is to set up for an Active preset for seeing limited obs). Select the ManualGS button from the right side.
- Open the Position Editor by clicking the Image Button in the OT Main Toolbar. In the Position Editor, select the ManualGS from the Position Editor Main Toolbar.
This will bring up the Position Editor, along with the Guide Star Selection pop-up.
From this pop-up the user can select the Guide Star Type, in this case LUCIAORef, and which catalog they desire to query.
By default, if ACTIVE telescope mode is selected all Viewing Options in the Position Editor Left Toolbar are selected except mask and offsets. The position editor typically will show an overlay of the science field, guide patrol field, any user added targets, etc. The AO Field of View should be selected and outlined in purple. If these Field of Views are not overlaid if may be good to overlay them.
Once a catalog is selected from the Guide Star Selection pop-up, those will be overlaid with either green circles (NOMAD), turquoise squares (UCAC4), or turquoise diamonds (UCAC5/Gaia) with the magnitude limits corresponding to the type selected from the Guide Star Selection pop-up, in this case LUCIAORef. Make sure that appropriate Catalog Query is selected in the Viewing Options in Position Editor Left Tool Bar or else it may not be visible.
Note that an image of the field does not automatically appear. An image of the field can be downloaded from an image server one of two ways. Hit the Images button in the Position Editor Main Toolbar to query the the default image server using the base coordinates of the observation selected in the Target Element. Or one can use the Catalog button to open the Catalog Navigator. Keep in mind that the catalog overlay may not align perfectly with the image. There is some distortion in the SDSS images.
To add a an AO Reference Star, activate the +LUCIAORef button. Click within a catalog overlay box. The buttons in the lower left can be used change the magnification.
If the user clicks within the catalog overlay box, the catalog information will then be sent to the Target Element and recorded as a numbered LUCIAORef element. If the user clicks outside the catalog overlay, the coordinates of the clicked point will be recorded to the Target Element as the numbered LUCIAORef element.
 |
 |
The user may have an AO reference star in mind for the field and can enter it in manually. With Target Element: Select New in the Target Element. In the drop down menu, select LUCIAORef to create a new AO Reference Star element in the Target Environment. You will need to manually enter a valid SIMBAD designation or the RA DEC for the AO Reference Star.


