Getting Started
1. What is the easiest way to “Get Started” with the PIT?
Many feel that the easiest way to get started in the PIT is to use the checklist that appears in the Problems Section of the PIT as a guideline:
This section lists outstanding items the PI must enter (abstract, observation, etc.) before submitting. For instance, the above image shows a newly created proposal with many outstanding items. As the PI fills in each item in the indicated Section, it will disappear from the list until the problem panel is clear.
Double clicking on an entry will take you to the relevant section.
Below is a close-up of the Problem Node, which lists a description of the Problem and the Section in which it appears. As you fill in the title, abstract, contact information, etc. these items will disappear, not unlike a PIT “to do” checklist.
A proposal with outstanding items cannot be submitted; a message will appear in the Submit Tab indicating that the PI must fill in the item requested and the submit button will remain greyed out.
2. What is the easiest method for adding observations nodes in the observation panel?
It is often easiest to start by filling in the Target Tab as described here. Once your targets are entered, switch back to the Observation Tab and use the Lookup Text Box to enter the names of the targets you have already filled into the Target Tab.
This will create an observation node for each target where you can define the Resources (instrument), Conditions, and Observing Time as described here.
You can add multiple targets this way.
If you find that you are observing many targets with the same Resource and in the same Conditions, it may make sense to reorder the “group by” option on the top of the Observation Tab to “Resources : Conditions : Target”. This changes the hierarchy of each observation, grouping by the first node, then the second, then the third.
At this point, you would only have to enter the Instrument Configuration and Conditions once and it would apply to all targets in your proposal.
3. How does this work for Binocular Observations (General PIT)?
IMPORTANT NOTE: The INAF PIT is, by design, solely monocular and INAF PIs can safely disregard this section. Further The INAF PIT has a space for “Run Name” in the Observation Time Node; PIs should use this to specify priority.
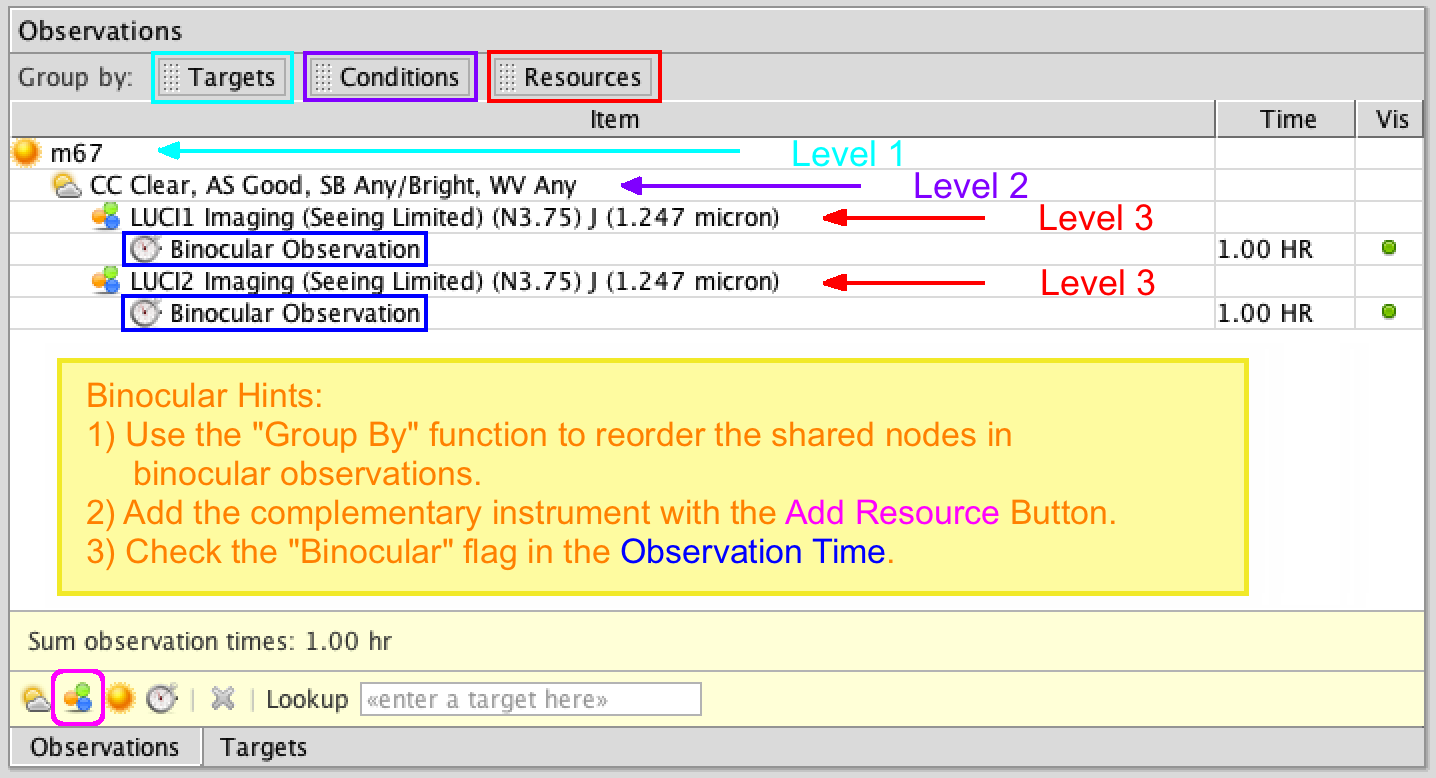
This philosophy makes sense when setting up binocular observations as well. The available observing modes are described for LBTO partnership here. Binocular Observations share common target information conditions. It may make sense to reorder the “group by” option on the top of the Observation Tab to “Target : Conditions : Resources”. This changes the hierarchy of each observation, grouping by the first node, then the second, then the third.
Binocular observations require the user to set up the instrument configuration for both sides separately. As well, the user will need to select the Binocular Flag in the Observation Time node.
4. I see warnings, errors, or list items in the Problems Section of the OT. What do they mean?
Users should pay attention to warnings and messages appearing in the Problems Section of the PIT. These can be a useful guide indicating missing nodes, or indicating telescope/instrument configurations that may not be available or are only available in a shared risk manner. For example, if the user fails generate an equivalent observation for both sides, the following messages will indicate that the binocular observation is incomplete:
Any messages in the problems section marked with a “X” are severe enough that they will prevent submission.


